|
TAG GIRL DRAGON
 ENGLISH VERSION ENGLISH VERSION

Here you find the original of this tutorial:

This tutorial was translated with PSPX7 but it can also be made using other versions of PSP.
Since version PSP X4, Image>Mirror was replaced with Image>Flip Horizontal,
and Image>Flip with Image>Flip Vertical, there are some variables.
In versions X5 and X6, the functions have been improved by making available the Objects menu.
In the latest version X7 command Image>Mirror and Image>Flip returned, but with new differences.
See my schedule here
French translation here
your versions ici
For this tutorial, you will need:
Material here
Tube libellulegraphisme_Stieg_Larssons_The_Girl_With_the_Dragon_Tattoo
Tube 6_homme_animabelle
Mist-DBK URBAN-COLLECTION12
Imagen rr_oct18_rest_pat 16
mzimm_travelroundtheworld2_ lantern_light_s
Grisi_Humo
Adorno_marco-cadenas-nines
(you find here the links to the material authors' sites)
Plugins
consult, if necessary, my filter section here
DC Special - Book here
Tramages - Pool Shadow here
Filters Unlimited 2.0 here
Filters DC Special and Tramages can be used alone or imported into Filters Unlimited.
(How do, you see here)
If a plugin supplied appears with this icon  it must necessarily be imported into Unlimited it must necessarily be imported into Unlimited

You can change Blend Modes according to your colors.
In the newest versions of PSP, you don't find the foreground/background gradient (Corel_06_029).
You can use the gradients of the older versions.
The Gradient of CorelX here
1. Open a new transparent image 900 x 700 pixels.
2. Set your foreground color to #0c1f25,
and your background color to #4c6470.

Set your foreground color to a Foreground/Background gradient, style Radial.
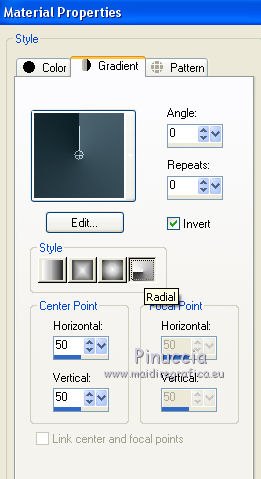
Flood Fill  the transparent image with your Gradient. the transparent image with your Gradient.
3. Effects>Plugins>DC Special - Book

4. Open the tube libellulegraphisme_Stieg_Larssons_The_Girl_With_the_Dragon_Tattoo.
Edit>Copy.
Go back to your work and go to Edit>Paste as new layer.
Image>Resize, 2 times to 80% and 1 time to 95%, resize all layers not checked.
Erase the watermark.
5. Image>Mirror.
Move  the tube to the left side. the tube to the left side.
6. Open the tube Grisi_Humo and go to Edit>Copy.
Go back to your work and go to Edit>Paste as new layer.
Place  the tube on the cigarette's point. the tube on the cigarette's point.

7. Selection Tool 
(no matter the type of selection, because with the custom selection your always get a rectangle)
clic on the Custom Selection 
and set the following settings.
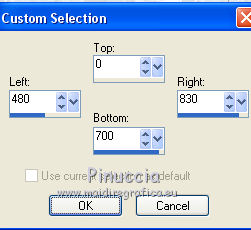
8. Layers>New Raster Layer.
Open the tube DBK URBAN-COLLECTION12 and go to Edit>Copy.
Go back to your work and go to Edit>Paste into selection.
Selections>Select None.
Change the Blend Mode of this layer to Luminance (legacy).
9. Open the tube 6_homme_animabelle and go to Edit>Copy.
Go back to your work and go to Edit>Paste as new layer.
Image>Resize, to 50%, resize all layer not checked.
Erase the watermark.
Change the Blend Mode of this layer to Luminance (legacy).
Move  the tube to the right side the tube to the right side

10. Layers>New Raster Layer.
Set your foreground color to Color.
Flood Fill  with your foreground color #0c1f25. with your foreground color #0c1f25.
11. Selections>Select All.
Selections>Modify>Contract - 5 pixels.
Press CANC on the keyboard 
Selections>Select None.
12. Layers>Merge>Merge visible.
13. Image>Resize, to 90%, resize all layer not checked.
14. Activate the Magic Wand Tool 
and click on the transparent zone to select it.
Flood Fill  the selection with your dark foreground color. the selection with your dark foreground color.
15. Layers>New Raster Layer.
Open "rr_oct18_rest_pat 16" and go to Edit>Copy.
Go back to your work and go to Edit>Paste into Selection.
Change the Blend Mode of this layer to Luminance (legacy).
16. Adjust>Blur>Radial Blur.
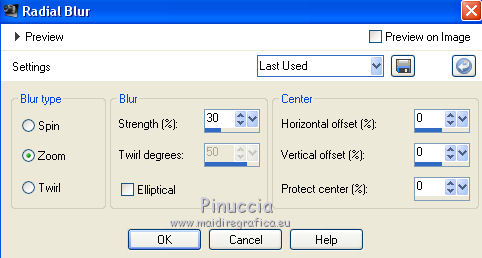
Effects>Edge Effects>Enhance More.
Selections>Select None.
17. Layers>Merge>Merge All.
18. Image>Add borders, 2 pixels, symmetric, color #0c1f25.
Layers>Promote Background Layer.
19. Image>Canvas Size - 950 x 750 pixels.
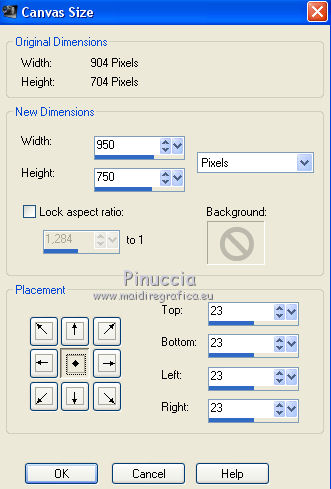
20. Select the transparent zone with your Magic Wand Tool 
Set again your foreground color to Gradient.
Flood Fill  the selection with your Gradient. the selection with your Gradient.
21. Effects>Plugins>Tramages - Pool Shadow, par défaut.

Selections>Select None.
22. Open the tube mzimm_travelroundtheworld2_lantern_light_s and go to Edit>Copy.
Go back to your work and go to Edit>Paste as new layer.
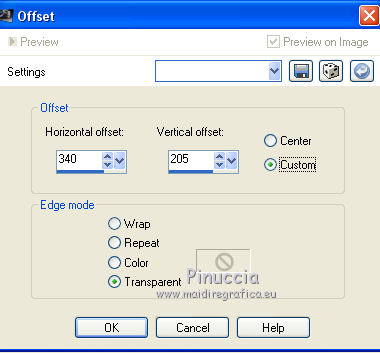
23. Effects>Image Effects>Offset.
24. Open Adorno_marco-cadenas-nines and go to Edit>Copy.
Go back to your work and go to Edit>Paste as new layer.
25. Layers>Merge>Merge All.
Image>Add borders, 2 pixels, symmetric, foreground color #0c1f25.
26. Sign your work and save as jpg.
Your versions here

If you have problems or doubts, or you find a not worked link, or only for tell me that you enjoyed this tutorial, write to me.
16 November 2018
|
 ENGLISH VERSION
