This tutorial was translated with PSPX3 but it can also be made using other versions of PSP.
Since version PSP X4, Image>Mirror was replaced with Image>Flip Horizontal,
and Image>Flip with Image>Flip Vertical, there are some variables.
In versions X5 and X6, the functions have been improved by making available the Objects menu.
In the latest version X7 command Image>Mirror and Image>Flip returned, but with new differences.
See my schedule here
French translation here
Your versions here
For this tutorial, you will need:
A landscape
The rest of the material here
Tube Mina.best.friends2014.
Tube luna_nines.
L'image du paysage trouvé sur le net.
Plugins
consult, if necessary, my filter section here
Alien Skin Xenofex 2 - Lightning here

You can change Blend Modes according to your colors.
In the newest versions of PSP, you don't find the foreground/background gradient (Corel_06_029).
You can use the gradients of the older versions.
The Gradient of CorelX here
1. Open a new transparent image 900 x 650 pixels.
2. Set your foreground color to #767779
and your foreground color to #4c3818.
Set your foreground color to a Foreground/Background Gradient, style Linear.

Flood Fill  the trasparent image with your gradient.
3. Open the tube by Luna - Edit>Copy.
Go back to your work and go to Edit>Paste as new layer.
Move  the tube to the top.
4. Layers>New Raster Layer.
Set your background color to white #ffffff.

5. Effects>Plugins>Alien Skin Xenofex 2 - Lightning
Inner color your background color #ffffff - Outer color your foreground color #767779

6. Image>Resize, to 50%, resize all layers not checked.
Move  the image at the upper left.

7. Layers>Duplicate.
Image>Mirror.
8. Open your landscape - Edit>Copy.
Go back to your work and go to Edit>Paste as new layer.
9. Activate the Clone Brush tool 
Aligned Mode checked


Right clic on the grass

and after left clic on the empty space


to get about this

10. Open the tube Mina.best.friends2014 - Edit>Copy.
Go back to your work and go to Edit>Paste as new layer.
Image>Resize, to 80%, resize all layers not checked.
Place  the tube as you like.
11. Activate the landscape layer.
Again activate the Clone Brush tool and, as above,
right clic on the grass and after, on the tube layer, left clic on the foots of boy and dog,
to get about this


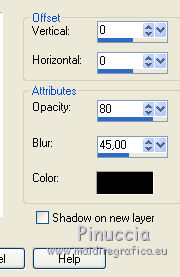
12. Effects>3D Effects>Drop Shadow, color black.

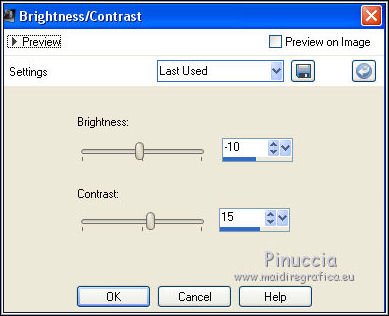
13. Adjust>Brightness and Contrast>Brightness and Contrast.

14. Activate the landscape layer.
Edit>Repeat Brightness and Contrast.
15. Activate the top layer.
Layers>New Raster Layer.
Flood fill  with your background color #ffffff.
Selections>Select All.
Selections>Modify>Contract - 2 pixels.
Press CANC on the keyboard 
Selections>Select None.
16. Layers>Merge>Merge visible.
17. Edit>Copy.
18. Image>Resize, to 90%, resize all layers not checked.
19. Selections>Select All.
Layers>New Raster Layer.
Layers>Arrange>Send to Bottom.
Edit>Paste into Selection.
Selections>Select None.
20. Adjust>Blur>Gaussian blur - radius 25.

21. Effects>3D Effects>Buttonize, color white.

22. Image>Add borders, 2 pixels, symmetric, color white.
23. Sign your work and save as jpg.

If you have problems or doubts, or you find a not worked link, or only for tell me that you enjoyed this tutorial, write to me.
13 August 2016

