|
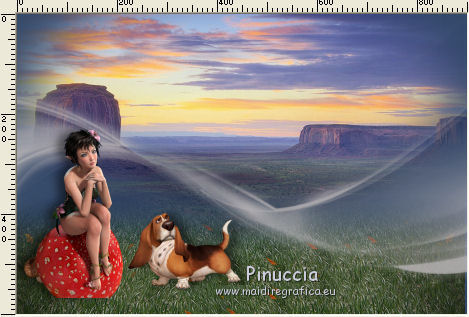
TAG ENFANT
english version

Here you find the original of this tutorial:

This tutorial was translated with PSPX17 but it can also be made using other versions of PSP.
Since version PSP X4, Image>Mirror was replaced with Image>Flip Horizontal,
and Image>Flip with Image>Flip Vertical, there are some variables.
In versions X5 and X6, the functions have been improved by making available the Objects menu.
In the latest version X7 command Image>Mirror and Image>Flip returned, but with new differences.
See my schedule here
French translation here
Your versions here
For this tutorial, you will need:
Material here
Tube calguisenfantart19092016 by Guismo
Mist_155_paysage_p2_animabelle
Tubtatie_30d8a3ad5a93977
Tube Lize-A0-0132
Tube hierba1-nines
Tube hierba2-nines
Tube calguisfeuilledevignesviergecenqfeuille17092014 by Guismo
Narah_Mask_0998
Texto-Enfant-Art-nines

You can change Blend Modes according to your colors.
Open the mask in PSP and minimize it with the rest of the material.
1. Open a new transparent image 900 x 600 pixels.
2. Set your Foreground color to #273e61,
and your Background color to #b9b5b7.

Flood Fill  the transparent image with your Foreground color #273e61. the transparent image with your Foreground color #273e61.
3. Open 155_paysage_p2_animabelle - Edit>Copy.
Go back to your work and go to Edit>Paste as new layer.
Image>Resize, to 80%, resize all layers not checked.
4. Effects>Image Effects>Offset.

5. Open the tube hierbas1-nines - Edit>Copy.
Go back to your work and go to Edit>Paste as new layer.
Move  the tube to the bottom, see my example. the tube to the bottom, see my example.

6. Layers>New Raster Layer.
Flood Fill  with your Background color #b9b5b7. with your Background color #b9b5b7.
7. Layers>New Mask Layer>A partir d'une image.
Ouvrir le menu deroulant sous la fenêtre d'origine et vous verrez la liste des images ouvertes.
Sélectionner le masque Narah_Mask_0998.

Layers>Merge>Merge Groupe.
8. Open tubtatie_30d8a3ad5a93977 - Edit>Copy.
Go back to your work and go to Edit>Paste as new layer.
Image>Resize, 1 time to 50% and 2 times to 80%, resize all layers not checked.
9. Effects>3D Effects>Drop Shadow, color black.

10. Image>Mirror.
Move  the tube at the bottom left, see my example. the tube at the bottom left, see my example.
11. Open the tube Lize-A0-0132 - Edit>Copy.
Go back to your work and go to Edit>Paste as new layer.
Image>Resize, 1 time to 50% and 2 times to 80%, resize all layers not checked.
Place  the tube as below. the tube as below.

12. Open the tube hierba2-nines - Edit>Copy.
Go back to your work and go to Edit>Paste as new layer.
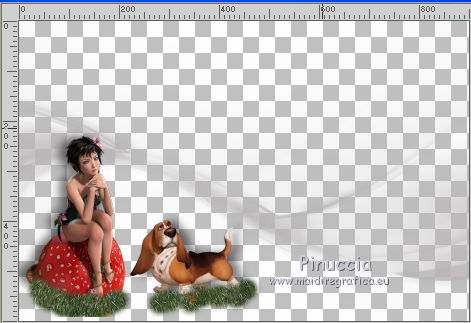
Place  the tube under the tubes the tube under the tubes
I closed the layer to see better

13. Open the tube calguisenfantart19092016 by Guismo - Edit>Copy.
Go back to your work and go to Edit>Paste as new layer.
Image>Resize, to 80%, resize all layers not checked.
Move  the tube to the top, see my example. the tube to the top, see my example.
14. Effects>3D Effects>Drop Shadow, color black.

15. Layers>Merge>Merge All.
16. Image>Add borders, 5 pixels, symmetric, color #273e61.
Image>Add borders, 50 pixels, symmetric, color #ffffff.
17. Activate the Magic Wand Tool 
and clic on the white bord to select it.
18. Adjust>Blur>Radial blur.

19. Effects>3D Effects>Inner bevel.

Selections>Select None.
20. Open the tube calguisfeuilledevignesviergecenqfeuille17092014 - Edit>Copy.
Go back to your work and go to Edit>Paste as new layer.
Image>Resize, 1 time to 50% and 1 time to 80%, resize all layers not checked.
21. Image>Free Rotate - 25 degrees to left.

Move  the tube at the top left. the tube at the top left.
Effects>3D Effects>Drop Shadow, same settings.
22. Layers>Duplicate.
Image>Mirror.
23. Open Texto-Enfant-Art-nines - Edit>Copy.
Go back to your work and go to Edit>Paste as new layer.
Move  the text at the bottom left. the text at the bottom left.
24. Sign your work.
Layers>Merge>Merge All.
25. Image>Add borders, 3 pixels, symmetric, color #273e61.
Save as jpg.

If you have problems or doubts, or you find a not worked link, or only for tell me that you enjoyed this tutorial, write to me.
25 November 2016
|

