|
TAG EL FOTOGRAFO


This tutorial was translated with PSPX3 but it can also be made using other versions of PSP.
Since version PSP X4, Image>Mirror was replaced with Image>Flip Horizontal,
and Image>Flip with Image>Flip Vertical, there are some variables.
In versions X5 and X6, the functions have been improved by making available the Objects menu.
In the latest version X7 command Image>Mirror and Image>Flip returned, but with new differences.
See my schedule here
French translation here
Your versions here
For this tutorial, you will need:
Material here
Tube FBR_Photographing Faeries_nykolai
couple tubed by corinne.vicaire
Plugins
consult, if necessary, my filter section here
L&K's - L&K Trouble here
L&K's - L&K Trix here

You can change Blend Modes according to your colors.
In the newest versions of PSP, you don't find the foreground/background gradient (Corel_06_029).
You can use the gradients of the older versions.
The Gradient of CorelX here
1. Open a new transparent image 900 x 650 pixels.
2. Set your foreground color to #cdcdcd
and your foreground color to #3f3f3f.

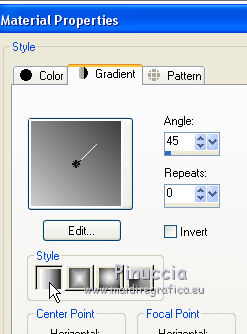
Set your foreground color to a Foreground/Background Gradient, style Linear.

Flood Fill  the trasparent image with your gradient. the trasparent image with your gradient.
3. Open the tube of the couple - Edit>Copy.
Go back to your work and go to Edit>Paste as new layer.
optional: Image>Resize, à 95%, resize all layers not checked
4. Selection Tool 
(no matter the type of selection, because with the custom selection your always get a rectangle)
clic on the Custom Selection 
and set the following settings.

5. Layers>New Raster Layer.
Flood Fill  the layer with your gradient. the layer with your gradient.
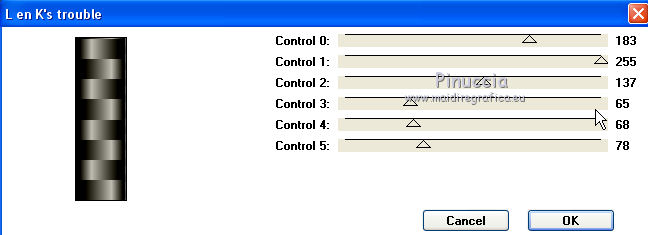
6. Effects>Plugins>L&&K's - L&K Trouble.

Selections>Select None.
7. Layers>Duplicate.
Image>Mirror.
Layers>Merge>Merge down.
8. Effects>Distortion Effects>Twirl.

9. Layers>New Raster Layer.
Flood Fill  with your background color #3f3f3f. with your background color #3f3f3f.
10. Selections>Select All.
Selections>Modify>Contract - 5 pixels.
Press CANC sur le clavier 
Selections>Select None.
11. Layers>Merge>Merge visible.
12. Image>Resize, to 90%, resize all layers not checked.
13. Activate the Magic Wand Tool 
and clic on the transparent part to select it.
Flood Fill  the selection with your gradient. the selection with your gradient.
14. Effects>Plugins>L&K's - L&K Trix.

Selections>Invert.
15. Effects>3D Effects>Buttonize, color white.

Edit>Repeat Buttonize.
Selections>Select None.
16. Layers>Merge>Merge All.
Image>Add borders, 2 pixels, symmetric, background color #3f3f3f.
17. Edit>Copy.
18. Image>Canvas Size - 954 x 704.

19. Select the white part with your Magic Wand tool.
20. Edit>Paste into Selection.
21. Adjust>Blur>Gaussian blur - radius 15.

Selections>Select None.
22. Open the tube FBR_Photographing Faeries_nykolai.
Activate the fairy layer - Edit>Copy.
Go back to your work and go to Edit>Paste as new layer.
Move  the tube in the upper left. the tube in the upper left.
Effects>3D Effects>Drop Shadow, color black.

23. Open again the tube and activate the man layer.
Edit>Copy.
Go back to your work and go to Edit>Paste as new layer.
Image>Resize, to 80%, resize all layers not cheched.
Move  in the upper right. in the upper right.
Effects>3D Effects>Drop Shadow, color black.

24. Layers>Merge>Merge All.
25. Image>Add borders, 5 pixels, symmetric, background color #3f3f3f.
Image>Add borders, 20 pixels, symmetric, color white.
26. Sign your work and save as jpg.

If you have problems or doubts, or you find a not worked link, or only for tell me that you enjoyed this tutorial, write to me.
13 August 2016
|


