|
TAG EL AVIADOR
 ENGLISH VERSION ENGLISH VERSION

Here you find the original of this tutorial:

This tutorial was translated with PSPX7 but it can also be made using other versions of PSP.
Since version PSP X4, Image>Mirror was replaced with Image>Flip Horizontal,
and Image>Flip with Image>Flip Vertical, there are some variables.
In versions X5 and X6, the functions have been improved by making available the Objects menu.
In the latest version X7 command Image>Mirror and Image>Flip returned, but with new differences.
See my schedule here
French translation here
Le vostre versioni ici
For this tutorial, you will need:
Material here
Tube femmes_0459_lisat
Mina.5205 mist vintage
Seleccion_sel_266_nines
Adorno_nines
Texto_Lisa_ac
(you find here the links to the material authors' sites)
Plugins
consult, if necessary, my filter section here
AAA Frames - Frame Works here
Xero - Fritillary here
Mura's Meister - Perspective Tiling here

You can change Blend Modes according to your colors.
In the newest versions of PSP, you don't find the foreground/background gradient (Corel_06_029).
You can use the gradients of the older versions.
The Gradient of CorelX here
1. Open a new transparent image 950 x 700 pixels.
2. Set your foreground color to #363638,
Set your background color to #8e8e8f.

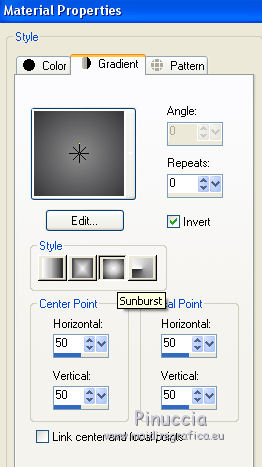
Set your foreground color to a Foreground/Background Gradient, style Sunburst.

Flood Fill  the transparent image with your Gradient. the transparent image with your Gradient.
3. Selections>Select All.
Layers>New Raster Layer.
4. Open the mask smArt_maszk_54 - Edit>Copy.
Go back to your work and go to Edit>Paste into Selection.
Selections>Select None.
5. Change the Blend Mode of this layer to Soft Light.
6. Open the tube Mina@.5222 mistpaesaggio 04.18 - Edit>Copy.
Go back to your work and go to Edit>Paste as new layer.
Change the Blend Mode of this layer to Luminance (Legacy).
7. Open the tube calguismisted25022018 - Edit>Copy.
Go back to your work and go to Edit>Paste as new layer.
Image>Resize, to 50%, resize all layers not checked.
8. Effects>Image Effects>Offset.

9. Change the Blend Mode of this layer to Luminance (Legacy).
10. Open the tube Criss 2623 - Edit>Copy.
Go back to your work and go to Edit>Paste as new layer.
Image>Resize, 2 times to 80%, resize all layers not checked.
Move  the tube at bottom right. the tube at bottom right.
11. Change the Blend Mode of this layer to Soft Light and reduce the opacity to 80%.

12. Layers>New Raster Layer.
Selections>Select All.
13. Open the tube Adorno_aviador_nines - Edit>Copy.
Go back to your work and go to Edit>Paste into Selection.
Selections>Select None.
14. Change the Blend Mode of this layer to Hard Light.
15. Layers>Merge>Merge visible.
16. Effects>Plugins>AAA Frames - Frame Works.

17. Edit>Copy.
18. Image>Resize, to 80%, resize all layers not checked.
19. Effects>3D Effects>Drop Shadow, color black.

Repeat Effects>3D Effects>Drop Shadow.

20. Layers>New Raster Layer.
Layers>Arrange>Send to Bottom.
Selections>Select All.
Edit>Paste into Selection.
Selections>Select None.
21. Layers>Duplicate.
Image>Resize, to 90%, resize all layers not checked.
22. Effects>Plugins>Mura's Meister - Perspective Tiling.

23. Activate the Magic Wand Tool  feather 20 feather 20

click on the transparent part to select it.
Click 4 times CANC on the keyboard 
Selections>Select None.
24. Activate the bottom layer.
Effects>Plugins>Xero - Fritillary.

25. Image>Add borders, 2 pixels, symmetric, foreground color.
26. Layers>New Raster Layer.
Set your foreground color to Color.
Flood Fill  with your foreground color #363638. with your foreground color #363638.
Selections>Select All.
Selections>Modify>Contract - 10 pixels.
Press CANC on the keyboard.
Selections>Invert.
27. Effects>Texture Effects>Weave
weave color: foreground color #363638
gap color: background color #8e8e8f.

Selections>Select None.
28. Layers>Merge>Merge All.
29. Image>Add borders, 30 pixels, symmetric, #ffffff.
30. Open the tube Criss 2623 - Edit>Copy.
Go back to your work and go to Edit>Paste as new layer.
Image>Resize, 1 time to 80% and 1 time to 90%, resize all layers not checked.
31. Image>Mirror.
Move  the tube at the bottom left. the tube at the bottom left.
32. Effects>3D Effects>Drop Shadow, color black.

33. Open Texto_El Aviador - Edit>Copy.
Go back to your work and go to Edit>Paste as new layer.
Move  the texte at the bottom right. the texte at the bottom right.
34. Layers>Merge>Merge All.
Image>Add borders, 2 pixels, symmetric, foreground color #363638.
35. Sign your work and save as jpg.
Your versions here

If you have problems or doubts, or you find a not worked link, or only for tell me that you enjoyed this tutorial, write to me.
2 May 2018
|
 ENGLISH VERSION
