|
TAG BABY COLD


Here you find the original of this tutorial:

This tutorial was translated with PSPX3 but it can also be made using other versions of PSP.
Since version PSP X4, Image>Mirror was replaced with Image>Flip Horizontal,
and Image>Flip with Image>Flip Vertical, there are some variables.
In versions X5 and X6, the functions have been improved by making available the Objects menu.
In the latest version X7 command Image>Mirror and Image>Flip returned, but with new differences.
See my schedule here
French translation here
Your versions here
For this tutorial, you will need:
Material here
Mist Criss 2406 by Linda Gatita
Mistnoel2016-021by KrysTubes
Adorno Monti-MetalHanger-Silver
Camino de Nieve by Niria Mercader
Wort_coldbabywhite
Plugins
consult, if necessary, my filter section here
Filters Unlimited 2.0 here
Mura's Meister - Cloud here
Mura's Meister - Copies here
Simple - Top Left Mirror here
Tramages - Pool Shadow here
Redfield - Craquelure 3D here
Filters Simple and Tramages can be used alone or imported into Filters Unlimited.
(How do, you see here)
If a plugin supplied appears with this icon  it must necessarily be imported into Unlimited it must necessarily be imported into Unlimited

You can change Blend Modes according to your colors.
In the newest versions of PSP, you don't find the foreground/background gradient (Corel_06_029).
You can use the gradients of the older versions.
The Gradient of CorelX here
1. Open a new transparent image 900 x 650 pixels.
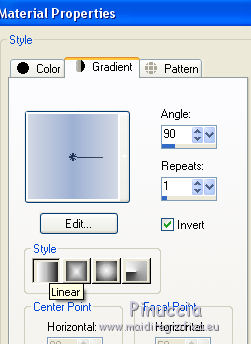
2. Set your foreground color to #9eb1d3,
and your background color to #d2d8e4.
Set your foreground color to a Foreground/Background Gradient, style Linear.

Flood Fill  the transparent image with your Gradient. the transparent image with your Gradient.
3. Effects>Plugins>Redfield - Craquelure 3DD v.1.70
Select the preset Crannied and ok.

4. Selections>Select All.
Selections>Modify>Contract - 70 pixels.
5. Layers>New Raster Layer.
Set your foreground color to Color.
Flood Fill  the layer with your foreground color #9eb1d3. the layer with your foreground color #9eb1d3.
6. Selections>Modify>Contract - 5 pixels.
Press CANC on the keyboard 
7. Set your foreground color to Gradient.
Flood Fill  the layer with your Gradient. the layer with your Gradient.
8. Effects>Plugins>Mura's Meister - Cloud.

Selections>Select None.
9. Open the tube Mistnoel2016-021 by Krys - Edit>Copy.
Go back to your work and go to Edit>Paste as new layer.
Erase the watermark.
Move  the tube to the right side. the tube to the right side.

10. Open the tube Criss 2406 - Edit>Copy.
Go back to your work and go to Edit>Paste as new layer.
Image>Resize, 2 times to 80%, resize all layers not checked.
Move  the tube to the left side. the tube to the left side.
11. Close the background layer.
Layers>Merge>Merge visible.
12. Effects>Plugins>Mura's Meister - Copies.

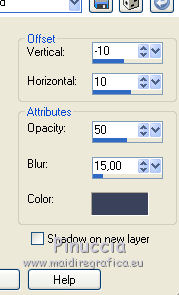
13. Effects>3D Effects>Drop Shadow, color #3b415a.

14. Open the tube Adorno Monti-MetalHanger-Silver - Edit>Copy.
Go back to your work and go to Edit>Paste as new layer.
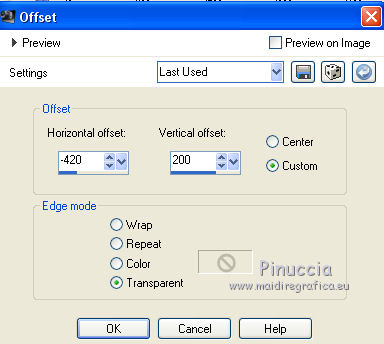
15. Effects>Image Effects>Offset.

16. Effects>Plugins>Simple - Top Left Mirror.

17. Open the tube Camino de Nieve by Niria - Edit>Copy.
Go back to your work and go to Edit>Paste as new layer.
18. Effects>Image Effects>Offset.

19. Open coldbabywhite - Edit>Copy.
Go back to your work and go to Edit>Paste as new layer.
Move  the wordart at the bottom right. the wordart at the bottom right.
Open again the background layer.

20. Layers>Merge>Merge All.
21. Image>Add borders, 2 pixels, symmetric, foreground color #9eb1d3.
Image>Add borders, 40 pixels, symmetric, background color #d2d8e4.
22. Activate the Magic Wand Tool 
and click on the 40 pixels bord to select it.
23. Selections>Invert.
24. Effects>3D Effects>Buttonize, color #ffffff.

25. Selections>Invert.
26. Effects>Plugins>Tramages - Pool Shadow, default settings.

Selections>Select None.
27. Image>Add borders, 2 pixels, symmetric, foreground color #9eb1d3.
28. Sign your work on a new layer.
Layers>Merge>Merge All and save as jpg.

If you have problems or doubts, or you find a not worked link, or only for tell me that you enjoyed this tutorial, write to me.
2 Janvier 2018
|

