This tutorial was translated with PSPX3 but it can also be made using other versions of PSP.
Since version PSP X4, Image>Mirror was replaced with Image>Flip Horizontal,
and Image>Flip with Image>Flip Vertical, there are some variables.
In versions X5 and X6, the functions have been improved by making available the Objects menu.
In the latest version X7 command Image>Mirror and Image>Flip returned, but with new differences.
See my schedule here
French translation here
Your versions here
For this tutorial, you will need:
Material here
Tube alguisasianbeauty10032017
Narah_Mask_1063
mask.ket-fadesuave
Plugins
consult, if necessary, my filter section here
Frischluft - Mosaic Plane, Amiga Rulez here
&<Bkg Designer sf10IV> - Crumple (à importer dans Unlimited) here
Filters Unlimited 2.0 here
Simple - Pizza Slice Mirror here
VM Distortion - Broken Mirror here
Filters VM Distortion and Simple can be used alone or imported into Filters Unlimited.
(How do, you see here)
If a plugin supplied appears with this icon  it must necessarily be imported into Unlimited

You can change Blend Modes according to your colors.
In the newest versions of PSP, you don't find the foreground/background gradient (Corel_06_029).
You can use the gradients of the older versions.
The Gradient of CorelX here
Open the masks in PSP and minimize them with the rest of the material.
1. Set your foreground color to #1f3083.
Set your background color to #f3d1bb.

Set your foreground color to a Foreground/Background Gradient, style Linear.

2. Open a new transparent image 900 x 650 pixels.
Flood Fill  the transparent image with your Gradient.
3. Effects>Plugins>Frischluft - Mosaic Plane.

4. Effects>Plugins>Frischluft - Amiga Rulez.

5. Effects>Plugins>Filters Unlimited 2.0 - &<Bkg Designer sf10IV> - Crumple.

6. Layers>Duplicate.
7. Effects>Geometric Effects>Circle.

8. Layers>New Raster Layer.
Flood Fill  the layer with your background color f3d1bb.
9. Layers>New Mask layer>From image
Open the menu under the source window and you'll see all the files open.
Select the mask Narah_Mask_1063.

Layers>Merge>Merge Group.
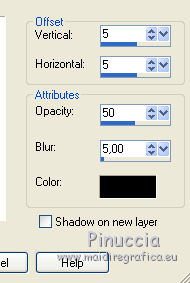
10. Effects>3D Effects>Drop Shadow, color black.

11. Effects>Plugins>Filters Unlimited 2.0 - Simple - Pizza Slice Mirror.

12. Open the tube alguisasianbeauty10032017 - Edit>Copy.
Go back to your work and go to Edit>Paste as new layer.
Image>Resize, 2 times to 80%, resize all layers not checked.
13. Layers>New Mask layer>From image
Open the menu under the source window
and select the mask mask.ket-fadesuave.

Layers>Duplicate.
Layers>Merge>Merge group.
Place  the tube in the middle of the circle.
14. Effects>3D Effects>Drop Shadow, color black.

15. Close the bottom layer raster 1.
Layers>Merge>Merge visible.
16. Layers>Duplicate.
Image>Resize, 1 time to 50% and 1 time to 70%, resize all layers not checked.
17. Effects>Plugins>VM Distortion/Broken Mirror.

18. Effects>3D Effects>Drop Shadow, color black.

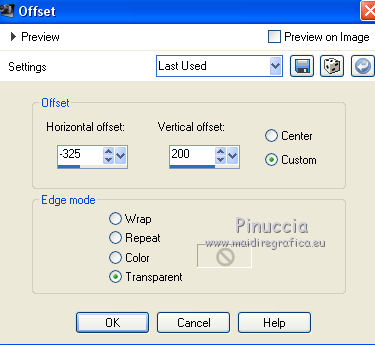
19. Effects>Image Effects>Offset.

20. Layers>Duplicate.
Image>Mirror.
21. Layers>Merge>Merge down.
22. Layers>Duplicate.
Move  the image to the bottom.

23. Re-open the bottom layer.
Layers>Merge>Merge All.
24. Image>Add borders, 2 pixels, symmetric, foreground color #1f3083.
Image>Add borders, 20 pixels, symmetric, background color #f3d1bb.
25. Activate the Magic Wand tool 
click on the 20 pixels bord to select it.
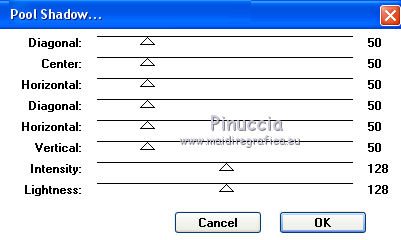
26. Effects>Plugins>Tramages - Pool Shadow, default settings.

Selections>Select None.
27. Image>Add borders, 2 pixels, symmetric, foreground color #1f3083.
Image>Add borders, 30 pixels, symmetric, background color #f3d1bb.
28. Image>Resize, 95%, resize all layers checked.
29. Sign your work and save as jpg.
The tube of this version is by Beatrice


If you have problems or doubt, or you find a not worked link, or only for tell me that you enjoyed this tutorial, write to me.
24 March 2017

