|
TOP STONE


This tutorial was translated with PSPX7 but it can also be made using other versions of PSP.
Since version PSP X4, Image>Mirror was replaced with Image>Flip Horizontal,
and Image>Flip with Image>Flip Vertical, there are some variables.
In versions X5 and X6, the functions have been improved by making available the Objects menu.
In the latest version X7 command Image>Mirror and Image>Flip returned, but with new differences.
See my schedule here
 French translation here French translation here
 Your versions ici Your versions ici
For this tutorial, you will need:
Material
here
Tube Tocha24428 by Tony Chavarria
Tube calguismistedlanscape02082012 by Guismo
Tube aclis_vases
(you find here the links to the material authors' sites)
Plugins
consult, if necessary, my filter section here
Nik Software - Color Efex Pro here
Alien Skin Eye Candy 5 Texture - Stone Wall here

You can change Blend Modes according to your colors.
In the newest versions of PSP, you don't find the foreground/background gradient (Corel_06_029).
You can use the gradients of the older versions.
The Gradient of CorelX here
1. Open a new transparent image 1000 x 750 pixels.
Set your foreground color to #5d4a3b,
and your background color to #d8a868.

Set your foreground color to a Foreground/Background Gradient, style Linear.
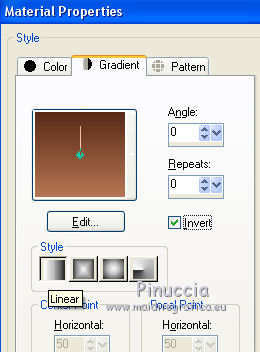
Flood Fill  the transparent image with your Gradient. the transparent image with your Gradient.
2. Selections>Select All.
Open the tube calguismistedlanscape02082012 and go to Edit>Copy.
Go back to your work and go to Edit>Paste into Selection.
Selections>Select None.
3. Effects>Image Effects>Seamless Tiling, default settings.

4. Adjust>Blur>Radial Blur.
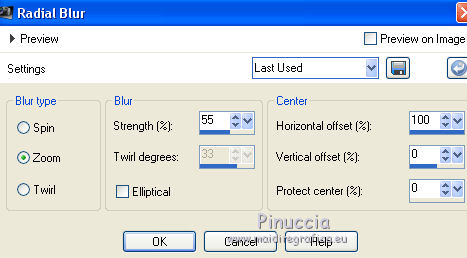
5. Effects>Art Media Effects>Brush Strokes, background color #d8a868.
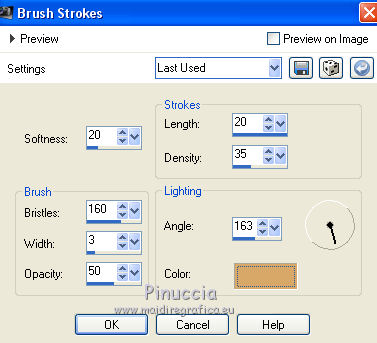
6. Layers>Duplicate.
Close the bottom layer.
7. Effects>Geometric Effects>Perspective Horizontal.
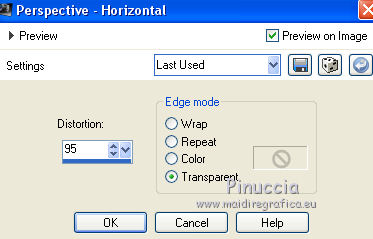
8. Image>Mirror.
Repeat Effects>Geometric Effects>Perspective hotizontal.

9. Effects>Distortion Effects>Warp.
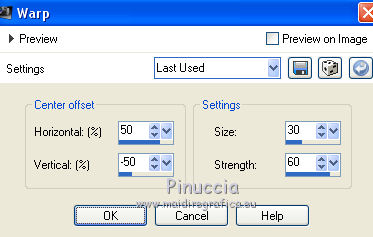
10. Image>Flip.
11. Effects>ImageEffects>Offset.
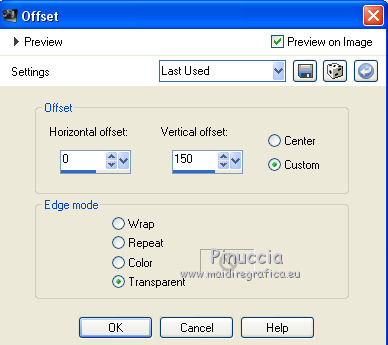
12. Effects>3D Effects>Drop Shadow, color black.
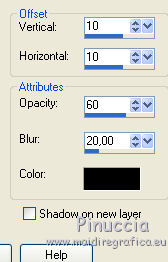
13. Layers>Duplicate.
Image>Flip.
Image>Mirror.
14. Open and activate the closed layer.
15. Edit>Paste as new layer (the tube calguismistedlandscape is still in memory).
Move  the tube at the upper left. the tube at the upper left.
16. Effects>Reflection Effects>Rotating Mirror.

17. Layers>Merge>Merge visible.
18. Selections>Select All.
Selections>Modify>Contract - 50 pixels.
Selections>Invert.
19. Effects>Plugins>Alien Skin Eye Candy 6 Texture - Stone Wall.
Preset Stained Glass/Brown.

20. Selections>Invert.
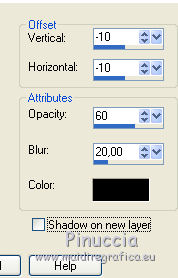
Effects>3D Effects>Drop Shadow, color black.

Repeat Drop Shadow, vertical and horizontal -10.
Selections>Select None.
21. Effects>Plugins>Nik Software - Color Efex Pro
Bi-color filter - to the right Violet-Pink 4.

22. Open the tube Tocha24428 and go to Edit>Copy.
Go back to your work and go to Edit>Paste as new layer.
Image>Resize, 2 times to 80%, resize all layers not checked.
Move  the tube at the bottom right. the tube at the bottom right.
23. Effects>3D Effects>Drop Shadow, color black.
24. Open the tube aclis_vasos and go to Edit>Copy.
Go back to your work and go to Edit>Paste as new layer.
Image>Resize, 2 times to 80%, resize all layers not checked.
Move  the tube at the bottom left. the tube at the bottom left.
Effects>3D Effects>Drop Shadow, same settings.
25. Sign your work on a new layer.
Layers>Merge>Merge All and save as jpg.
Version with tubes by Yoka and Azalée (the landscape is mine)

 Your versions here Your versions here

If you have problems or doubts, or you find a not worked link, or only for tell me that you enjoyed this tutorial, write to me.
15 April 2021
|


