|
TOP NENA
 ENGLISH VERSION ENGLISH VERSION

Here you find the original of this tutorial:

This tutorial was translated with PSPX7 but it can also be made using other versions of PSP.
Since version PSP X4, Image>Mirror was replaced with Image>Flip Horizontal,
and Image>Flip with Image>Flip Vertical, there are some variables.
In versions X5 and X6, the functions have been improved by making available the Objects menu.
In the latest version X7 command Image>Mirror and Image>Flip returned, but with new differences.
See my schedule here
French translation here
Your versions ici
For this tutorial, you will need:
Material
here
Tube 3122-woman-LB TUBES
DW_Fantastic_Nature_Paper12
DW_Fantastic_Nature21
Tube 0_2392e8_fd739cc4_XL
Tube 0_1bc9c3_58f4f2bb_L
Tube Zona-Branch3-01-18
Tube oiseaupetit
Narah_Mask_0930
(you find here the links to the material authors' sites)
Plugins
consult, if necessary, my filter section here
Mura's Meister - Perspective Tiling here

You can change Blend Modes according to your colors.
Open the Mask in PSP and minimize it with the rest of the material.
1. Open a new transparent image 900 x 600 pixels.
2. Selections>Select All.
Open DW_Fantastic_Nature_Paper12 and go to Edit>Copy.
Go back to your work and go to Edit>Paste into Selection.
Selections>Select None.
3. Selection Tool 
(no matter the type of selection, because with the custom selection your always get a rectangle)
clic on the Custom Selection 
and set the following settings.

4. Set your foreground color to #e3eecb.
Layers>New Raster Layer.
Flood Fill  with your foreground color #e3eecb. with your foreground color #e3eecb.
5. Layers>New Mask layer>From image
Open the menu under the source window and you'll see all the files open.
Select the mask Narah_Mask_0930.

Layers>Merge>Merge Group.
Selections>Select None.
Effects>Edge Effects>Enhance.
6. Image>Canvas Size - 900 x 700 pixels.

7. Activate the bottom layer, Raster 1.
Layers>Duplicate.
8. Effects>Plugins>Mura's Meister - Perspective Tiling.

9. Activate the top layer.
Open DW_Fantastic_Nature21 and go to Edit>Copy.
Go back to your work and go to Edit>Paste as new layer.
Image>Resize, to 80%, resize all layers not checked.
10. Effecs>Image Effects>Offset.

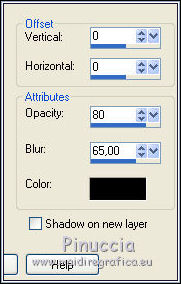
11. Effects>3D Effects>Drop Shadow, color #000000.

12. Open 0_2392e8_fd739cc4_XL and go to Edit>Copy.
Go back to your work and go to Edit>Paste as new layer.
Image>Resize, to 80%, resize all layers not checked.
13. Effecs>Image Effects>Offset.

14. Open Zona-Branch3-01-18 and go to Edit>Copy.
Go back to your work and go to Edit>Paste as new layer.
Erase the watermark.
Image>Resize, 2 times to 80%, resize all layers not checked.
15. Effecs>Image Effects>Offset.

16. Effects>3D Effects>Drop Shadow, color #000000.

17. Open oiseaupetit and go to Edit>Copy.
Go back to your work and go to Edit>Paste as new layer.
Image>Resize, 2 times to 80%, resize all layers not checked.
Place  the tube over the branch to the right side. the tube over the branch to the right side.
18. Open 0_1bc9c3_58f4f2bb_L and go to Edit>Copy.
Go back to your work and go to Edit>Paste as new layer.
19. Effecs>Image Effects>Offset.

20. Effects>3D Effects>Drop Shadow, color #000000.

21. Open the tube 3122-woman-LB TUBES, erase the watermark and go to Edit>Copy.
Go back to your work and go to Edit>Paste as new layer.
Place  rightly the tube. rightly the tube.
22. Effects>3D Effects>Drop Shadow, color #000000.

23. Layers>Merge>Merge All.
24. Image>Add borders, 2 pixels, symmetric, color #545415.
Image>Add borders, 5 pixels, symmetric, color #b9d08e.
Image>Add borders, 1 pixel, symmetric, color #545415.
25. Edit>Copy.
26. Image>Add borders, 40 pixels, symmetric, color white.
Activate your Magic Wand Tool 
and click on the white border to select it.
Edit>Paste into Selection.
26. Adjust>Blur>Gaussian Blur - radius 10

27. Selections>Invert.
Effetcs>3D Effects>Drop Shadow, color #000000.

28. Selections>Invert.
Effects>Texture Effects>Weave
weave color #ffffff
gap color #4e651b.

29. Image>Add borders, 2 pixels, symmetric, color #4e651b.
30. Sign your work and save as jpg.
Your versions here

If you have problems or doubts, or you find a not worked link, or only for tell me that you enjoyed this tutorial, write to me.
9 November 2019
|
 ENGLISH VERSION
