|
TOP DONNA IN BLUE
 ENGLISH VERSION ENGLISH VERSION

Here you find the original of this tutorial:

This tutorial was translated with PSPX7 but it can also be made using other versions of PSP.
Since version PSP X4, Image>Mirror was replaced with Image>Flip Horizontal,
and Image>Flip with Image>Flip Vertical, there are some variables.
In versions X5 and X6, the functions have been improved by making available the Objects menu.
In the latest version X7 command Image>Mirror and Image>Flip returned, but with new differences.
See my schedule here
 French translation here French translation here
 Your versions ici Your versions ici
For this tutorial, you will need:
Material
here
Tube Min@.donneindien.2.1.14
145_animabelle_tubes_animaux
Patron_azul_nines
Preset Lights_donnablue_nines
Mask.Ket-fade
(you find here the links to the material authors' sites)
Plugins
consult, if necessary, my filter section here
Mura's Meister - Pole Transform here
Mura's Meister - Perspective Tiling here

You can change Blend Modes according to your colors.
In the newest versions of PSP, you don't find the foreground/background gradient (Corel_06_029).
You can use the gradients of the older versions.
The Gradient of CorelX here
Copy the Preset in the Presets Folder.
Open the mask and the pattern in PSP and minimize them with the rest of the material.
1. Open a new transparent image 1000 x 700 pixels.
2. Set your foreground color to Pattern
and select the pattern patron_azul_nines.
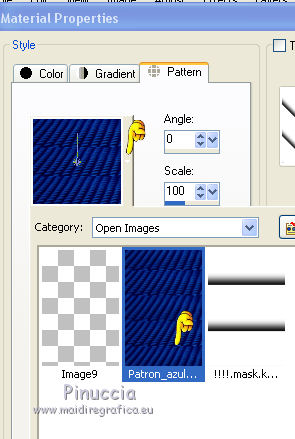
Flood Fill  the transparent image with your foreground pattern. the transparent image with your foreground pattern.
3. K key on the keyboard to activate your Pick Tool 
mode Scale 
pull the top central node down until 300 pixels,
and the bottom central node up until 330 pixels.

4. Effects>Plugins>Mura's Meister - Pole Transform.

5. Effects>3D Effects>Drop Shadow, color black.
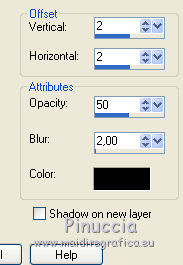
Repeat Drop Shadow, vertical and horizontal -2.
6. Activate your Magic Wand Tool 
and click in the circle to select it.
Selections>Modify Expand - 5 pixels.
7. Set your foreground color to #04093b,
and your background color to #66a3c4.

Set your foreground color to a Foreground/Background Gradient, style Sunburst.
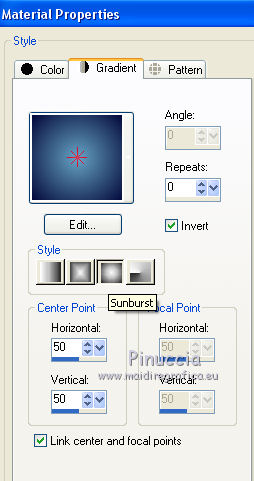
Layers>New Raster Layer.
Layers>Arrange>Send to Bottom.
Flood Fill  the layer with your Gradient. the layer with your Gradient.
8. Open the tube 145_animabelle_tubes_animaux, close the layer of the watermark.
Layers>Copy Special>Copy Merged.
9. Go back to your work.
Layers>New Raster Layer.
Edit>Paste into Selection.
10. Adjust>Blur>Radial Blur.
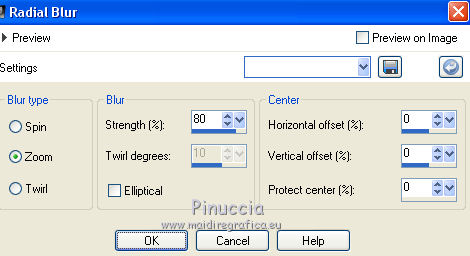
11. Activate again the tube 145_animabelle_tubes_animaux.
Activate the layer of the tube and go to Edit>Copy.
Go back to your work and go to Edit>Paste into Selection.
Selections>Select None.
12. Layers>Merge>Merge visible.
13. Image>Resize, to 80%, resize all layers not checked.
14. Effects>Image Effects>Offset.
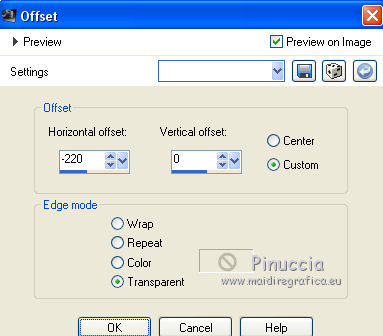
15. Layers>Duplicate.
Image>Mirror.
Layers>Merge>Merge Down.
16. Effects>Geometric Effects>Perspective Vertical.
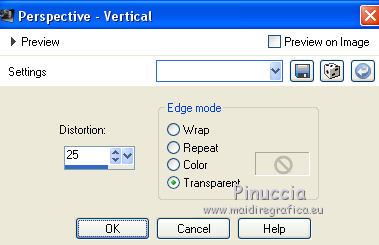
17. Effects>Image Effects>Offset.
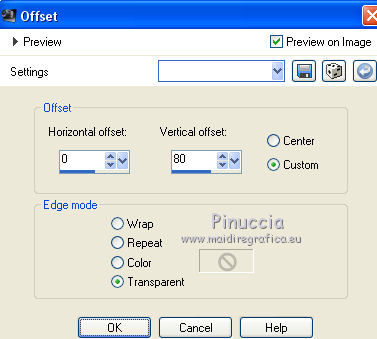
18. Effects>3D Effects>Drop Shadow, color black.
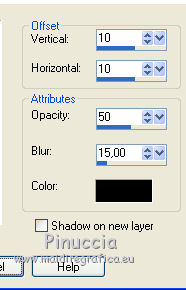
Repeat Drop Shadow, vertical and horizontal -10.
19. Layers>New Raster Layer.
Layers>Arrange>Send to Bottom.
Flood Fill  the layer with your Gradient. the layer with your Gradient.
20. Selections>Select All.
Edit>Paste into Selection (the tube 145_animabelle_Animaux is still in memory).
Selections>Select None.
21. Effects>Image Effects>Seamless Tiling, default settings.

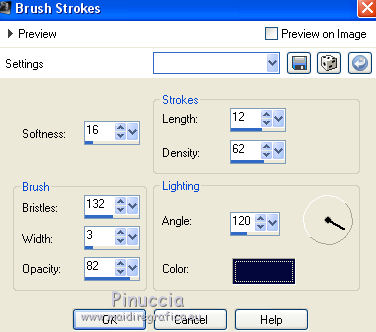
22. Effects>Art Media Effects>Brush Strokes, foreground color #04093b.
23. Layers>New Mask layer>From image
Open the menu under the source window and you'll see all the files open.
Select the mask mask.ket-fadesuave.
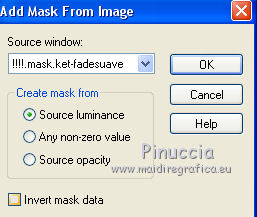
Layers>Duplicate, to apply the mask 2 times.
Layers>Merge>Merge Group.
24. Layers>Duplicate.
25. Effects>Illumination Effects>Lights.
Select the preset donnablue_nines and ok.
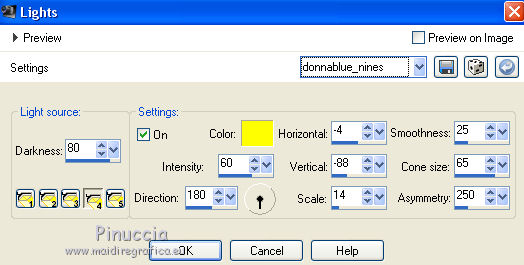
26. Change the Blend Mode of this layer to Dodge.
27. Layers>New Raster Layer.
Layers>Arrange>Send to Bottom.
Change the settings of your Gradient, style Linear.
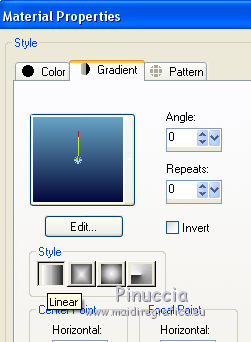
Flood Fill  the layer with your Gradient. the layer with your Gradient.
28. Layers>Merge>Merge visible.
29. Layers>Duplicate.
Adjust>Blur>Gaussian Blur - radius 50.

30. Image>Canvas Size - 1000 x 800 pixels.
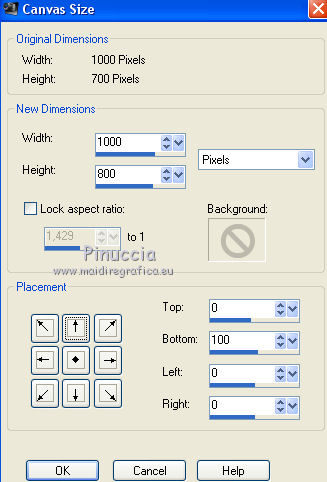
31. Effects>Texture Effects>Mosaic - Glass.
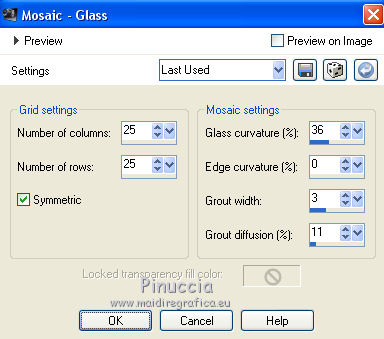
32. Effects>Plugins>Mura's Meister - Perspective Tiling.

33. Layers>New Raster Layer.
Layers>Arrange>Send to Bottom.
Set your foreground to Color.
Flood Fill  the layer with your foreground color #04093b. the layer with your foreground color #04093b.
34. Activate your top layer.
Open the tube Min@.donneindianen,14 and go to Edit>Copy.
Go back to your work and go to Edit>Paste as new layer.
Image>Resize, 2 times to 80%, resize all layers not checked.
Place  correctly the tube. correctly the tube.
35. Effects>3D Effects>Drop Shadow, color black.
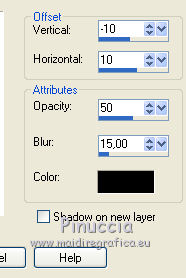
36. Activate the layer Merged.
Adjust>Brightness and Contrast>Brightness/Contrast.
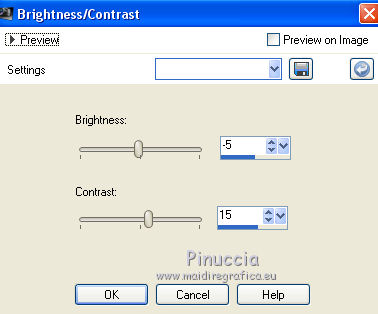
37. Sign your work.
Layers>Merge>Merge All and save as jpg.
 Your versions here Your versions here

If you have problems or doubts, or you find a not worked link, or only for tell me that you enjoyed this tutorial, write to me.
2 Mai 2020
|
 ENGLISH VERSION

 ENGLISH VERSION
