|
TOP COUPLE BLOND
 ENGLISH VERSION ENGLISH VERSION

Here you find the original of this tutorial:

This tutorial was translated with PSPX7 but it can also be made using other versions of PSP.
Since version PSP X4, Image>Mirror was replaced with Image>Flip Horizontal,
and Image>Flip with Image>Flip Vertical, there are some variables.
In versions X5 and X6, the functions have been improved by making available the Objects menu.
In the latest version X7 command Image>Mirror and Image>Flip returned, but with new differences.
See my schedule here
 French translation here French translation here
 Your versions ici Your versions ici
For this tutorial, you will need:
Material
here
Tube AnariRidzi-37C
Tube Grisi_Misted_Paisaje_350
Narah_mask_0664
Selección sel_mask_nines
(you find here the links to the material authors' sites)
Plugins
consult, if necessary, my filter section here
Mura's Meister - Copies here
Mura's Meister - Pole Transform here
Nik Software - Color Efex Pro here
AFS IMPORT - BORFADE 3 here
Filters Unlimited 2.0 here
Filters AFS IMPORT can be used alone or imported into Filters Unlimited.
(How do, you see here)
If a plugin supplied appears with this icon  it must necessarily be imported into Unlimited it must necessarily be imported into Unlimited

You can change Blend Modes according to your colors.
In the newest versions of PSP, you don't find the foreground/background gradient (Corel_06_029).
You can use the gradients of the older versions.
The Gradient of CorelX here
Copy the Preset in the Presets Folder.
1. Open a new transparent image 1000 x 700 pixels.
2. Set your foreground color to #453b1f,
and your background color to #e1b691.

Flood Fill  the transparent image with your foreground color #453b1f. the transparent image with your foreground color #453b1f.
3. Selections>Select All.
Layers>New Raster Layer.
Open the tube Grisi_Misted_Paisaje_350 and go to Edit>Copy.
Go back to your work and go to Edit>Paste into Selection.
Selections>Select None.
4. Layers>New Raster Layer.
Flood Fill  the layer with your background color #e1b691. the layer with your background color #e1b691.
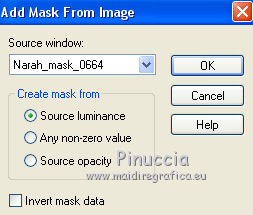
5. Layers>New Mask layer>From image
Open the menu under the source window and you'll see all the files open.
Select the mask Narah_mask_0664.

Layers>Merge>Merge Group.
6. Selections>Load/Save Selection>Load Selection from Disk.
Look for and load the selection sel_paisaje_nines.

Press CANC on the keyboard 
Selections>Select None.
7. Layers>Duplicate.
Activate the layer below of the original.
8. Effects>Plugins>Mura's Meister - Copies.

9. Adjust>Sharpness>Sharpen More.
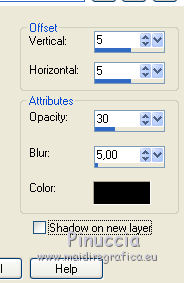
10. Effects>3D Effects>Drop Shadow, color black.

11. Activate the layer above of the copy.
Effects>Plugins>Mura's Meister - Pole Transform.

12. Effects>Image Effects>Offset.

Adjust>Sharpness>Sharpen More.
13. Effects>3D Effects>Drop Shadow, same settings.

14. Layers>Merge>Merge Down.
15. Effects>Plugins>Nik Software - Color Efex Pro
Bi color Filter - Color Set Moss 2.

16. Open the tube AnaRidzi-37C and go to Edit>Copy.
Go back to your work and go to Edit>Paste as new layer.
Image>Resize, 1 time to 80% and 1 time to 90%, resize all layers not checked.
Move  the tube down. the tube down.
17. Effects>3D Effects>Drop Shadow, color black.

18. Layers>Merge>Merge visible.
19. Effects>Plugins>AFS IMPORT - BORDEFADE3.

20. Sign your work on a new layer.
Layers>Merge>Merge All and save as jpg.
 Your versions here Your versions here

If you have problems or doubts, or you find a not worked link, or only for tell me that you enjoyed this tutorial, write to me.
2 Mai 2020
|
 ENGLISH VERSION
