|
TOP ACUARELA


This tutorial was translated with PSPX7 but it can also be made using other versions of PSP.
Since version PSP X4, Image>Mirror was replaced with Image>Flip Horizontal,
and Image>Flip with Image>Flip Vertical, there are some variables.
In versions X5 and X6, the functions have been improved by making available the Objects menu.
In the latest version X7 command Image>Mirror and Image>Flip returned, but with new differences.
See my schedule here
 French translation here French translation here
 Your versions ici Your versions ici
For this tutorial, you will need:
Material
here
Tube ketacuarela2014006 by Ket_Mexico
Tube NP-1325 by Nara Pamplona
Tube Gabry-woman-566
Tube DBK-ACCESORY_024 by Katrina
Tube ket-varios-003 by Ket-Mexico
Imagen carralage1-by-helenem
(you find here the links to the material authors' sites)
Plugins
consult, if necessary, my filter section here
Filters Unlimited 2.0 here
DC Special - Crystal here
Xero - Fritillary here
Filters DC Special can be used alone or imported into Filters Unlimited.
(How do, you see here)
If a plugin supplied appears with this icon  it must necessarily be imported into Unlimited it must necessarily be imported into Unlimited

You can change Blend Modes according to your colors.
1. Open a new transparent image 1000 x 600 pixels.
2. Set your foreground color to #b47b22,
and your background color to #f2fafc.

Flood Fill  the transparent image with your foreground color. the transparent image with your foreground color.
3. Open the tube Ketacuarela2014006 and go to Edit>Copy.
Go back to your work and go to Edit>Paste as new layer.
4. Effects>Image Effects>Seamless Tiling, default settings.

5. Adjust>Blur>Motion Blur.
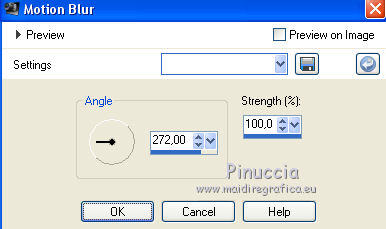
6. Effects>Plugins>Xero - Fritillary.
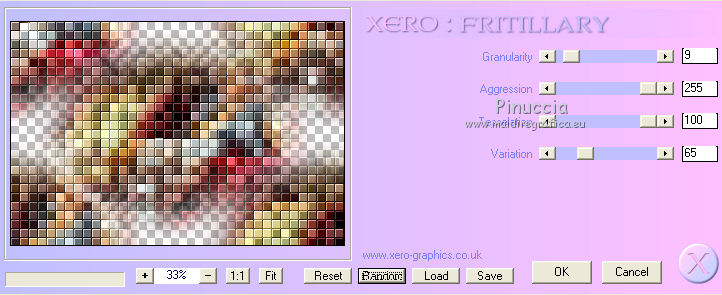
7. Effects>Plugins>DC Special - Crystal.
attention, please, the effect used in this tutorial is differente from the effect normally found in the DC Special filter.
attention l'effet utilisé dans ce tutoriel est une manipulation de l'effet original.
I added in the materiale the effect used, to import in Filters Unlimited 2.0 .

8. Edit>Paste as new layer (the tube ketacuarela2014006 is always in memory)
Image>Resize, to 80%, resize all layers not checked.
9. Layers>New Raster Layer.
Flood Fill  the layer with your background color #f2fafc. the layer with your background color #f2fafc.
10. Selections>Select All.
Selections>Modify>Contract - 5 pixels.
Press CANC on the keyboard 
Selections>Select None.
11. Layers>Merge>Merge visible.
12. Image>Resize, to 80%, resize all layers not checked.
13. Adjust>Brightness and Contrast>Brightness and Contrast>Clarify until PSPX2, Local Tone Mapping after PSPX3.
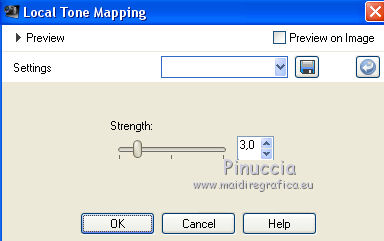
14. Image>Canvas Size - 1000 x 750 pixels.
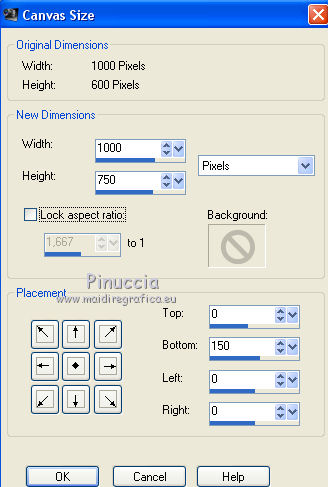
15. Layers>New Raster Layer.
Layers>Arrange>Send to Bottom.
Set your foreground color to #5a0000

Flood Fill  the layer with your foreground color #5a0000. the layer with your foreground color #5a0000.
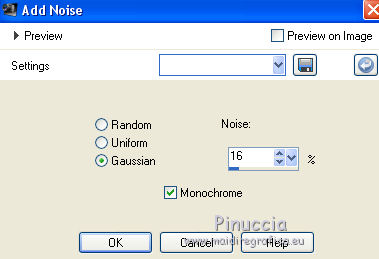
16. Adjust>Add/Remove Noise>Add Noise.
17. Selections>Select All.
18. Layers>New Raster Layer.
Open the image carralage 1-by-helenem, erase the watermark and go to Edit>Copy.
Go back to your work and go to Edit>Paste into selection.
Selections>Select None.
Change the Blend Mode of this layer to Hard Light.
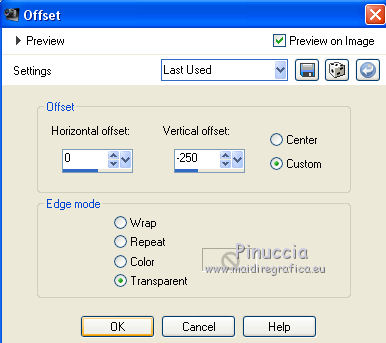
19. Effects>Image Effects>Offset.
20. Activate your top layer.
Open the tube NP-1325 and go to Edit>Copy.
Go back to your work and go to Edit>Paste as new layer.
Image>Resize, 1 time to 80% and 1 time to 90%, resize all layers not checked.
Move  the tube to the left side. the tube to the left side.
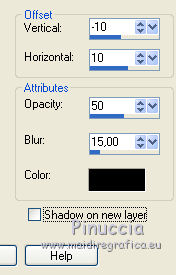
21. Effects>3D Effects>Drop Shadow, color black.
22. Open the tube Gabry-woman-566 and go to Edit>Copy.
Go back to your work and go to Edit>Paste as new layer.
Move  the tube to the right side. the tube to the right side.
Effects>3D Effects>Drop Shadow, same settings.
25. Open the tube DBK ACCESORY_024 and go to Edit>Copy.
Go back to your work and go to Edit>Paste as new layer.
Image>Resize, 2 times to 50%, resize all layers not cheched.
Effects>3D Effects>Drop Shadow, same settings.
Move  the tube at the bottom left, next to the woman. the tube at the bottom left, next to the woman.
26. Open the tube ket-varios003 and go to Edit>Copy.
Go back to your work and go to Edit>Paste as new layer.
Image>Resize, 1 time to 50% and 1 time to 60%, resize all layers not checked.
Effects>3D Effects>Drop Shadow, same settings.
Move  the tube at the bottom right, next to the woman. the tube at the bottom right, next to the woman.
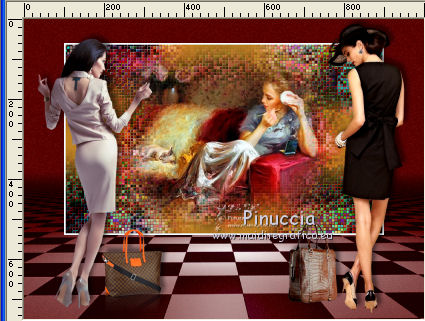
27. Layers>Merge>Merge All.
28. Image>Add borders, 2 pixels, symmetric, color black.
29. Sign your work and save as jpg.
 Your versions here Your versions here

If you have problems or doubts, or you find a not worked link, or only for tell me that you enjoyed this tutorial, write to me.
31 May 2021
|


