|
TOP 3D ACUARIO


This tutorial was translated with PSPX7 but it can also be made using other versions of PSP.
Since version PSP X4, Image>Mirror was replaced with Image>Flip Horizontal,
and Image>Flip with Image>Flip Vertical, there are some variables.
In versions X5 and X6, the functions have been improved by making available the Objects menu.
In the latest version X7 command Image>Mirror and Image>Flip returned, but with new differences.
See my schedule here
 French translation here French translation here
 Your versions ici Your versions ici
For this tutorial, you will need:
Material
here
Tube Little_girl_CibiBijoux
Tube Ecoliere_CibiBijoux
Tube 7-2013 baby by Roby2765
Tube lunapaisagem6316 by Luna
Tube poisson_3 by Thafs
Tube poisson_2 by Thafs
Narah_mask_0243
Gotas agua 1/2 by nines
Patron oro
Textura Brick wall
(you find here the links to the material authors' sites)
Plugins
consult, if necessary, my filter section here
Filters Unlimited 2.0 here
Toadies - 3D Checkers here
Mura's Meister - Perspective Tiling here
Filters Toadies can be used alone or imported into Filters Unlimited.
(How do, you see here)
If a plugin supplied appears with this icon  it must necessarily be imported into Unlimited it must necessarily be imported into Unlimited

You can change Blend Modes according to your colors.
In the newest versions of PSP, you don't find the foreground/background gradient (Corel_06_029).
You can use the gradients of the older versions.
The Gradient of CorelX here
The texture Brick Wall or Corel_15_032 is standard in PSP.
If you don't find it in your PSP, copy the supplied texture in the Textures Folder.
Open the mask and the golden pattern in PSP and minimize them with the rest of the material.
1. Open a new transparent image 500 x 600 pixels.
2. Set your foreground color to Pattern and, under the Open Images, select the golden pattern.
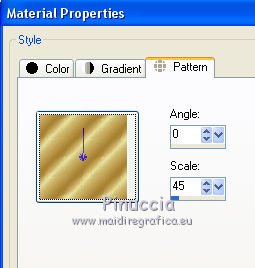
Flood Fill  the transparent image with the golden pattern. the transparent image with the golden pattern.
3. Effects>Plugins>Filters Unlimited 2.0 - Buttons & Frames - 3D Glass Frame.
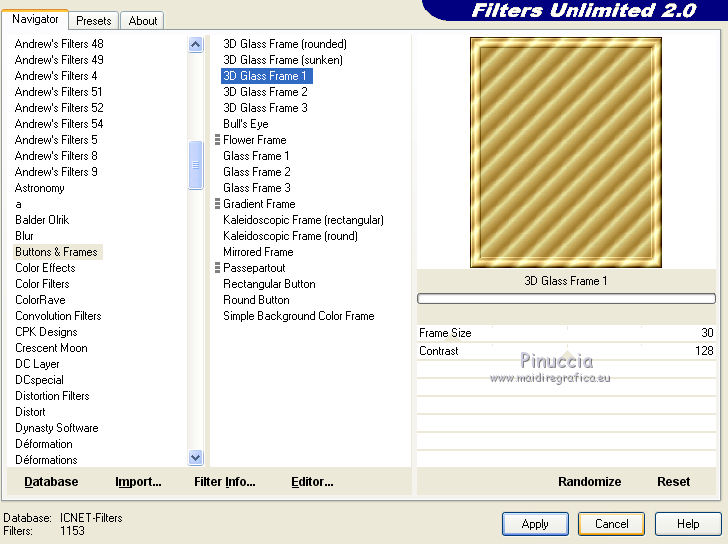
4. Selections>Select All.
Selections>Modify>Contract - 30 pixels.
Press CANC on the keyboard 
Keep selected.
5. Set your foreground color to #738361,
and your background color to #446568.
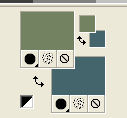
Set your foreground color to a Foreground/Background Gradient, style Linear.
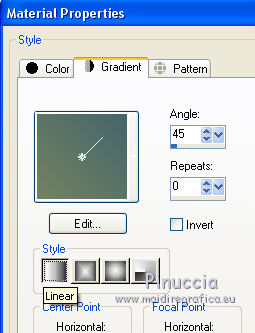
Layers>New Raster Layer.
Flood Fill  the layer with your gradient. the layer with your gradient.
6. Layers>New Raster Layer.
Open the tube lunapaisagem-6316 and go to Edit>Copy.
Go back to your work and go to Edit>Paste into selection.
Selections>Select None.
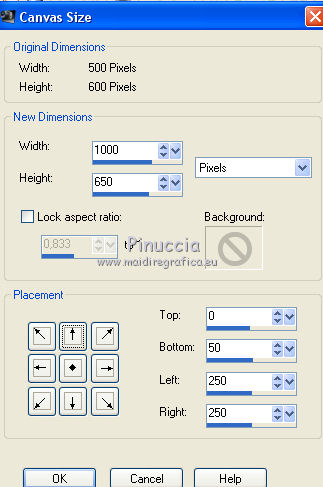
7. Image>Canvas Size - 1000 x 650 pixels.
8. Layers>New Raster Layer.
Layers>Arrange>Send to Bottom.
Set your foreground color to #adb399.
Flood Fill  the layer with your foreground color #adb399. the layer with your foreground color #adb399.
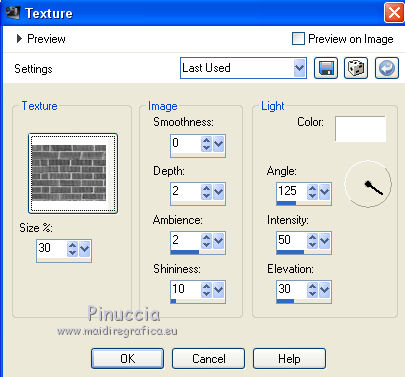
9. Effects>Texture Effects>Texture - select the texture Brick Wall or Corel_15_032.
10. Set your foreground color to #1b7832.
Layers>New Raster Layer.
Flood Fill  the layer with your foreground color #1b7832. the layer with your foreground color #1b7832.
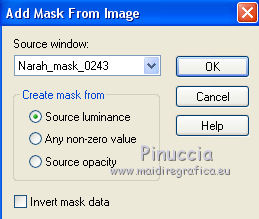
11. Calques>Nouveau calque de masque>A partir d'une image.
Ouvrir le menu deroulant sous la fenêtre d'origine et vous verrez la liste des images ouvertes.
Sélectionner le masque Narah_mask_0243.
Layers>Merge>Merge Group.
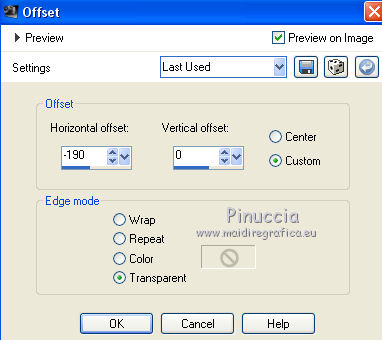
12. Effects>Image Effects>Offset.
13. Layers>Duplicate.
Image>Mirror.
14. Layers>Merge>Merge visible.
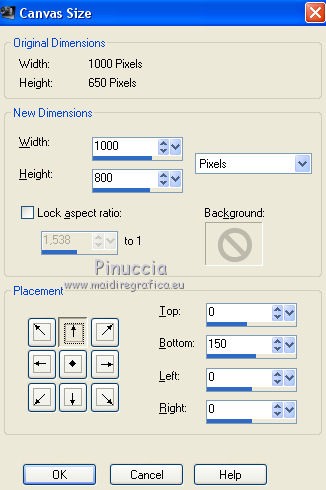
15. Image>Canvas Size - 1000 x 800 pixels.
16. Set your foreground color to black.
Layers>New Raster Layer.
Flood Fill  the layer with color black. the layer with color black.
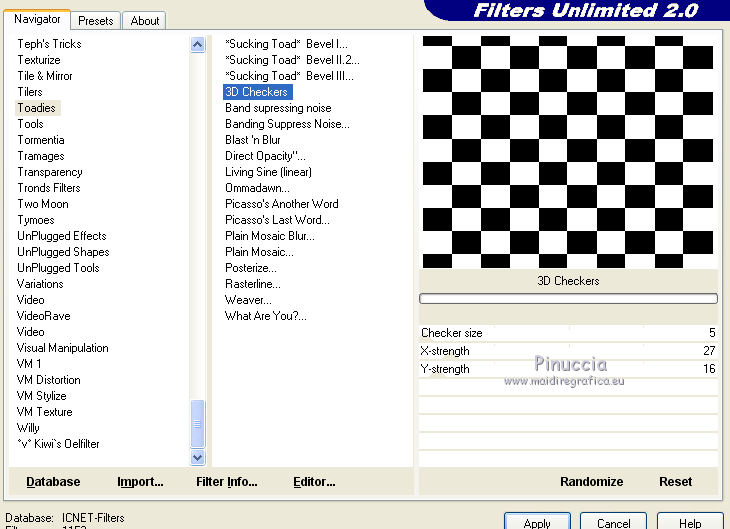
17. Effects>Plugins>Toadies - 3D Checkers.
18. Effects>Plugins>Mura's Meister - Perspective Tiling.

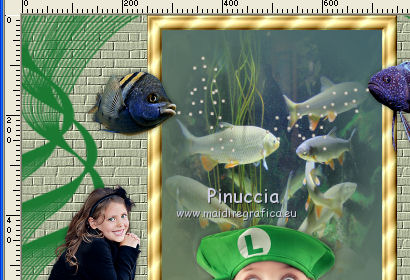
19. Open the tube Little-girl_CibiBijoux and go to Edit>Copy.
Go back to your work and go to Edit>Paste as new layer.
Image>Resize, to 80%, resize all layers not checked.
Move  the tube at the bottom left. the tube at the bottom left.
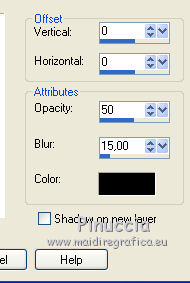
20. Effects>3D Effects>Drop Shadow, color black.
21. Open the tube Ecoliere_CibiBijoux and go to Edit>Copy.
Go back to your work and go to Edit>Paste as new layer.
Image>Resize, 2 times to 80%, resize all layers not checked.
Image>Mirror.
Move  the tube at the bottom right. the tube at the bottom right.
Effects>3D Effects>Drop Shadow, same settings.
22. Open the tube 7-2013 Baby by Roby-2765 and go to Edit>Copy.
Go back to your work and go to Edit>Paste as new layer.
Image>Resize, 3 times to 80%, resize all layers not checked.
Move  the tube down at the center. the tube down at the center.
Effects>3D Effects>Drop Shadow, same settings.
23. Open the tube poisson_3_by_Thafs and go to Edit>Copy.
Go back to your work and go to Edit>Paste as new layer.
Image>Resize, 5 times to 80%, resize all layers not checked.
Image>Mirror.
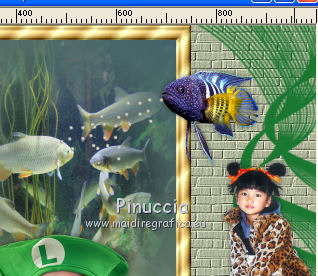
Move  the tube at the upper right, see my example. the tube at the upper right, see my example.
Effects>3D Effects>Drop Shadow, same settings.
24. Open the tube gotas agua 1 by nines and go to Edit>Copy.
Go back to your work and go to Edit>Paste as new layer.
Place  the tube on the fish's mouth. the tube on the fish's mouth.
25. Open the tube poisson_2_by_Thafs and go to Edit>Copy.
Go back to your work and go to Edit>Paste as new layer.
Image>Resize, 6 times to 80%, resize all layers not checked.
Move  the tube at the upper left, see my example. the tube at the upper left, see my example.
Effects>3D Effects>Drop Shadow, same settings.
26. Open the tube gotas agua 2 by Nines and go to Edit>Copy.
Go back to your work and go to Edit>Paste as new layer.
Place  the tube on the fish's mouth. the tube on the fish's mouth.
27. Sign your work on a new layer.
Image>Add borders, 2 pixels, symmetric, color black.
Save as jpg.
 Your versions here Your versions here

If you have problems or doubts, or you find a not worked link, or only for tell me that you enjoyed this tutorial, write to me.
14 May 2021
|


