|
TAG WOLVES
 ENGLISH VERSION ENGLISH VERSION


This tutorial was translated with PSPX7 but it can also be made using other versions of PSP.
Since version PSP X4, Image>Mirror was replaced with Image>Flip Horizontal,
and Image>Flip with Image>Flip Vertical, there are some variables.
In versions X5 and X6, the functions have been improved by making available the Objects menu.
In the latest version X7 command Image>Mirror and Image>Flip returned, but with new differences.
See my schedule here
French translation here
Your versions ici
For this tutorial, you will need:
Material
here
Tube cickadesingn-pi-378
Tube MKM 2013 MARCH SERIES WOLVES_T2
Misted paysghiver24-coly
tube c718c82
mascara 78e2ed7931
(you find here the links to the material authors' sites)
Plugins
consult, if necessary, my filter section here
Mura's Meister - Perspective Tiling here
VDL Adrenaline - Snowflakes here

You can change Blend Modes according to your colors.
In the newest versions of PSP, you don't find the foreground/background gradient (Corel_06_029).
You can use the gradients of the older versions.
The Gradient of CorelX here
Copy the Selection in the Selections Folder.
Open the mask in PSP and minimize it with the rest of the material.
1. Open a new transparent image 900 x 600 pixels.
2. Set your foreground color to #96adc2,
and your background color to #0b567e.

Set your foreground color to a Foreground/Background Gradient, style Sunburst.
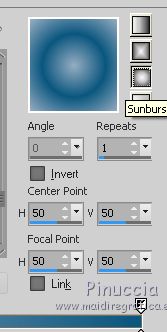
Flood Fill  the transparent image with your Gradient. the transparent image with your Gradient.
3. Layers>New Raster Layer.
Set your foreground color to #ffffff.
Flood Fill  the layer with color #ffffff. the layer with color #ffffff.
4. Layers>New Mask layer>From image
Open the menu under the source window and you'll see all the files open.
Select the mask 78e2ed7931.
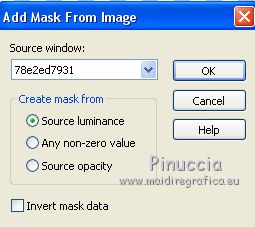
Layers>Merge>Merge Group.
5. Effects>Edge Effects>Enhance More.
6. Selections>Load/Save Selection>Load Selection from Disk.
Look for and load the selection sel.50wolves.nines.
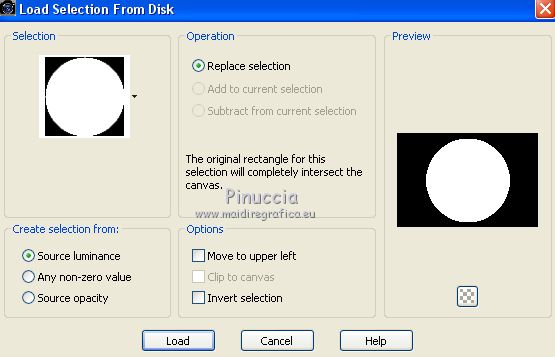
7. Set again your foreground color to #96adc2,

and change the settings of your gradient, style Linear.
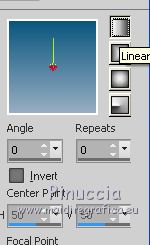
Layers>New Raster Layer.
Flood Fill  the selection with your Gradient. the selection with your Gradient.
Keep selected.
8. Open the tube paysghiver24-coly, erase the watermark and go to Edit>Copy.
Go back to your work and go to Edit>Paste into Selection.
Selections>Select None.
9. Effects>3D Effects>Drop Shadow, color #000000.

10. Open the tube MKM 2013 MARCH SERIES WOLVES_T2 and go to Edit>Copy.
Go back to your work and go to Edit>Paste as new layer.
Image>Resize, 2 times to 70% and 1 time to 90%, resize all layers not checked.
Place  the tube in the circle. the tube in the circle.

11. Layers>Merge>Merge visible.
12. Selections>Load/Save Selection>Load Selection from Disk.
Load again the selection sel.50wolves.nines.

13. Layers>Duplicate - 2 times
and rename the layers wolf 1, wolf 2 et wolf 3.
14. Activate the layer wolf 1.
Effects>Plugins>VDL Adrenaline - Snowflakes
if you use the new version of this plugin (the result doesn't change):
VanDerLee - Snowflakes

15. Activate the layer wolf 2.
Effects>Plugins>VDL Adrenaline - Snowflakes - Random Seed 60 and ok

Close this layer and activate the layer wolf 3.
16. Effects>Plugins>VDL Adrenaline - Snowflakes - Random Seed 70 and ok

Close this layer.
17. Layers>New Raster Layer.
Flood Fill  the layer with the Gradient Linear. the layer with the Gradient Linear.
18. Effects>Texture Effects>Weave
weave color #0b567e;
gap color #96adc2.
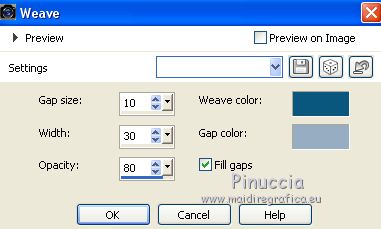
19. Image>Canvas Size - 900 x 700 pixels.
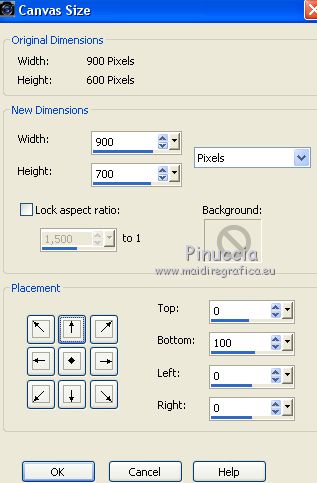
20. Effects>Plugins>Mura's Meister - Perspective Tiling.

21. Activate your Magic Wand Tool  , feather 20 , feather 20

Click on the transparent part to select it.
Press 3 times CANC on the keyboard 
Selections>Select None.
22. Open the tube c718c82 and go to Edit>Copy.
Go back to your work and go to Edit>Paste as new layer.
Image>Resize, to 80%, resize all layers not checked.
Move  the tube at the bottom left. the tube at the bottom left.
23. Effects>3D Effects>Drop Shadow, same settings.

24. Open the tube cickadesingn-pi-378, erase the watermark and go to Edit>Copy.
Go back to your work and go to Edit>Paste as new layer.
Image>Mirror.
Image>Resize, 1 time to 80% and 1 time to 90%, resize all layers not checked.
Move  the tube to the right side. the tube to the right side.
25. Effects>3D Effects>Drop Shadow, same settings.

26. Layers>New Raster Layer.
Flood Fill  with your background color #0b567e. with your background color #0b567e.
27. Selections>Selectionner All.
Selections>Modify>Contract - 3 pixels.
Press CANC on the keyboard.
28. Set your foreground color to Color.
Flood Fill  with your foreground color #96adc2. with your foreground color #96adc2.
Selections>Modify>Contract - 5 pixels.
Press CANC on the keyboard.
29. Flood Fill  with your background color #0b567e. with your background color #0b567e.
Selections>Modify>Contract - 2 pixels.
Press CANC on the keyboard.
Selections>Select None.
30. Sign your work on a new layer.
Keep this layer selected.
The layer wolf 1 is open.
The layers wolf 2 and 3 are close
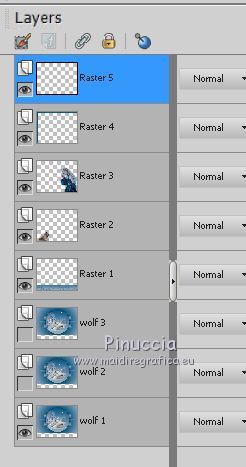
31. Edit>Copy Special>Copy Merged.
Open Animation Shop and go to Edit>Paste>Paste as new image.
32. Go back to PSP.
Close the layer wolf 1 and open the layer wolf 2.
Edit>Copy Special>Copy Merged.
Go back to Animation Shop and Edit>Paste>Paste after the current frame.
33. Go back to PSP.
Close the layer wolf 2 and open the layer wolf 3.
Edit>Copy Special>Copy Merged.
Go back to Animation Shop and Edit>Paste>Paste after the current frame.
34. Check your result clicking on View  and save as gif. and save as gif.
Your versions here

If you have problems or doubts, or you find a not worked link, or only for tell me that you enjoyed this tutorial, write to me.
5 January 2020
|
 ENGLISH VERSION
