|
TAG BEAU VISAGE
 ENGLISH VERSION ENGLISH VERSION


This tutorial was translated with PSPX7 but it can also be made using other versions of PSP.
Since version PSP X4, Image>Mirror was replaced with Image>Flip Horizontal,
and Image>Flip with Image>Flip Vertical, there are some variables.
In versions X5 and X6, the functions have been improved by making available the Objects menu.
In the latest version X7 command Image>Mirror and Image>Flip returned, but with new differences.
See my schedule here
French translation here
Your versions ici
For this tutorial, you will need:
Material
here
beau_visage_tubed_by_thafs
75_mist_exclusif_paysage_animabelle
Narah_Mask_1420
Narah_Mask_1391
seleccion sel.322.nines
Texto Beau_Visage_nines
(you find here the links to the material authors' sites)
Plugins
consult, if necessary, my filter section here
Filters Unlimited 2.0 here
Photo Aging Kit (to import in Unlimited) herei

You can change Blend Modes according to your colors.
Copy the preset Emboss 3 in the Presets Folder.
Copy the selection in the Selections Folder.
Open the masks in PSP and minimize them with the rest of the material.
1. Open a new transparent image 950 x 700 pixels.
2. Set your foreground color to #2d4b80,
et your background color to #c8dffc.

Flood Fill  the transparent image with your foreground color #2d4b80. the transparent image with your foreground color #2d4b80.
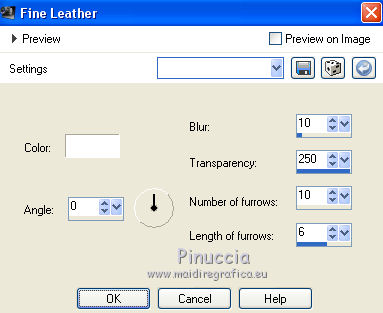
3. Effects>Texture Effects>Fine Leather - color #ffffff.
4. Open the tube 75_mist_exclusif_paysage_animabelle and go to Edit>Copy.
Go back to your work and go to Edit>Paste as new layer.
Change the Blend Mode of this layer to Luminance (legacy)
5. Layers>New Raster Layer.
Flood Fill  with your background color #c8dffc. with your background color #c8dffc.
6. Layers>New Mask layer>From image
Open the menu under the source window and you'll see all the files open.
Select the mask Narah_Mask_1420
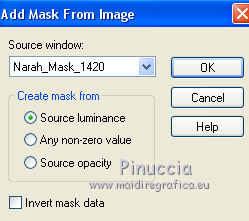
Layers>Merge>Merge group.
7. Effects>User Defined Filter - select the preset Emboss 3 and ok.

8. Set your foreground color to #ffffff.
Layers>New Raster Layer.
Flood Fill  with color #ffffff. with color #ffffff.
9. Layers>New Mask layer>From image
Open the menu under the source window
and select the mask Narah_Mask_1391
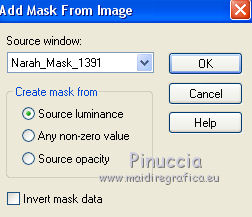
Layers>Merge>Merge group.
10. Effects>Image Effects>Seamless Tiling, default settings.

11. Reduce the opacity of this layer to 70%.
12. Open the tube beau_visage_tubed_by_thafs, erase the watermark and go to Edit>Copy.
Go back to your work and go to Edit>Paste as new layer.
Image>Resize, to 80%, resize all layers not checked.
Image>Mirror.
Move  the tube to the left side. the tube to the left side.
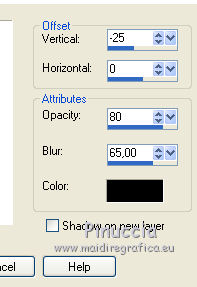
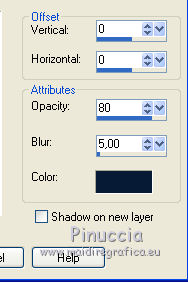
13. Effects>3D Effects>Drop Shadow, color #081b36.
14. Layers>Merge>Merge visible.
15. Edit>Copy.
16. Selections>Load/Save Selection>Load Selection from Disk.
Look for and load the selection sel.322.nines.
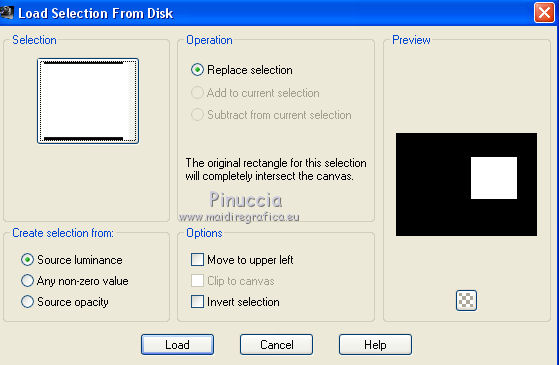
17. Layers>New Raster Layer.
Edit>Paste into Selection (the image of step 15).
Selections>Select None.
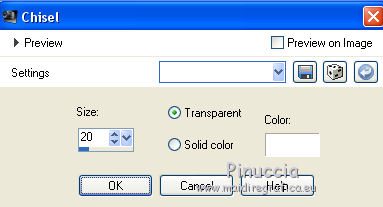
18. Effects>3D Effects>Chisel, color #ffffff.
19. Effects>3D Effects>Drop Shadow, color #081b36.
20. Open the text Beau_Visage_nines, erase the watermark and go to Edit>Copy.
Go back to your work and go to Edit>Paste as new layer.
Move  the text at the bottom right. the text at the bottom right.
21. Layers>Merge>Merge All.
22. Image>Add borders, 2 pixels, symmetric, color #081b36.
Image>Add borders, 30 pixels, symmetric, color #cfe9ff.
23. Activate your Magic Wand Tool 
and click on the 30 pixels border to select it.
24. Set your background color to a color at your choice (for me the dark color #2d4b80).
Effects>Plugins>Filters Unlimited 2.0 - Photo Aging Kit - Photo Frame 01.

Selections>Select None.
25. Activate your Magic Wand Tool  with this settings with this settings

and click on the black border to select it.

Press 2 times CANC on the keyboard 
and the border will get your background color.

Selections>Select None.
26. Image>Resize, to 98%, resize all layers checked.
27. Sign your work and save as jpg.
Version with tube de Beatriz

Your versions here

If you have problems or doubts, or you find a not worked link, or only for tell me that you enjoyed this tutorial, write to me.
4 September 2019
|
 ENGLISH VERSION
