|
TAG VALENTINES
 ENGLISH VERSION ENGLISH VERSION


This tutorial was translated with PSPX7 but it can also be made using other versions of PSP.
Since version PSP X4, Image>Mirror was replaced with Image>Flip Horizontal,
and Image>Flip with Image>Flip Vertical, there are some variables.
In versions X5 and X6, the functions have been improved by making available the Objects menu.
In the latest version X7 command Image>Mirror and Image>Flip returned, but with new differences.
See my schedule here
French translation here
Your versions ici
For this tutorial, you will need:
Material
here
Tube dessinfem41-coly by Colybrix
visage homme 2 by Lily
Narah_Mask_1513
Tube mini_corazon_nines
Corner HearAssorted
(you find here the links to the material authors' sites)
Plugins
consult, if necessary, my filter section here
Filters Unlimited 2.0 here
VM Natural - Splash here
VM Distortion - Circulator, Gear here
AP Lines - Lines SilverLining here
Alien Skin Snap Art - Oil Paint here
AAA Frames - Foto Frame here
Filters VM Natural and VM Distortion can be used alone or imported into Filters Unlimited.
(How do, you see here)
If a plugin supplied appears with this icon  it must necessarily be imported into Unlimited it must necessarily be imported into Unlimited

You can change Blend Modes according to your colors.
In the newest versions of PSP, you don't find the foreground/background gradient (Corel_06_029).
You can use the gradients of the older versions.
The Gradient of CorelX here
Open the mask in PSP and minimize it with the rest of the material.
1. Open a new transparent image 900 x 600 pixels.
2. Set your foreground color to #d2a95c,
and your background color to #63295c.

Set your foreground color to a Foreground/Background Gradient, style Rectangular.

Flood Fill  the transparent image with your Gradient. the transparent image with your Gradient.
3. Layers>Duplicate.
4. Effects>Plugins>VM Distortion - Circulator.

5. Effects>Plugins>VM Distorion - Gear.

6. Effects>Plugins>AP Lines - Lines SilverLining.

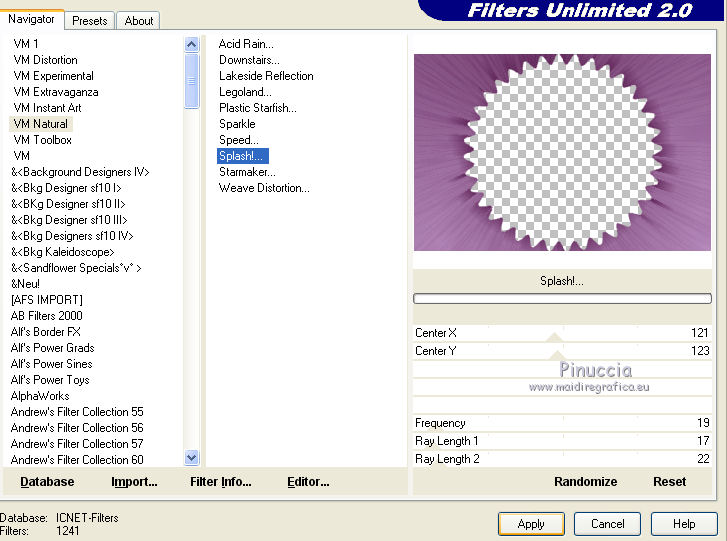
7. Effects>Plugins>VM Natural - Splash

8. Effets>Effets 3D>Ombre portée, couleur #000000.

9. Activate your bottom layer.
Open the tube visage homme2 by Lily, erase the watermark and go to Edit>Copy.
Go back to your work and go to Edit>Paste as new layer.
Place  rightly the tube. rightly the tube.
Change the Blend Mode of this layer to Soft Light.
10. Set your foreground color to #ffffff.
Layers>New Raster Layer.
Flood Fill  the layer with color #ffffff. the layer with color #ffffff.
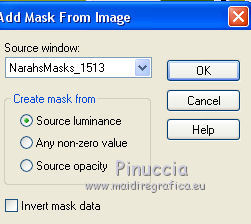
11. Layers>New Mask layer>From image
Open the menu under the source window and you'll see all the files open.
Select the mask Narah_Mask_1513.

Layers>Merge>Merge Group.
12. Open the tube dessinfem41-coly, erase the watermark and go to Edit>Copy.
Go back to your work and go to Edit>Paste as new layer.
Image>Resize, to 80%, resize all layers not checked.
Move  the tube to the right side. the tube to the right side.
13. Effects>3D Effects>Drop Shadow, color #9f53a5.

15. Open the tube mini_corazon_nines and go to Edit>Copy.
Go back to your work and go to Edit>Paste as new layer.
Place  the heart on the girl's hand. the heart on the girl's hand.

Change the Blend Mode of this layer to Hard Light, or other (I made Burn).
16. Layers>Merge>Merge All.
17. Image>Add borders, 2 pixels, symmetric, background color #63295c.
18. Edit>Copy.
19. Image>Add borders, 50 pixels, symmetric, color #ffffff.
Activate your Magic Wand Tool 
and click on this border to select it.
Edit>Paste into Selection.
I joined: Adjust>Blur>Gaussian Blur - radius 20

20. Effects>Plugins>Alien Skin Snap Art - Oil Paint

I joined: Selections>Promote Selection to layer
and I changed the Blend Mode to Multiply.
Layers>Merge>Merge down.
See your, according to your colors
21. Selections>Invert.
Effects>3D Effects>Drop Shadow, color #000000.

Selections>Select None.
22. Effects>Plugins>AAA Frames - Foto Frame.

23. Open HearAssorted and go to Edit>Copy.
Go back to your work and go to Edit>Paste as new layer.
24. Sign your work on a new layer.
Layers>Merge>Merge All.
25. Image>Add borders, 2 pixels, symmetric, background color #63295c.
Save as jpg.
Your versions here

If you have problems or doubts, or you find a not worked link, or only for tell me that you enjoyed this tutorial, write to me.
30 January 2020
|
 ENGLISH VERSION
