|
TAG BLACK ME
 ENGLISH VERSION ENGLISH VERSION


This tutorial was translated with PSPX7 but it can also be made using other versions of PSP.
Since version PSP X4, Image>Mirror was replaced with Image>Flip Horizontal,
and Image>Flip with Image>Flip Vertical, there are some variables.
In versions X5 and X6, the functions have been improved by making available the Objects menu.
In the latest version X7 command Image>Mirror and Image>Flip returned, but with new differences.
See my schedule here
French translation here
Your versions ici
For this tutorial, you will need:
Material
here
Tube femme VSP97 by Valy
DBK AA Decor-242
krysmistafrique2017-014
CAL-1833-040617
Mask_20_GB_2019
(you find here the links to the material authors' sites)
Plugins
consult, if necessary, my filter section here
Alien Skin Eye Candy 5 Impact - Glass, Motion Trail here

You can change Blend Modes according to your colors.
Copy the preset Emboss 3 in the Presets Folder.
Copy the Selections in the Selections Folder.
Open the mask in PSP et le minimiser avec le reste du matériel.
1. Open a new transparent image 900 x 600 pixels.
2. Set your foreground color to #241f25,
and your background color to #ffffff.

Flood Fill  the transparent image with your foreground color #241f25. the transparent image with your foreground color #241f25.
3. Layers>New Raster Layer.
Flood Fill  with your background color #ffffff. with your background color #ffffff.
4. Layers>New Mask layer>From image
Open the menu under the source window and you'll see all the files open.
Select the mask Mask_20_GB_2019.
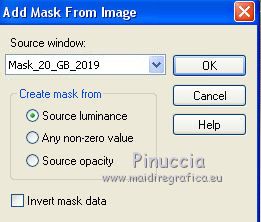
Layers>Merge>Merge Group.
5. Effects>User Defined Filter - select the preset Emboss 3 and ok.

6. Keep the mask's layer selected.
Selections>Load/Save Selection>Load Selection from Disk.
Look for and load the selection sel.326.1.nines
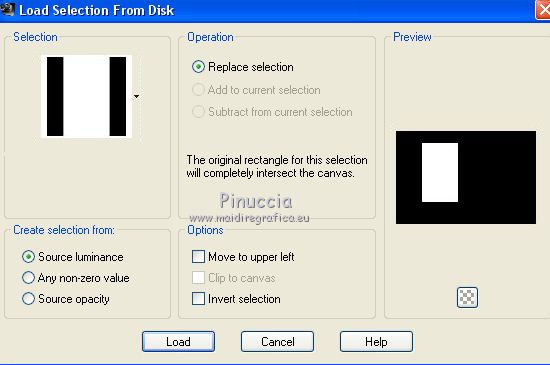
Press CANC on the keyboard 
Keep selected.
7. Layers>New Raster Layer.
Open the tube DBK AA Decor-242 and go to Edit>Copy.
Go back to your work and go to Edit>Paste into Selection.
Selections>Select None.
8. Activate again the mask's layer.
Selections>Load/Save Selection>Load Selection from Disk.
Look for and load the selection sel.326.2.nines
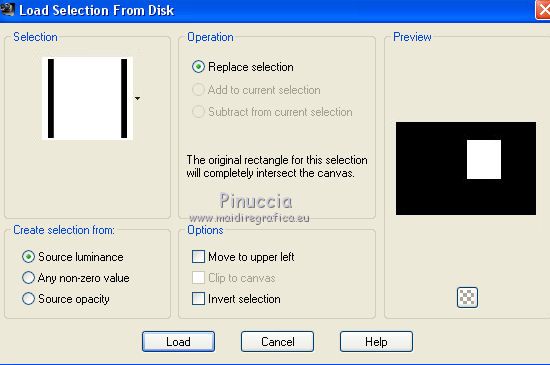
Press CANC on the keyboard 
Keep selected.
9. Layers>New Raster Layer.
Open the tube krysmistafrique2017-014, erase the watermark and go to Edit>Copy.
Go back to your work and go to Edit>Paste into Selection.
Selections>Select None.
10. Activate your bottom layer.
Selections>Load/Save Selection>Load Selection from Disk.
Look for and load the selection sel.326.nines
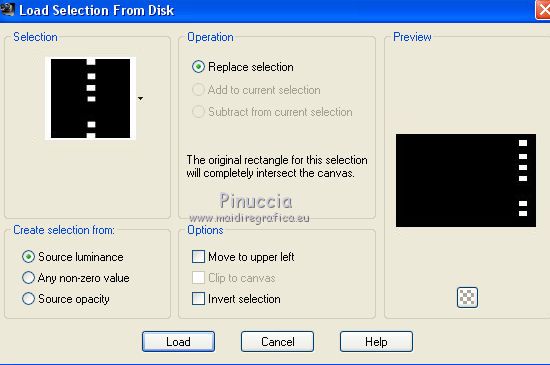
Selections>Promote Selection to layer.
Keep selected.
11. Effects>Plugins>Alien Skin Eye Candy 5 Impact - Glass.

Selections>Select None.
12. Effects>3D Effects>Drop Shadow, color #ffffff.
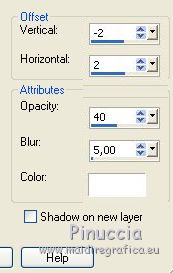
13. Image>Mirror.
Effects>Plugins>Alien Skin Eye Candy 5 Impact - Motion Trail.

Change the Blend Mode of this layer to Screen.
14. Layers>Dupliquer.
Image>Mirror.

15. Activate your top layer.
Open the tube CAL-1833-040617, erase the watermark and go to Edit>Copy.
Go back to your work and go to Edit>Paste as new layer.
Image>Resize, to 80%, resize all layers not checked.
Move  the tube down. the tube down.

16. Effects>3D Effects>Drop Shadow, color #000000.
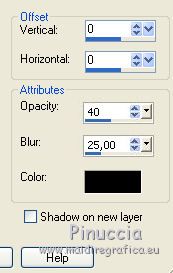
17. Layers>Merge>Merge All.
18. Image>Add borders, 2 pixels, symmetric, color #262127.
Image>Ajouter des bordures, 10 pixels, symétrique, couleur #ffffff.
Image>Ajouter des bordures, 30 pixels, symétrique, couleur #262127.
19. Open the tube femme VSP97, erase the watermark and go to Edit>Copy.
Go back to your work and go to Edit>Paste as new layer.
Image>Resize, 1 time to 80% and 1 time to 90%, resize all layers not checked.
Image>Mirror.
Move  the tube to the right side. the tube to the right side.
20. Effects>3D Effects>Drop Shadow, color #000000.

21. Layers>Merge>Merge All.
22. Image>Add borders, 2 pixels, symmetric, color #dbd13d.
Image>Add borders, 2 pixels, symmetric, color #15a0f9.
Image>Add borders, 5 pixels, symmetric, color #901440.
23. Sign your work and save as jpg.
Version with tube by Thafs

Your versions here

If you have problems or doubts, or you find a not worked link, or only for tell me that you enjoyed this tutorial, write to me.
15 Octobre 2019
|
 ENGLISH VERSION
