|
TAG THE ROOM
 ENGLISH VERSION ENGLISH VERSION


This tutorial was translated with PSPX7 but it can also be made using other versions of PSP.
Since version PSP X4, Image>Mirror was replaced with Image>Flip Horizontal,
and Image>Flip with Image>Flip Vertical, there are some variables.
In versions X5 and X6, the functions have been improved by making available the Objects menu.
In the latest version X7 command Image>Mirror and Image>Flip returned, but with new differences.
See my schedule here
French translation here
Your versions ici
For this tutorial, you will need:
Material
here
Tube FA0012 by Isa
lunapaisagem4175
Tube romantic_illusion_molemina_el (40)
Narah_Mask_1426
(you find here the links to the material authors' sites)
Plugins
consult, if necessary, my filter section here
Filters Unlimited 2.0 here
Carolaine and Sensibility - CS-HLines here
FM Tile Tools - Saturation Emboss here
Simple - Diamonds here

You can change Blend Modes according to your colors.
Open the mask in PSP et le minimiser avec le reste du matériel.
1. Open a new transparent image 900 x 600 pixels.
2. Set your foreground color to #b66611,
and your background color to #faf6e2.

Flood Fill  the transparent image with your foreground color #b66611. the transparent image with your foreground color #b66611.
3. Effects>Plugins>Filters Unlimited 2.0 - Paper Texture - Canvas size

4. Open the tube lunapaisagem4175 and go to Edit>Copy.
Go back to your work and go to Edit>Paste as new layer.
Change the Blend Mode of this layer to Hard Light.
5. Layers>New Raster Layer.
Flood Fill  with your background color #faf6e2. with your background color #faf6e2.
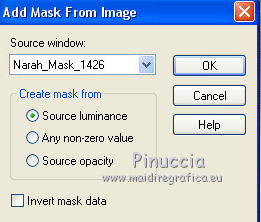
6. Layers>New Mask layer>From image
Open the menu under the source window and you'll see all the files open.
Select the mask Narah_Mask_1426

Layers>Merge>Merge group.
7. Effects>Plugins>Carolaine and Sensibility - CS-HLines.

8. Adjust>Sharpness>Sharpen More.
9. Effects>Geometric Effects>Skew.

10. Layers>Duplicate.
Image>Mirror.
11. Layers>Merge>Merge Down.
12. Effects>Plugins>FM Tile Tools - Saturation Emboss, default settings.

13. Layers>Merge>Merge All.
14. Image>Add borders, 2 pixels, symmetric, foreground color #b66611.
Image>Add borders, 40 pixels, symmetric, background color #faf6e2.
15. Activate your Magic Wand Tool 
and click on the 40 pixels' border to select it.
16. Effects>Plugins>Simple - Diamonds.
17. Adjust>Blur>Gaussian Blur - radius 15.

18. Selections>Invert.
Effects>3D Effects>Drop Shadow, color #000000.

Selections>Select None.
19. Selections>Select All.
Select>Modify>Contract - 20 pixels.
20. Effects>3D Effects>Drop Shadow, color #000000.

21. Selections>Invert.
Effects>Texture Effects>Weave
Weave Color: foreground color #b66611
Gap Color: background color #faf6e2.

Selections>Select None.
22. Open the tube flor romantic_illusion_molemina and go to Edit>Copy.
Go back to your work and go to Edit>Paste as new layer.
Move  the tube in the angle at the upper left. the tube in the angle at the upper left.

23. Open the tube FA0012 by Isa and go to Edit>Copy.
Go back to your work and go to Edit>Paste as new layer.
Image>Mirror.
Move  the tube at the bottom right. the tube at the bottom right.
24. Effects>3D Effects>Drop Shadow, color #000000.

25. Layers>Merge>Merge All.
26. Image>Add borders, 2 pixels, symmetric, foreground color #b66611.
27. Sign your work and save as jpg.
Version with tubes by Mina and Luz Cristina

Your versions here

If you have problems or doubts, or you find a not worked link, or only for tell me that you enjoyed this tutorial, write to me.
4 Octobre 2019
|
 ENGLISH VERSION
