|
TAG MANU CARRASCO


This tutorial was translated with PSPX7 but it can also be made using other versions of PSP.
Since version PSP X4, Image>Mirror was replaced with Image>Flip Horizontal,
and Image>Flip with Image>Flip Vertical, there are some variables.
In versions X5 and X6, the functions have been improved by making available the Objects menu.
In the latest version X7 command Image>Mirror and Image>Flip returned, but with new differences.
See my schedule here
 French translation here French translation here
 Your versions ici Your versions ici
For this tutorial, you will need:
Material
here
3187-Manuel Carrasco-LB tubes
Misted MR_Crimson by Maryse
calguisdeco2902015 by Guismo
Mask_GB_128
Texto_Manu-Carrasco_nines
(you find here the links to the material authors' sites)
Plugins
consult, if necessary, my filter section here
Filters Unlimited 2.0 here
AAA Frames - Foto Frame here
Mura's Meister - Perspective Tiling here
Tramages - Pool Shadow here
Filters Tramages can be used alone or imported into Filters Unlimited.
(How do, you see here)
If a plugin supplied appears with this icon  it must necessarily be imported into Unlimited it must necessarily be imported into Unlimited

You can change Blend Modes according to your colors.
In the newest versions of PSP, you don't find the foreground/background gradient (Corel_06_029).
You can use the gradients of the older versions.
The Gradient of CorelX here
Open the mask in PSP and minimize it with the rest of the material.
1. Open a new transparent image 950 x 650 pixels.
2. Set your foreground color to #94b979,
and your background color to #1b431d.

Set your foreground color to a Foreground/Background Gradient, style Rectangular.

Flood Fill  the transparent image with your Gradient. the transparent image with your Gradient.
3. Open the tube MR_Crimson, erase the watermark and go to Edit>Copy.
Go back to your work and go to Edit>Paste as new layer.
Image>Resize, 2 times to 80%, resize all layers not checked.
4. Effects>Image Effects>Offset.
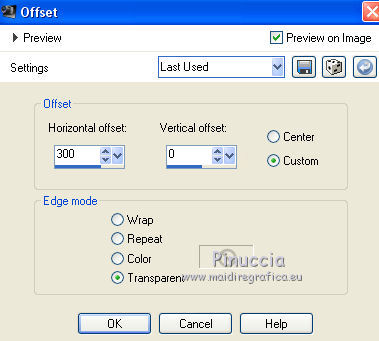
5. Layers>Duplicate.
Image>Mirror.
6. Layers>New Raster Layer.
Set your foreground color to Color.
Flood Fill  the layer with your foreground color #94b979. the layer with your foreground color #94b979.
7. Layers>New Mask layer>From image
Open the menu under the source window and you'll see all the files open.
Select the masque Mask_GB_128.

Layers>Merge>Merge Group.
Effects>Edge Effects>Enhance More.
8. Effects>Image Effects>Seamless Tiling, side by side

9. Open the tube calguisdeco29042015, erase the watermark and go to Edit>Copy.
Go back to your work and go to Edit>Paste as new layer.
Image>Resize, 3 times to 80%, resize all layers not checked.
Place  correctly the tube. correctly the tube.

10. Effects>3D Effects>Drop Shadow, color #000000.
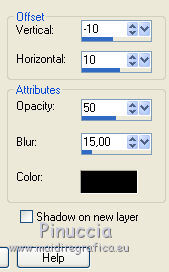
11. Layers>Merge>Merge visible.
12. Effects>Plugins>AAA Frames - Foto Frame.

13. Edit>Copy.
14. Image>Resize, to 90%, resize all layers not checked.
15. Effects>3D Effects>Drop Shadow, color #000000.
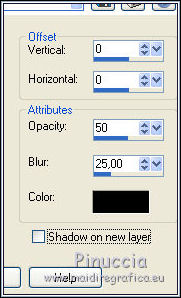
Edit>Repeat Drop Shadow.
16. Image>Canvas Size - 950 x 750 pixels.
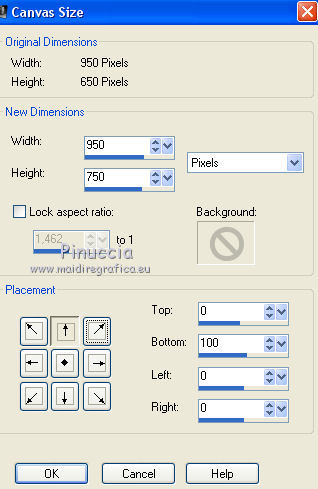
17. Layers>New Raster Layer.
Layers>Arrange>Send to Bottom.
Selections>Select All.
Edit>Paste into Selection.
18. Adjust>Blur>Gaussian Blur - radius 20.

19. Effects>Texture Effects>Weave
weave color: #1f4520
gap color: #94b979.

20. Effects>Plugins>Mura's Meister - Perspective Tiling.

21. Layers>New Raster Layer.
Layers>Arrange>Send to Bottom.
Set again your foreground color to Gradient.
Flood Fill  the layer with your Gradient. the layer with your Gradient.
22. Activate your top layer.
Open the tube 3187-Manuel Carrasco-LB tubes, erase the watermark and go to Edit>Copy.
Go back to your work and go to Edit>Paste as new layer.
Image>Resize, to 80%, resize all layers not checked.
Move  the tube at the bottom left. the tube at the bottom left.
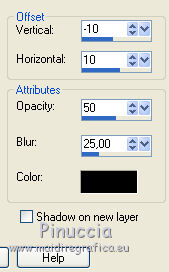
Effects>3D Effects>Drop Shadow, color #000000.
23. Open Texto_Manu-Carrasco_nines and go to Edit>Copy.
Go back to your work and go to Edit>Paste as new layer.
Move  the text at the bottom right. the text at the bottom right.
24. Layers>Merge>Merge All.
25. Image>Add borders, 2 pixels, symmetric, color #1f4520.
26. Image>Resize, to 90%, resize all layers checked.
27. Image>Add borders, 40 pixels, symmetric, foreground color #94b979.
Activate your Magic Wand Tool 
and click on the border to select it.
28. Effects>Plugins>Tramages - Pool Shadow, par défaut.

Selections>Select None.
29. Image>Add borders, 2 pixels, symmetric, color #1f4520.
31. Sign your work and save as jpg.
Version with tubes by Maryse and Luz Cristina

Your versions here

If you have problems or doubts, or you find a not worked link, or only for tell me that you enjoyed this tutorial, write to me.
4 March 2020
|

