|
TAG ILLUSIONS


This tutorial was translated with PSPX7 but it can also be made using other versions of PSP.
Since version PSP X4, Image>Mirror was replaced with Image>Flip Horizontal,
and Image>Flip with Image>Flip Vertical, there are some variables.
In versions X5 and X6, the functions have been improved by making available the Objects menu.
In the latest version X7 command Image>Mirror and Image>Flip returned, but with new differences.
See my schedule here
 French translation here French translation here
 Your versions ici Your versions ici
For this tutorial, you will need:
Material
here
Tube sassyillusion_brunette05_10
Tube K@rine_dreams_Misted215_Mars_09
Tube Ketmisted2013094
Tube mc2026
2Bit_Masken49
Burgs-AHeartLadyBurgSheet-sjm0
(you find here the links to the material authors' sites)
Plugins
consult, if necessary, my filter section here
Filters Unlimited 2.0 here
Simple - Top Left Mirror here
Filters Simple can be used alone or imported into Filters Unlimited.
(How do, you see here)
If a plugin supplied appears with this icon  it must necessarily be imported into Unlimited it must necessarily be imported into Unlimited

You can change Blend Modes according to your colors.
In the newest versions of PSP, you don't find the foreground/background gradient (Corel_06_029).
You can use the gradients of the older versions.
The Gradient of CorelX here
Open the mask in PSP and minimize it with the rest of the material.
1. Open a new transparent image 900 x 700 pixels.
2. Set your foreground color to #560008,
and your background color to #efeaec.

Flood Fill  the transparent with your foreground color #560008. the transparent with your foreground color #560008.
3. Layers>New Raster Layer.
Flood Fill  with your background color #efeaec. with your background color #efeaec.
4. Layers>New Mask layer>From image
Open the menu under the source window and you'll see all the files open.
Select the mask 2Bit_Mask49.

Layers>Merge>Merge Group.
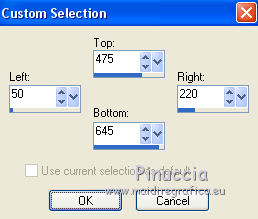
5. Selection Tool 
(no matter the type of selection, because with the custom selection your always get a rectangle)
clic on the Custom Selection 
and set the following settings.

6. Layers>New Raster Layer raster.
Open the tube K@rine_Dreams_Misted215 and go to Edit>Copy.
Go back to your work and go to Edit>Paste into Selection.
Selections>Select None.
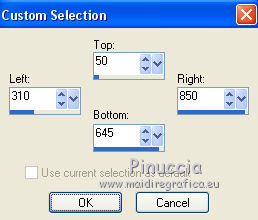
7. Custom Selection 

8. Layers>New Raster Layer raster.
Open the tube ketmisted2013094 and go to Edit>Copy.
Go back to your work and go to Edit>Paste into Selection.
Selections>Select None.
9. Custom Selection 

10. Layers>New Raster Layer raster.
Open the tube mc2026 and go to Edit>Copy.
Go back to your work and go to Edit>Paste into Selection.
Selections>Select None.
11. Custom Selection 

12. Layers>New Raster Layer raster.
Open the tube sassyillusions-brunette-05-10 and go to Edit>Copy.
Go back to your work and go to Edit>Paste into Selection.
Selections>Select None.
13. Layers>Merge>Merge All.
14. Image>Add borders, 5 pixels, symmetric, background color #efeaec.
15. Layers>Promote Background Layer.
16. Image>Resize, to 90%, resize all layers not checked.
17. Activate your Magic Wand Tool 
and click on the transparent part to select it.
18. Set your foreground color to a Foreground/Background Gradient, style Linear.

Flood Fill  the selection with your gradient. the selection with your gradient.
19. Open the tube Corner_Burgs-AHeartLadyBugSheet and go to Edit>Copy.
Go back to your work and go to Edit>Paste as new layer.
Move  the tube at the upper left. the tube at the upper left.
20. Effects>Plugins>Simple - Top Left Mirror.

21. Layers>Merge>Merge all.
22. Image>Add borders, 5 pixels, symmetric, background color #efeaec.
23. Sign your work and save as jpg.
 Your versions here Your versions here

If you have problems or doubts, or you find a not worked link, or only for tell me that you enjoyed this tutorial, write to me.
19 April 2020
|

