|
TAG GOOD DAY
 ENGLISH VERSION ENGLISH VERSION


This tutorial was translated with PSPX7 but it can also be made using other versions of PSP.
Since version PSP X4, Image>Mirror was replaced with Image>Flip Horizontal,
and Image>Flip with Image>Flip Vertical, there are some variables.
In versions X5 and X6, the functions have been improved by making available the Objects menu.
In the latest version X7 command Image>Mirror and Image>Flip returned, but with new differences.
See my schedule here
French translation here
Your versions ici
For this tutorial, you will need:
Material
here
Tube 3081-woman-LB TUBES
Mist 3152-luzcristina
17_tube_enfantin_animabelle
Tube bolt by Emilse
Mask-VSP146
mask.ket-fadesuave
Texto_Nines
marco_esquinas_nines
(you find here the links to the material authors' sites)
Plugins
consult, if necessary, my filter section here
AP Lines - Lines SilverLining here
Mehdi - Sorting Tiles here
Mura's Meister - Perspective Tiling here

You can change Blend Modes according to your colors.
In the newest versions of PSP, you don't find the foreground/background gradient (Corel_06_029).
You can use the gradients of the older versions.
The Gradient of CorelX here
Open the masks in PSP and minimize them with the rest of the material.
1. Open a new transparent image 900 x 600 pixels.
Set your foreground color to #faf6e2,
and your background color to #b9a686.

Flood Fill  the transparent image with your background color. the transparent image with your background color.
3. Effects>Plugins>AP Lines - Lines SilverLining

4. Layers>New Raster Layer.
Flood Fill  with your foreground color #faf6e2. with your foreground color #faf6e2.
5. Layers>New Mask layer>From image
Open the menu under the source window and you'll see all the files open.
Select the mask Mask-VSP146

Layers>Merge>Merge group.
Adjust>Sharpness>Sharpen More.
6. Layers>Merge>Merge visible.
7. Layers>Duplicate and close this layer for a moment.
8. Activate the layer Merged.
Selections>Select All.
Selections>Modify>Contract - 40 pixels.
9. Set your foreground color to #fcf8e4.
Layers>New Raster Layer.
Flood Fill  the layer with color #fcf8e4. the layer with color #fcf8e4.
10. Effects>3D Effects>Drop Shadow, color #000000.

11. Selections>Modify>Contract - 20 pixels.
Press CANC on the keyboard 
Flood Fill  with background color #b9a686. with background color #b9a686.
12. Effects>3D Effects>Drop Shadow, color #000000.

13. Selections>Modify>Contract - 20 pixels.
Press CANC on the keyboard.
Effects>3D Effects>Drop Shadow, same settings.
Keep selected.
14. With your Material colors
foreground #fcf8e4
background #b9a686

Set your foreground color to a Foreground/Background Gradient, style Rectangular

Flood Fill  the selection with your Gradient. the selection with your Gradient.
15. Effects>Plugins>Mehdi - Sorting Tiles.

Keep always selected
16. Layers>New Raster Layer.
Open the tube 3152-luzcristina and go to Edit>Copy.
Go back to your work and go to Edit>Paste into Selection.
Selections>Select None.
17. Open the tube 3081-woman-LB TUBES and go to Edit>Copy.
Go back to your work and go to Edit>Paste as new layer.
Image>Resize, to 80%, resize all layers not checked.
18. Layers>New Mask layer>From image
Open the menu under the source window
and select the mask mask.ket-fadesuave

Layers>Duplicate (to apply the mask 2 times)
Layers>Merge>Merge group.
19. Move  the tube into the frame. the tube into the frame.
20. Image>Canvas Size - 900 x 700 pixels.

21. Open and activate the closed layer.
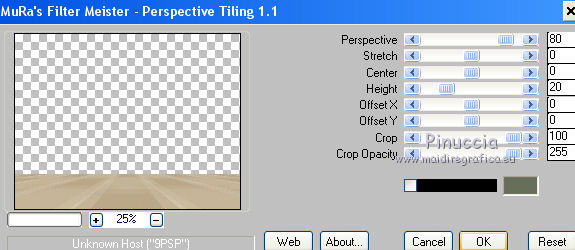
Effects>Plugins>Mura's Meister - Perspective Tiling.

22. Open the tube bolt and go to Edit>Copy.
Go back to your work and go to Edit>Paste as new layer.
Move  the tube on the frame. the tube on the frame.
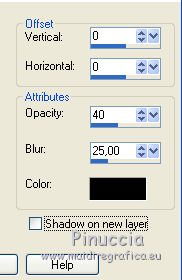
23. Effects>3D Effects>Drop Shadow, color #000000.

24. Open the tube 17_tube_enfantin_animabelle and go to Edit>Copy.
Go back to your work and go to Edit>Paste as new layer.
Image>Resize, to 70%, resize all layers not checked.
Move  the tube at the bottom right. the tube at the bottom right.
Effects>3D Effects>Drop Shadow, same settings.
25. Open Texto_Nines and go to Edit>Copy.
Go back to your work and go to Edit>Paste as new layer.
Move  the tube at the bottom left. the tube at the bottom left.
26. Layers>Merge>Merge All.
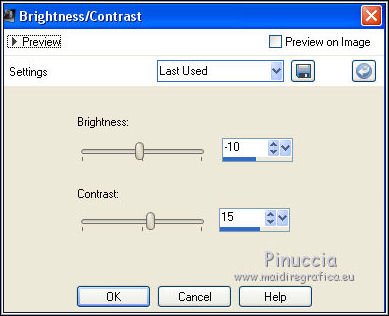
Adjust>Brightness and Contrast>Brightness and Contrast.

27. Image>Add borders, 2 pixels, symmetric, color #9d7946.
Image>Add borders, 30 pixels, symmetric, color #f2deac.
Activate your Magic Wand Tool 
and click on the last border to select it.
Selections>Invert.
Effects>3D Effects>Drop Shadow, color #000000.

Selections>Select None.
28. Open marco_esquinas_nines and go to Edit>Copy.
Go back to your work and go to Edit>Paste as new layer.
29. Sign your work on a new layer.
Image>Add borders, 2 pixels, symmetric, color #9d7946.
Save as jpg.
Version with the colors of the tutorial

Your versions here

If you have problems or doubts, or you find a not worked link, or only for tell me that you enjoyed this tutorial, write to me.
15 September 2019
|
 ENGLISH VERSION
