|
TAG CARICATURA
 ENGLISH VERSION ENGLISH VERSION


This tutorial was translated with PSPX7 but it can also be made using other versions of PSP.
Since version PSP X4, Image>Mirror was replaced with Image>Flip Horizontal,
and Image>Flip with Image>Flip Vertical, there are some variables.
In versions X5 and X6, the functions have been improved by making available the Objects menu.
In the latest version X7 command Image>Mirror and Image>Flip returned, but with new differences.
See my schedule here
French translation here
Your versions ici
For this tutorial, you will need:
Material
here
Tube DBK AA CelMale-253 by Katrina
Tube 18_fleurs_animabelle
Tube nicole_decor6-2014
Narah_mask_0618
(you find here the links to the material authors' sites)

You can change Blend Modes according to your colors.
The texture Fur is standard in PSP.
If you don't find it in your PSP, copy the supplied texture in the Textures Folder.
Open the mask in PSP and minimize it with the rest of the material.
1. Open a new transparent image 850 x 600 pixels.
2. Set your foreground color to #534d43,
and your background color to #d6c1a1.

Flood Fill  the transparent image with your foreground color. the transparent image with your foreground color.
3. Open the tube 18_fleur_animabelle and go to Edit>Copy.
Go back to your work and go to Edit>Paste as new layer.
Change the Blend Mode of this layer to Hard Light.
4. Open texto-poema-nines and go to Edit>Copy.
Go back to your work and go to Edit>Paste as new layer.
Move  the text to the right side. the text to the right side.
5. Layers>Duplicate.
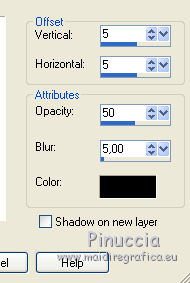
Effects>Image Effects>Offset.

Change the Blend Mode of this layer to Screen.
6. Layers>New Raster Layer.
Flood Fill  with your background color #d6c1a1. with your background color #d6c1a1.
7. Layers>New Mask layer>From image
Open the menu under the source window and you'll see all the files open.
Select the mask Narah-mask-0618.

Layers>Merge>Merge Group.
Adjust>Sharpness>Sharpen More.
8. Open the tube DBK AA CelMore-253 and go to Edit>Copy.
Go back to your work and go to Edit>Paste as new layer.
Image>Resize, to 80%, resize all layers not checked.
Move  the tube to the left side. the tube to the left side.
9. Effects>3D Effects>Drop Shadow, color black.

10. Layers>Merge>Merge All.
11. Image>Add borders, 2 pixels, symmetric, foreground color #534d43.
Image>Add borders, 50 pixels, symmetric, background color #d6c1a1.
12. Activate your Magic Wand Tool 
and click on the last border to select it.
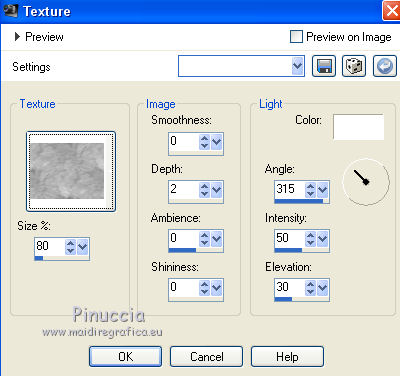
13. Effects>Texture Effects>Texture - select the texture Fur

Selections>Invert.
14. Effects>3D Effects>Cutout, color black.

Selections>Select None.
15. Open the tube nicole-decor6-2014 and go to Edit>Copy.
Go back to your work and go to Edit>Paste as new layer.
Image>Resize, to 50%, resize all layers not checked.
Move  the tube at the bottom right. the tube at the bottom right.
16. Effects>3D Effects>Drop Shadow, color black.

17. Sign your work on a new layer.
18. Layers>Merge>Merge All.
19. Image>Add borders, 2 pixels, symmetric, foreground color #534d43
Save as jpg.
Version with tubes by Mou and Tigre Blanc

Your versions here

If you have problems or doubts, or you find a not worked link, or only for tell me that you enjoyed this tutorial, write to me.
18 January 2020
|
 ENGLISH VERSION
