|
TAG AMORE
 ENGLISH VERSION ENGLISH VERSION


This tutorial was translated with PSPX7 but it can also be made using other versions of PSP.
Since version PSP X4, Image>Mirror was replaced with Image>Flip Horizontal,
and Image>Flip with Image>Flip Vertical, there are some variables.
In versions X5 and X6, the functions have been improved by making available the Objects menu.
In the latest version X7 command Image>Mirror and Image>Flip returned, but with new differences.
See my schedule here
French translation here
Your versions ici
For this tutorial, you will need:
Material
here
Misted_Criss 1223 by Linda Gatita
Adorno_rallitas_nines
Adorno_amore_nines
(you find here the links to the material authors' sites)
Plugins
consult, if necessary, my filter section here
Filters Unlimited 2.0 here
Krusty's FX vol.II 1.0 - Pattern Generator P (Flower) here
Graphics Plus - Button Beveler II here
Mura's Meister - Pole Transform here
Filters Krusty's and Graphics Plus can be used alone or imported into Filters Unlimited.
(How do, you see here)
If a plugin supplied appears with this icon  it must necessarily be imported into Unlimited it must necessarily be imported into Unlimited

You can change Blend Modes according to your colors.
1. Open a new transparent image 900 x 600 pixels.
2. Set your foreground color to #905e71,
and your background color to #44001a.

Flood Fill  the transparent image with your foreground color #905e71. the transparent image with your foreground color #905e71.
3. Effects>Plugins>Filters Unlimited 2.0 - Krusty's FX vol.II 1.0 - Pattern Generator (Flower), defaut settings.

4. Open Adorno_lineas_nines and go to Edit>Copy.
Go back to your work and go to Edit>Paste as new layer.
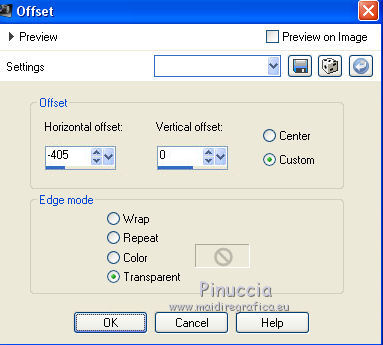
5. Effecs>Image Effects>Offset.

6. Layers>Duplicate.
Image>Mirror.
Layers>Merge>Merge Down.
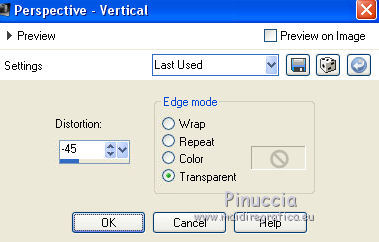
7. Effects>Geometric Effects>Perspective Vertical.

8. Layers>Duplicate.
Image>Flip.
Layers>Merge>Merge Down.
9. Effects>Plugins>Mura's Meister - Pole Transform.

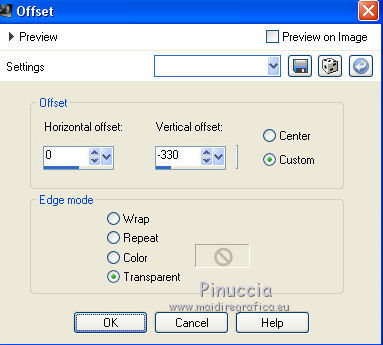
10. Effects>Image Effects>Offset.

11. Layers>Duplicate.
Image>Flip.
Layers>Merge>Merge Down.
Effects>Edge Effects>Enhance More.
12. Activate your bottom layer.
Open the tube Misted_Criss 1223 by Linda Gatita and go to Edit>Copy.
Go back to your work and go to Edit>Paste as new layer.
I resized to 90%.
Place  the tube in the center. the tube in the center.
Layers>Duplicate.
13. Layers>Merge>Merge Down.
14. Image>Add borders, 2 pixels, symmetric, background color #44001a.
Image>Add borders, 30 pixels, symmetric, foreground color #905e71.
15. Activate your Magic Wand Tool 
and click on the last border to select it.
16. Effects>Plugins>Filters Unlimited 2.0 - Graphics Plus - Button Beveler II.

Selections>Select None.
17. Open Adorno_amore_nines, erase the watermark and go to Edit>Copy.
Go back to your work and go to Edit>Paste as new layer.
18. Sign your work on a new layer.
Layers>Merge>Merge All.
19. Image>Add borders, 2 pixels, symmetric, background color #44001a.
20. Save as jpg.

Your versions here

If you have problems or doubts, or you find a not worked link, or only for tell me that you enjoyed this tutorial, write to me.
18 January 2020
|
 ENGLISH VERSION

 ENGLISH VERSION
