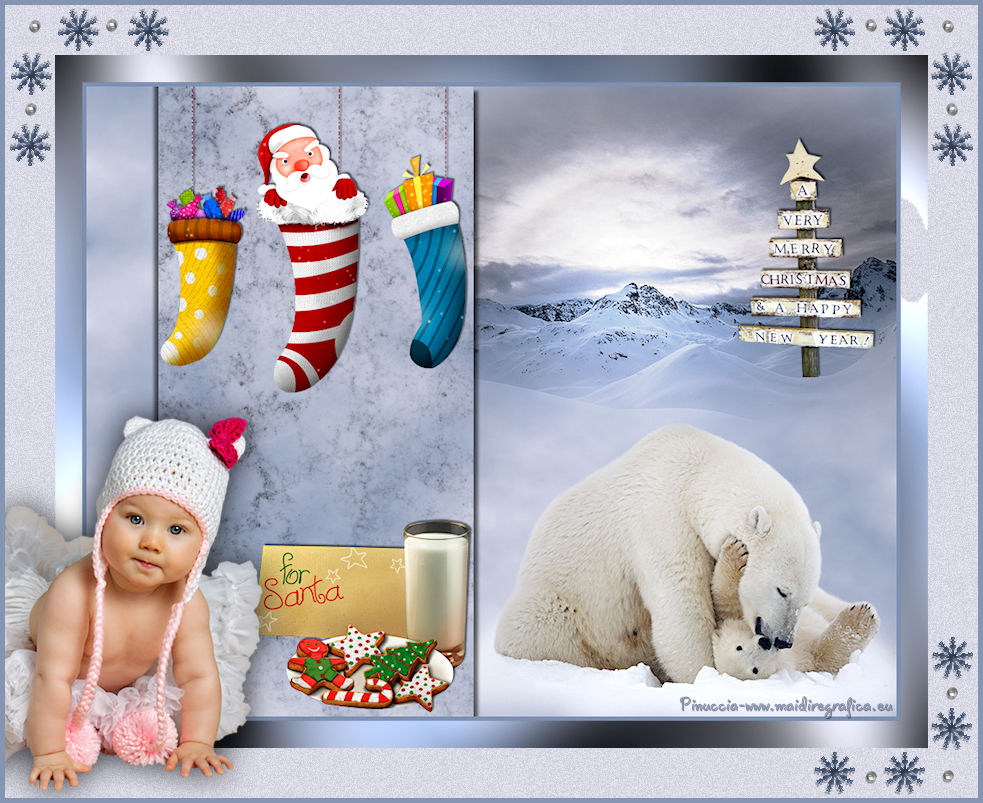
Here you find the original of this tutorial:

This tutorial was created with PSP X2 but it can also be made using other versions of PSP.
Since version PSP X4, Image>Mirror was replaced with Image>Flip Horizontal,
and Image>Flip with Image>Flip Vertical, there are some variables.
In versions X5 and X6, the functions have been improved by making available the Objects menu.
In the latest version X7 command Image>Mirror and Image>Flip returned, but with new differences.
See my schedule here
French translation here
Your versions here
For this tutorial, you will need:
Material here
For the tubes thanks Beatriz, Animabelle, Criss and Nines
Effects>Plugins
consult, if necessary, my filter section here
Filters Unlimited 2.0 here
Photo Aging Kit - Dirt & Dust (to import in Unlimited) here
Mura's Meister - Cloud here
Graphics Plus - Cross Shadow here
Filters Graphics Plus can be used alone or imported into Filters Unlimited.
(How do, you see here)
If a plugin supplied appears with this icon  it must necessarily be imported into Unlimited

You can change Blend Modes according to your colors.
In the newest versions of PSP, you don't find the foreground/background gradient (Corel_06_029).
You can use the gradients of the older versions.
The Gradient of CorelX here
1. Set your foreground color to #8494b1,
and your background color to #dadae6.

Set your foreground color to a Foreground/Background Gradient, style Rectangulaire.

2. Open a new transparent image 900 x 700 pixels.
Flood Fill  with your Gradient.
3. Effects>Effects>Plugins>Mura's Meister - Cloud.

Remember that this filter works with the colors of your materials palette,
but keeps in memory the first settings from the opening of your PSP.
So if you have already used the filter, to make sure you have set the correct colors, press the Reset button.
The result is random and for this reason it will not be the same as mine.
If you want to change the appearance of the clouds, click on the preview window,
until you see what you prefer.
4. Selection Tool 
(no matter the type of selection, because with the custom selection your always get a rectangle)
clic on the Custom Selection 
and set the following settings.

Selections>Promote Selection to Layer.
5. Effects>Plugins>Filters Unlimited 2.0 - Photo Aging Kit - Dirt & Dust.

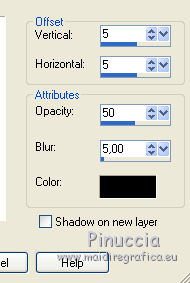
5. Effects>3D Effects>Drop Shadow, color black.

Repeat Drop Shadow, vertical and horizontal -5.
6. Open the tube 88_misted_paysage_animabelle and go to Edit>Copy.
Go back to your work and go to Edit>Paste as new layer.
Move  the tube at the upper right.
Layers>Arrange>Move Down.

Keep this layer selected.
7. Open the tube 146_animabelle_tubes_animaux y and go to Edit>Copy.
Go back to your work and go to Edit>Paste as new layer.
Image>Resize, 2 times to 80%, resize all layers not checked.
Move  the tube at the bottom right.
8. Activate the top layer.

Open the tube Criss Nav 74 and go to Edit>Copy.
Go back to your work and go to Edit>Paste as new layer.
Image>Resize, 2 times to 80%, resize all layers not checked.
Move  the tube at the upper right.
9. Effects>3D Effects>Drop Shadow, color black.

10. Open the tube 038_tube_noel_p1_animabelle and go to Edit>Copy.
Go back to your work and go to Edit>Paste as new layer.
Image>Resize, to 50%, resize all layers not checked.
Move  the tube at the upper left, see my example.
11. Effects>3D Effects>Drop Shadow, same settings.

12. Open the tube Criss adorno Nav 33 and go to Edit>Copy.
Go back to your work and go to Edit>Paste as new layer.
Image>Resize, 1 time to 50% and 1 time to 80%, resize all layers not checked.
Move  the tube at the bottom left.

Effects>3D Effects>Drop Shadow, same settings.
13. Layers>Merge>Merge All.
14. Image>Add borders, 5 pixels, symmetric, foreground color #8494B1.
Image>Add borders, 30 pixels, symmetric, color white #ffffff.
15. Activate your magic wand Tool 
and click on the white border to select it.
16. Change the Gradient's settings, style Linear.

Flood Fill  the selection with your Gradient.
17. Effects>Plugins>Graphics Plus - Cross Shadow.

Selections>Select None.
18. Adjust>Brightness and Contrast>Brightness and Contrast.

19. Image>Resize, to 90%, resize all layers cheched.
20. Image>Add borders, 50 pixels, symmetric, color white.
21. Select this border with your Magic Wand Tool 
Flood Fill  with your background color #dadae6.
22. Adjust>Add/Remove Noise>Add Noise.

Selections>Select None.
23. Open corners estrellitas y tornillos_nines and go to Edit>Copy.
Go back to your work and go to Edit>Paste as new layer.
24. Open the tube 1756-baby_LB TUBES and go to Edit>Copy.
Go back to your work and go to Edit>Paste as new layer.
Image>Resize, 2 times to 80%, resize all layers not checked.
Move  the tube at the bottom left.

25. Effects>3D Effects>Drop Shadow, color black.

26. Image>Add borders, 5 pixels, symmetric, foreground color #8494b1.
27. Sign your work and save as jpg.

If you have problems or doubt, or you find a not worked link, or only for tell me that you enjoyed this tutorial, write to me.
4 December 2019
 english version
