|
FROM THE SEA


Thanks Irene for the invitation to translate your tutorials

This tutorial was written with PSPX8 and translated with PSPX9 and PSP2020, but it can also be made using other versions of PSP.
Since version PSP X4, Image>Mirror was replaced with Image>Flip Horizontal,
and Image>Flip with Image>Flip Vertical, there are some variables.
In versions X5 and X6, the functions have been improved by making available the Objects menu.
In the latest version X7 command Image>Mirror and Image>Flip returned, but with new differences.
See my schedule here
 italian translation here italian translation here

For this tutorial, you will need:

(The links of material creators here).

consult, if necessary, my filter section here
Filters Unlimited 2.0 here
Graphics Plus - Quick Tile I here
Alien Skin Eye Candy 5 Impact - Glass here
Filters Graphics Plus can be used alone or imported into Filters Unlimited.
(How do, you see here)
If a plugin supplied appears with this icon  it must necessarily be imported into Unlimited it must necessarily be imported into Unlimited

You can change Blend Modes according to your colors.
In the newest versions of PSP, you don't find the foreground/background gradient (Corel_06_029).
You can use the gradients of the older versions.
The Gradient of CorelX here
Copy the preset  in the folder of the plugin Alien Skin Eye Candy 5 Impact>Settings>Glass. in the folder of the plugin Alien Skin Eye Candy 5 Impact>Settings>Glass.
One or two clic on the file (it depends by your settings), automatically the preset will be copied in the right folder.
why one or two clic see here

If you have problems with the canal alpha, open a new transparent image 950 x 550 pixels,
and use the selections from disk.
1. Set your foreground color to #b5c7d5,
and your background color to #2b3d4d.

Set your foreground color to a Foreground/Background Gradient, style Linear.

Open Canal_alpha_fromt he sea
This image, that will be the basis of your work is not empty,
but contains the selections saved to alpha channel.
Flood Fill  the transparent image with your Gradient. the transparent image with your Gradient.
2. Layers>New Raster Layer.
Selections>Select All.
Open the misted Visage from the sea 1_Aigen&tubeMM 
Erase the watermark and go to Edit>Copy.
Minimize this image; you'll use it again.
Go back to your work and go to Edit>Paste into Selection.
Selections>Select None.
Effects>Image Effects>Seamless Tiling, default settings.

Adjust>Blur>Motion Blur.

Adjust>Blur>Gaussian Blur - radius 20.

Change the Blend Mode of this layer to Overlay.
3. Layers>Merge>Merge Down.
Effects>Distortion Effects>Wave.

4. Open déco 1 
Erase the watermark and go to Edit>Copy.
Go back to your work and go to Edit>Paste as new layer.
5. Layers>New Raster Layer.
Selections>Load/Save Selection>Load Selection from Alpha Channel.
The selection sélection #1 is immediately available. You just have to click Load.

Flood Fill  the selection with your Gradient. the selection with your Gradient.
Activate again the misted Visage from the sea 1_Aigen&tubeMM.
Edit>Copy.
Go back to your work and go to Edit>Paste into Selection.
Selections>Select None.
Adjust>Sharpness>Sharpen.
Effects>Plugins>Alien Skin Eye Candy 5 Impact - Glass.
Select the preset From the sea

6. Selections>Modify>Select Selection Borders.

Flood Fill  the selection with your Gradient. the selection with your Gradient.
Effects>3D Effects>Inner Bevel.

Selections>Select None.
7. Layers>New Raster Layer.
Selections>Load/Save Selection>Load Selection from Alpha Channel.
Open the Selections menu and load the selection sélection #2.

Flood Fill  the selection with your Gradient. the selection with your Gradient.
Open the misted ai-generated-Paysage ocean1_misted MM 
Edit>Copy.
Go back to your work and go to Edit>Paste into Selection.
Adjust>Sharpness>Sharpen.
Layers>Duplicate.
Change the Blend Mode of this layer to Overlay.
Layers>Merge>Merge Down.
8. Effects>Plugins>Alien Skin Eye Candy 5 Impact - Glass, same settings.
Keep selected.
9. Selections>Modify>Select Selection Borders, same settings.

Flood Fill  the selection with your Gradient. the selection with your Gradient.
Effects>3D Effects>Inner Bevel, same settings.
Selections>Select None.
Layers>Merge>Merge Down.
Layers>Arrange>Move Down.

10. Activate your background layer, Raster 1.
Open déco 2 
Erase the watermark and go to Edit>Copy.
Go back to your work and go to Edit>Paste as new layer.
Change the Blend Mode of this layer to Overlay.
11. Activate the layer Raster 2.
Layers>New Raster Layer.
Selections>Select All.
Open the misted ai-generated-Paysage ocean2_misted MM 
Erase the watermark and go to Edit>Copy.
Go back to your work and go to Edit>Paste into Selection.
Selections>Select None.
Stay on this layer.
12. Effects>Image Effects>Seamless Tiling, Side by Side.

Change the Blend Mode of this layer to Soft Light.

13. Activate your top layer, Raster 2.
Layers>New Raster Layer.
Selections>Load/Save Selection>Load Selection from Alpha Channel.
Open the Selections menu and load the selection sélection #3.

Flood Fill  the selection with your Gradient. the selection with your Gradient.
Edit>Paste into Selection (the landscape océan2 is still in memory).
Adjust>Sharpness>Sharpen.
Effects>Plugins>Alien Skin Eye Candy 5 Impact - Glass, preset From the sea.
14. Selections>Modify>Select Selection Borders, same settings.
Flood Fill  the selection with your Gradient. the selection with your Gradient.
Effects>3D Effects>Inner Bevel, same settings.
Selections>Select None.
15. Image>Resize, to 75%, resize all layers not checked.
Adjust>Sharpness>Sharpen.
Effects>3D Effects>Drop shadow, color back.

16. Open déco bulles 
Erase the watermark and go to Edit>Copy.
Go back to your work and go to Edit>Paste as new layer.
Objects>Align>Bottom.
or K key to activate your Pick Tool 
Position X: 233,00 - Position Y: 288,00.

Change the Blend Mode of this layer to Overlay.

17. Activate the layer Raster 1.
Edit>Copy.
Edit>Paste as new image (save for caution).
18. Go back to your work.
Image>Add borders, 1 pixel, symmetric, background color.
Image>Add borders, 2 pixels, symmetric, foreground color.
Image>Add borders, 1 pixel, symmetric, background color.
Selections>Select All.
19. Image>Add borders, 20 pixels, symmetric, whatever color.
Selections>Invert.
Edit>Paste into Selection.
Effects>Plugins>Graphics Plus - Quick Tile II.

Unlimited doesn't keep in memory the settings;
for that I prefered to use the filtre alone
Effects>3D Effects>Inner Bevel, same settings.
Selections>Invert.
Effects>3D Effects>Drop shadow, color black.

Selections>Select None.
20. Layers>New Raster Layer.
Selections>Select All.
Edit>Paste as new layer (the minimized image is still in memory).
Selections>Select None
Layers>Arrange>Send to Bottom.
21. Activate the layer above, Raster 1.
Selections>Select All.
Edit>Cut - this cuts and keeps in memory.
Selections>Modify>Contract - 20 pixels.
Edit>Paste into Selection

Selections>Select None.
Effects>3D Effects>Drop shadow, same settings.
Adjust>Sharpness>Sharpen.
22. Activate your bottom layer, Raster 2.
Effects>Plugins>Graphics Plus - Quick Tile II, same settings.

Effects>Edge Effects>Enhance More.
Adjust>Sharpness>Sharpen.
23. Activate your top layer.
Open déco hippocampes 
Edit>Copy.
Go back to your work and go to Edit>Paste as new layer.
Don't move it.
24. Open déco corail 
Erase the watermark and go to Edit>Copy.
Go back to your work and go to Edit>Paste as new layer.
K key to activate your Pick Tool 
Position X: 49,00 - Position Y: 436,00.

25. Open Dauphin 
Edit>Copy.
Go back to your work and go to Edit>Paste as new layer.
Position X: 711,00 - Position Y: 228,00.

26. Open Coquillage 
Edit>Copy.
Go back to your work and go to Edit>Paste as new layer.
Position X: 731,00 - Position Y: 433,00.

27. Open Poisson 
Edit>Copy.
Go back to your work and go to Edit>Paste as new layer.
Position X: 156,00 - Position Y: 197,00.

28. Open Titre 
Edit>Copy.
Go back to your work and go to Edit>Paste as new layer.
Position X: 372,00 - Position Y: 64,00.

M key to deselect the Tool.
29. Sign your work on a new layer.
Add the watermark of the author and of the translator.
30. Open déco coins 
Erase the watermark and go to Edit>Copy.
Go back to your work and go to Edit>Paste as new layer.
31. Image>Add borders, 1 pixel, symmetric, background color.
32. Image>Resize, 950 pixels width, resize all layers checked.
Adjust>Sharpness>Unsharp Mask - Soft.

Save as jpg.
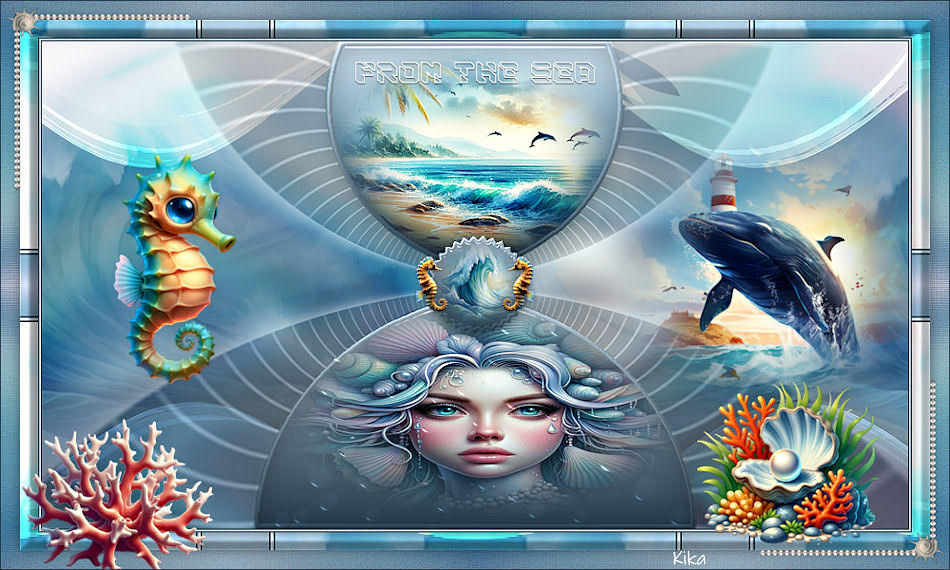
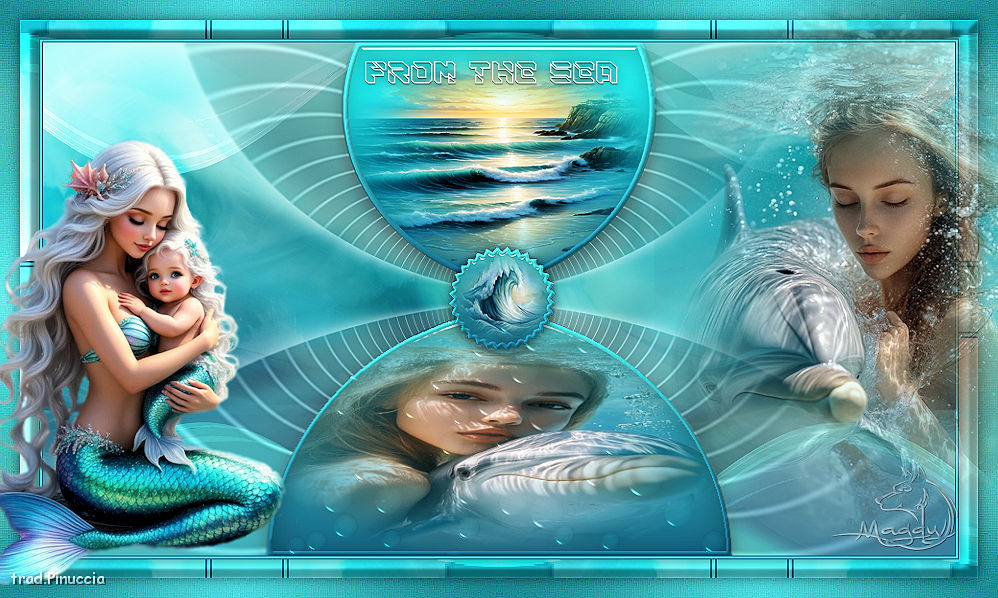
Second version.


 Your versions. Thanks Your versions. Thanks

Kika

Magdy

If you have problems or doubts, or you find a not worked link,
or only for tell me that you enjoyed this tutorial, write to me.
28 June 2024

|


