|
DANSE AU SON DES MOTS
 DANCE TO THE SOUND OF WORDS DANCE TO THE SOUND OF WORDS

Thanks Irene for the invitation to translate your tutorials
This tutorial was written with PSPX8 and translated with PSPX7 and PSPX3, but it can also be made using other versions of PSP.
Since version PSP X4, Image>Mirror was replaced with Image>Flip Horizontal,
and Image>Flip with Image>Flip Vertical, there are some variables.
In versions X5 and X6, the functions have been improved by making available the Objects menu.
In the latest version X7 command Image>Mirror and Image>Flip returned, but with new differences.
See my schedule here
 italian translation here italian translation here
For this tutorial, you will need:
Material here
Thanks for the tubes Silvie and AnaRidzi.
A mask found on the net.
The rest of the material is by Moi-Même.
(The links of material creators here).
consult, if necessary, my filter section here
Filters Unlimited 2.0 here
Herfs - Fresnel Alpha - in the material
AP [Lines] - Lines SilverLining here
Mehdi - Wavy Lab 1.1 here
Mura's Meister - Pole Transform here
Mura's Meister - Copies here

You can change Blend Modes according to your colors.

(Don't forget to erase the watermarks of the tubes and don't save the modifications when you'll close them)
Open the masks in PSP and minimize them with the rest of the material.
Set your foreground color to #e3493f,
and your background color to #3f221e.

1. Open canal alpha danse mots (size 950 x 550 pixels)
Window>Duplicate or, on the keyboard, shift+D to make a copy.

Close the original.
The copy, that will be the basis of your work, is not empty,
but contains the selections saved to alpha channel.
(in the material you find the selections to save on the selections folder and to load "from disk", in case of problems with alpha channel)
Flood Fill  the transparent image with your background color. the transparent image with your background color.
2. Layers>New Raster Layer.
Effects>Plugins>Mehdi - Wavy Lab 1.1.
This filters creates gradients with the colors of your Materials palette.
The first is your background color, the second is your foreground color.
Change the last two colors created by the filtre with color white #ffffff.

Adjust>Blur>Gaussian Blur - radius 30.

Effects>Plugins>Filters Unlimited 2.0 - Herf - Fresnel alpha, default settings

Reduce the opacity of this layer to 70%.
Layers>Merge>Merge Down.
3. (This effect can change according to the used tube).
Layers>New Raster Layer.
Selections>Select All.
Open the dancer tube and go to Edit>Copy.
Minimize the tube.
Go back to your work and go to Edit>Paste into Selection.
Selections>Select None.
Adjust>Blur>Motion Blur.

4. K key to activate your Pick Tool 
mode Scale 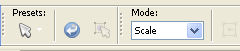
push the top central node down to 100 pixels,
and the lower central node up to 450 pixels.
(If you don't see the rulers, go to View>Rulers).

M key to deselect the Tool.
Effects>Plugins>Mura's Meister - Pole Transform.

Selections>Load/Save Selection>Load Selection from Alpha Channel.
The selection #1 is immediately available. You just have to click Load.

Press CANC on the keyboard 
Keep selected.
5. Activate the layer below (Raster 1).
Layers>New Raster Layer.
Flood Fill the layer with your foreground color.
Layers>New Mask layer>From image
Open the menu under the source window and you'll see all the files open.
Select the mask 1406-silk_space.

Layers>Merge>Merge Group.
Keep always selected.
6. Activate again the layer below, Raster 1.
Layers>New Raster Layer.
Open the landscape tube and go to Edit>Copy.
Go back to your work and go to Edit>Paste into Selection.
Selections>Select None.
8. Activate the top layer.

Edit>Copy.
Layers>New Raster Layer.
Selections>Load/Save Selection>Load Selection from Alpha Channel.
Load again the selection #1.
Selections>Modify>Select Selection Borders.

Flood Fill the selection with your background color.
Edit>Paste into Selection (the image in memory).
Effects>Texture Effects>Straw Wall.

Effects>3D Effects>Inner Bevel.

Selections>Select None.
Effects>3D Effects>Drop Shadow, color black.

9. Layers>Arrange>Move Down.
Layers>Merge>Merge Down - 2 times.

Effects>3D Effects>Drop Shadow, color black.

Selections>Load/Save Selection>Load Selection from Alpha Channel.
Open the selections menu and load the selection #2

Effects>Geometric Effects>Spherize

Selections>Select None.
You should have this.

10. Layers>Duplicate.
Image>Resize, to 10%, resize all layers not checked.
Layers>Arrange>Bring to Top.
Effects>Plugins>Mura's Meister - Copies.

The result is random, so you can't get the same result as mine,
and even if you apply the effect a second time with the same settings the result will always be different.
If you want to change it, click on the preview window until you see the result you like best.

K key to activate your Pick Tool
and set Position X: 5,00 and Position Y: 188,00.

M key to deselect the Tool.
Adjust>Sharpness>Sharpen.
Effects>3D Effects>Drop Shadow, same settings.
11. Activate the layer below.

Effects>Reflection Effects>Rotating Mirror.

For my example, I skipped this step, because it took away the clear part of the effect.

See the tag with this step at the end of the tutorial.
12. Activate the layer below, Raster 3.
Set your foreground color to black.
Layers>New Raster Layer.
Flood Fill the layer with color black.
Layers>New Mask layer>From image
Open the menu under the source window
and select the mask Mask flouté_by MM

Layers>Duplicate.
Layers>Merge>Merge Group.
Effects>Plugins>AP Lines - Lines SilverLining.

Layers>Arrange>Move Down.
This is the result

This the result, skipping step 11.

13. Open déco 1, and go to Edit>Copy.
Go back to your work and go to Edit>Paste as new layer.
Change the Blend Mode of this layer to Overlay.
Selections>Load/Save Selection>Load Selection from Alpha Channel.
Open the selections menu and load again the selection #2
Press CANC on the keyboard.
Selections>Select None.
14. Activate the top layer.
Open the tube déco mon texte, and go to Edit>Copy.
Go back to your work and go to Edit>Paste as new layer.
Change the Blend Mode of this layer to Luminance (legacy).
15. Open déco texte 2, and go to Edit>Copy.
Go back to your work and go to Edit>Paste as new layer.
Change the Blend Mode of this layer to Overlay.
K key to activate your Pick Tool
keep Position X: 11,00 and set Position Y: 113,00.

M key to deselect the Tool.
16. Set again your foreground color to the first color #e3493f
(necessary to apply the Mehdi plugin).

Image>Add borders, 1 pixel, symmetric, background color.
Selections>Select All.
Image>Add borders, 10 pixels, symmetric, color white.
Effects>Image Effects>Seamless Tiling, default settings.

Selections>Invert.
Adjust>Blur>Gaussian Blur - radius 30.
Effects>Texture Effects>Straw Wall, same settings.
Selections>Invert.
Effects>3D Effects>Drop Shadow, color black.
Selections>Select None.
17. Image>Add borders, 1 pixel, symmetric, background color.
Selections>Select All.
Image>Add borders, 10 pixels, symmetric, color white.
Selections>Invert.
Effects>Plugins>Mehdi - Wavy Lab 1.1., same settings.
Effects>Edge Effects>Enhance.
Selections>Invert.
Effects>3D Effects>Drop Shadow, same settings.
Selections>Select None.
Image>Add borders, 1 pixel, symmetric, background color.
18. Activate again the dancer tube and go to Edit>Copy.
Go back to your work and go to Edit>Paste as new layer.
Image>Resize, to 70%, resize all layers not checked.
Move  the tube to the right side, the tube to the right side,
or K key to activate your Pick Tool
and set Position X: 418,00 and Position Y: 16,00.

M key to deselect the Tool.
Effects>3D Effects>Drop Shadow, color black.

19. Sign your work on a new layer.
Add, if you want the author's and translator's watermarks.
20. Layers>Merge>Merge All.
Image>Resize, 950 pixels width, resize all layers checked.
Adjust>Sharpness>Unsharp Mask - Soft.

Save as jpg.
Version with the effect of step 11.
For the tubes of this version thanks Lana and Anna.br.

Your versions. Thanks

Marygraphics

Charlotte

Ginette

Marion
If you have problems or doubts, or you find a not worked link,
or only for tell me that you enjoyed this tutorial, write to me.
17 May 2022

|


