|
TOP URBAN CITY


Thanks Lica Cida for your invitation to translate your tutorial

This tutorial was created with PSPX9 and translated with PSPX2 and PSPX3, but it can also be made using other versions of PSP.
Since version PSP X4, Image>Mirror was replaced with Image>Flip Horizontal,
and Image>Flip with Image>Flip Vertical, there are some variables.
In versions X5 and X6, the functions have been improved by making available the Objects menu.
In the latest version X7 command Image>Mirror and Image>Flip returned, but with new differences.
See my schedule here
 French translation here French translation here
 your versions ici your versions ici
For this tutorial, you will need:
Material here
For the tubes thanks Suizabella (SuizaBella_Ref_AG-001950\SuizaBella Flores4)
Paysage _w62rKvQ7Iyw9m-YeC7CyPeM6hs
mask: maskmp.
The rest of the material is by Lica Cida
(you find here the links to the material authors' sites)
Plugins
consult, if necessary, my filter section here
Filters Unlimited 2.0 here
Filter Factory Gallery A - Holydays in Egypt here
Photoeffex - Scanlines here
Mura's Seamless - Check with Gradation, Emboss at Alpha here
Simple - Blintz here
AAA Frames - Foto Frame /AAA Filters - Custom, Transparent Vignette here
Filters Factory Gallery, Mura's Seamless and Simple can be used alone or imported into Filters Unlimited.
(How do, you see here)
If a plugin supplied appears with this icon  it must necessarily be imported into Unlimited it must necessarily be imported into Unlimited

You can change Blend Modes according to your colors.
In the newest versions of PSP, you don't find the foreground/background gradient (Corel_06_029).
You can use the gradients of the older versions.
The Gradient of CorelX here
Copy the script movercity_mp in the Scripts-Restriced Folder (but works also in the Scripts-Trusted Folder)
Copy the Preset Illumination\Lights_city_mp in the Presets Folder.
Open the mask in PSP and minimize it with the rest of the material.
1. Set your foreground color to #001922,
and your background color to #1ecefc.

Set your foreground color to a Foreground/Background Gradient, style Sunburst.

Open a new transparent image 1000 x 700 pixels.
Flood Fill  the transparent image with your gradient. the transparent image with your gradient.
2. Effects>Plugins>Mura's Seamless - Check with Gradation, par défaut.

3. If you don't see the Scripts Bar, go to View>Toolbars>Scripts.
Open the menu and select the script movercity

Click on the black arrow (or blue in the new versions) to run the script

The script was created with PSPX9.
If you are using an older version you'll gett this message

Avec PSPX3 I had no problems. Click ok to go on
Finally, you'll get this

if you have problems with the script,
copy/paste as new layer the file you find in the material (scriptrodado)
and move it  down outside the border, down outside the border,
to get the same result

Or, if you want, you can use the starting image - depart - that I added in the material,
and start the tutorial from here.

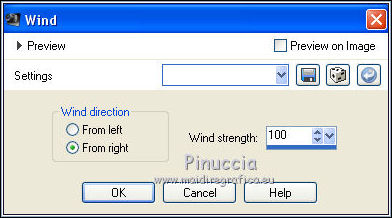
4. Effects>Distortion Effects>Wind - from the left, intensity 100

Repeat Effects>Distortion Effects>Wind, this time from the right.

5. Layers>New Raster Layer.
Flood Fill  the layer with your Gradient. the layer with your Gradient.
Layers>Arrange>Move Down.
6. Effects>Plugins>Filter Factory Gallery A - Holidays in Egypt.

Attention, please.
This effect is also in VM Extravaganza and Tramages.
In old versions it may happen that the filter added previously in the File Location,
prevents the use of the effect contained in the other filters.
Therefore, if you don't see the effect in your liste,
you have to remove from the File Locations the VM Extravaganza and/or Tramages,
or use the effect in Unlimited.

7. Effects>Plugins>Simple - Blintz
8. Effects>Reflection Effects>Rotating Mirror.

Effects>Plugins>AAA Filters - Transparent Vignette.

Effects>Image Effects>Seamless Tiling, default settings.

Effects>Plugins>Mura's Seamless - Emboss at alpha, default settings.

9. Open the image cityback and go to Edit>Copy.
Go back to your work and go to Edit>Paste as new layer.
Effects>Plugins>Mura's Seamless - Emboss at alpha, same settings.

Keep the Blend Mode of the layer to Multiply.
10. Layers>New Raster Layer.
Layers>Arrange>Send to Bottom.
Flood Fill  the layer with your gradient. the layer with your gradient.
11. Effects>Plugins>PhotoEffex - Scanlines, default settings.

12. Effects>Illumination Effects>Lights
select the preset city and ok

Change the Blend Move of the layer above to Overlay, ou at your choice.

13. Activate the layer Raster 3.

Open the image decocitylc and go to Edit>Copy.
Go back to your work and go to Edit>Paste as new layer.
14. Layers New Raster Layer (Raster 6).
Activate your Selection Tool  circle circle

and draw a circle as below

If you have problems, don't worry about how you draw the circle.
After drawing it, you can modify it with Selections>Edit Selection
and your Pick Tool 

Selections>Edit Selection and you'll get your selection.
15. Open the tube w62rKvQ7Iyw9m-YeC7CyPeM6hs and go to Edit>Copy.
Go back to your work and go to Edit>Paste into Selection.

Adjust>Sharpness>Sharpen More.
Effects>Plugins>AAA Filters - Custom - click on Landscape and ok.

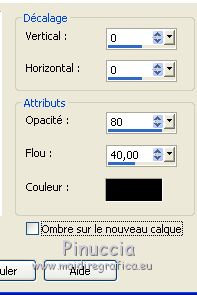
Effects>3D Effects>Drop Shadow, color #000000.

Selections>Select None.
16. Set your foreground color to white #ffffff.
Reduce the opacity of your Flood Fill Tool to 50%.
Layers>New Raster Layer (Raster 7).
Flood Fill  the layer with color white #ffffff. the layer with color white #ffffff.
(don't forget to set again the opacity to 100)
Layers>New Mask layer>From image
Open the menu under the source window and you'll see all the files open.
Select the mask maskmp.

Layers>Merge>Merge Group.
17. Effects>Geometric Effects>Skew.

Layers>Duplicate.
Image>Flip.
Layers>Duplicate.
Image>Mirror.
Layers>Merge>Merge Down - 2 times.
Effects>Plugins>Mura's Seamless - Emboss at alpha, default settings.

Layers>Blend Modes/Opacities

18. Open the image decocitylc1 and go to Edit>Copy.
Go back to your work and go to Edit>Paste as new layer.
19. Activate your top layer, Raster 1.
Open the tube SuizaBella Flores4 and go to Edit>Copy.
Go back to your work and go to Edit>Paste as new layer.
Move  the tube at the bottom right, or at your choice. the tube at the bottom right, or at your choice.
20. Open the tube SuizaBella_Ref_AG-001950 and go to Edit>Copy.
Go back to your work and go to Edit>Paste as new layer.
Image>Resize, to 80%, resize your layers not checked.
Move  the tube to the left side. the tube to the left side.
Adjust>Sharpness>Sharpen More.
Effects>3D Effects>Drop Shadow, same settings.

21. Image>Add borders, 1 pixel, symmetric, color #000000.
Image>Resize, to 90%, resize all layers checked.
22. Image>Add borders, 20 pixels, symmetric, color #ffffff.
Image>Add borders, 1 pixel, symmetric, color #000000.
Image>Add borders, 20 pixels, symmetric, color #ffffff.
23. Selections>Select All.
Selections>Modify>Contract - 42 pixels.
Effects>3D Effects>Drop Shadow, color #000000.

Selections>Select None.
24. Effects>Plugins>AAA Frames - Foto Frame

Add, if your like, author and translator watermarks.
Sign your work on a new layer.
Layers>Merge>Merge All and save as jpg.
Version with tubes by Azalée and Annytubes

 Your versions here Your versions here

If you have problems or doubts, or you find a not worked link, or only for tell me that you enjoyed this tutorial, write to me.
28 Août2020
|

