Home |
Home |

Mappa sito |
Mappa sito |
Tutorial |
Tutorial |
Tut tecnici |
Tut tecnici |
Links-Banner |
Links-Banner |
Regali-Award |
Regali-Award |
Informatica |
Informatica |
Archivio |
Archivio |
Mail |
Mail |
Privacy policy |
Privacy policy |
Novità |
Novità |
Home |
Home |
Mappa sito |
Mappa sito |
Tutorial |
Tutorial |
Tut tecnici |
Tut tecnici |
Links-Banner |
Links-Banner |
Regali-Award |
Regali-Award |
Informatica |
Informatica |
Archivio |
Archivio |
Mail |
Mail |
Privacy policy |
Privacy policy |
Novità |
Novità |
|
TOP SIENNA 

This tutorial was created with PSPX8 and translated with PSPX7 and PSPX3, but it can also be made using other versions of PSP.
If you have problems with the script, open the file "script" and copy/paste as new layer the two layers.  9. Activate the layer Raster 3 (the first layer of the script). Effects>Plugins>Mehdi - Weaver.  10. Activate the layer Copy of Raster 3. Effects>Plugins>Mehdi - Weaver.  Layers>Merge>Merge Down. Effects>Plugins>Mura's Seamless - Emboss at Alpha, default settings.  Effects>Distortion Effects>Pinch 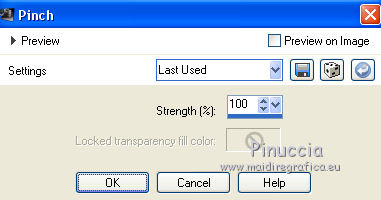 11. Activate the layer Raster 1. Effects>Plugins>Graphics Plus - Button Beveler III.  12. Effects>Plugins>Simple - Pizza Slice Mirror. Effets>Modules Externes>Simple - Top Left Mirror.  13. Effects>Artistic Effects>Halftone.  Adjust>Add/Remove Noise>JPEG Artifact Removal.  Effects>Plugins>FM Tile Tools - Blend Emboss, default settings. 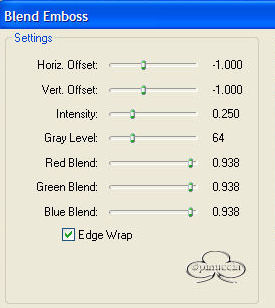 14. Selections>Load/Save Selection>Load Selection from Disk. Look for and load the selection sienna2lc.PspSelection.  Selections>Promote Selection to layer. 15. Effects>Plugins>Carolaine and Sensibility - CS-HLines, default.  Selections>Select None. Effects>Edge Effects>Enhance. Layers>Duplicate. Image>Mirror. Layers>Merge>Merge Down. Effects>Plugins>Alien Skin Eye Candy 5 Impact - Perspective Shadow, same settings. 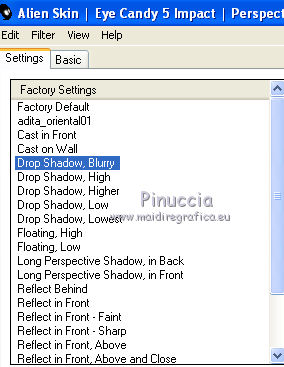 16. Activate again the layer Raster 1. Selections>Load/Save Selection>Load Selection from Disk. Look for and load the selection sienna3lc.PspSelection.  Layers>New Raster Layer. Set your foreground color to Color. Flood Fill  the selection with your foreground color #dfad4d. the selection with your foreground color #dfad4d.17. Effects>Plugins>Alien Skin Eye Candy 5 Impact - Extrude set both Solid color and Hightlight Color with your background color #400802  Selections>Select None. 18. Effects>Plugins>Carolaine and Sensibility - CS-HLines, default settings.  Effects>Edge Effects>Enhance. Effects>Plugins>Alien Skin Eye Candy 5 Impact - Perspective Shadow, same settings. 19. Activate the layer Raster 1. Effects>Illumination Effects>Lights. Select the preset lc11  20. Effects>Plugins>Nik Software - Color Efex Pro - Glamor Glow.  Repeat the Nik Effects on the layer Raster 4. 21. Layers>New Raster layer. Layers>Arrange>Send to Bottom. Selections>Select All. Open the image free_back_ildiko (4) and go to Edit>Copy. Go back to your work and go to Edit>Paste as new layer. Selections>Select None. Change the Blend Mode of Layer 1 to Overlay.  Activate the layer Promoted Selection (the layer with the selection circle1lc)  Adjust>One Step Photo Fix. Change the Blend Mode of the layer Raster 3 (the script) to Screen  Optional: activate the layer Raster 2. Effects>Plugins>Alien Skin Eye Candy 5 Impact - Perspective Shadow, same settings. The tag and the layers  22. Open the tube SuizaBella_Ref_AG-00747 and go to Edit>Copy. Go back to your work and go to Edit>Paste as new layer. Image>Resize, to 80%, resize all layers not checked. Move  the tube to the left side. the tube to the left side.Effects>3D Effects>Drop Shadow, at your choice. 23. Open the tube Grisi_Tube_Decoration_357 and go to Edit>Copy. Go back to your work and go to Edit>Paste as new layer. Image>Resize, 2 times to 80%, resize all layers not checked. Move the tube at the bottom right.Effects>3D Effects>Drop Shadow, at your choice. 24. Sign your work on a new layer. little note about the watermark: I don't ask to put watermark on the versions made by my translations. But if you decide to use the watermark supplied by the author, I would appreciate that my work as translator was also respected. For that, I added my watermark to the material. 25. Image>Ajouter des bordures, 1 pixel, symétrique, couleur #000000. Image>Ajouter des bordures, 10 pixels, symétrique, couleur #ffffff. Image>Ajouter des bordures, 1 pixel, symétrique, couleur #000000. Image>Ajouter des bordures, 10 pixels, symétrique, couleur #ffffff. Image>Ajouter des bordures, 1 pixel, symétrique, couleur #000000. Image>Ajouter des bordures, 10 pixels, symétrique, couleur #ffffff. 26. Image>Resize, 1024 pixels width, resize all layers checked. Save as jpg. Version with tubes by Beatriz and Nena Silva   Your versions here Your versions here If you have problems or doubts, or you find a not worked link, or only for tell me that you enjoyed this tutorial, write to me. 5 April 2020 |


 French translation
  it must necessarily be imported into Unlimited
 in the folder of the plugin Alien Skin Eye Candy 5 Impact>Settings>Glass.


 the image to the left side.


