|
TOP PAUSE


Thanks Lica Cida for your invitation to translate your tutorial

This tutorial was created with PSPX9 and translated with PSPX2 and PSPX3, but it can also be made using other versions of PSP.
Since version PSP X4, Image>Mirror was replaced with Image>Flip Horizontal,
and Image>Flip with Image>Flip Vertical, there are some variables.
In versions X5 and X6, the functions have been improved by making available the Objects menu.
In the latest version X7 command Image>Mirror and Image>Flip returned, but with new differences.
See my schedule here
 French translation here French translation here
 your versions ici your versions ici
For this tutorial, you will need:
Material here
Background image: abstract-stylish.
For the tubes thanks SuizaBella (Suizabella_Ref_AG-001049 and Suizabella_Ref_AG-001091)
The rest of the material is by Lica Cida.
(you find here the links to the material authors' sites)
Plugins
consult, if necessary, my filter section here
Filters Unlimited 2.0 here
&<Bkg Designer sf10I> - Cruncher (à importer dans Unlimited) here
Mura's Meister - Cloud here
Alien Skin Eye Candy 5 Impact - Perspective Shadow here
Flaming Pear - Flexify 2 here
AAA Frames - Foto Frame /AAA Filters - Custom here
Filters Graphics Plus can be used alone or imported into Filters Unlimited.
(How do, you see here)
If a plugin supplied appears with this icon  it must necessarily be imported into Unlimited it must necessarily be imported into Unlimited

You can change Blend Modes according to your colors.
1. Open a new transparent image 1000 x 700 pixels.
Set your foreground color to #634821
and your background color to #9b7130.

Effects>Plugins>Mura's Meister - Cloud

remember that this plugin works with the colors of your Materials,
but keeps in memory the first settings used after the opening of PSP.
So, if you have already used the plugin, press Reset to be sure to have your colors.
To change the appearance of the clouds, which is random, click on the window preview,
until you'll see the result you like better
(for that, your result will be always different).
2. Layers>New Raster Layer.
Selections>Select All.
Open the image abstract-stylish and go to Edit>Copy.
Go back to your work and go to Edit>Paste into Selection.
Selections>Select None.
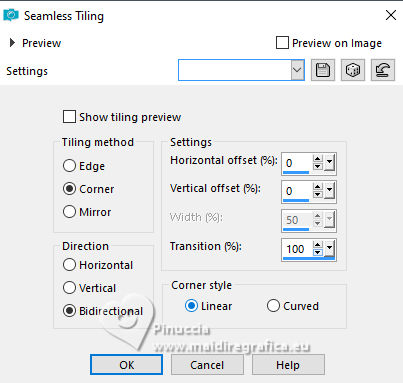
Effects>Image Effects>Seamless Tiling.
3. Effects>Geometric Effects>Skew.

4. Effects>Reflection Effects>Rotating Mirror.

Layers>Duplicate.
Image>Flip.
Layers>Merge>Merge Down.
Effects>Edge Effects>Enhance More.
Layers>Duplicate.
5. Effects>Plugins>Flaming Pear - Flexify 2.

Note: If you have problems to use the effect Glue: procedural +, use normal.
The effects will a bit different, but no problem.
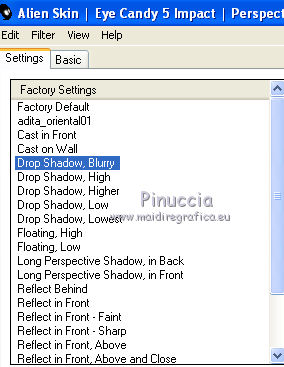
Effects>Plugins>Alien Skin Eye Candy 5 Impact - Perspective Shadow
sélectionner le preset Drop Shadow Blurry et ok.
6. Selections>Select All.
Selections>Modify>Contract - 80 pixels

Set your foreground color to white #ffffff.
Reduce the opacity of your Flood Fill Tool to 40
Layers>New Raster Layer.
Flood Fill  the selection with color white #ffffff. the selection with color white #ffffff.
7. Selections>Modify>Select Selection Borders.

Change the opacity of your Flood Fill Tool to 60%
Layers>New Raster Layer.
Flood Fill the selection with color white #ffffff.
don't forget to set again the opacity to 100
8. Effects>3D Effects>Inner Bevel.

Selections>Select None.
Layers>Merge>Merge Down.
9. Effects>Plugins>Filters Unlimited 2.0 - &<Bkg Designersf10I> - Cruncher

Effects>Edge Effects>Enhance More.
Effects>Plugins>Alien Skin Eye Candy 5 Impact - Perspective Shadow - preset Drop Shadow Blurry et ok.
I didn't apply the effect, because I found the result too dark;
you decide to apply or not
10. Open decoabstract-stylish and go to Edit>Copy.
Go back to your work and go to Edit>Paste as new layer.
Effects>Image Effects>Offset.

Keep the Blend Mode to Overlay.

11. Open the misted SuizaBella_Ref_AG-001091 and go to Edit>Copy.
Go back to your work and go to Edit>Paste as new layer.
Image>Resize, 2 times to 80%, resize all layers not checked.
Layers>Arrange>Move Down.
Place  rightly the tube, see my example. rightly the tube, see my example.
Adjust>Sharpness>Sharpen More.
Effects>Plugins>AAA Filters - Custom - click on Landscape and ok.

The Layers, the Blend Modes and the opacities (adapt according to your colors).

12. Activate the layer Raster 2.
Effects>Textures Effects>Weave, weave color: dark color.

13. Activate the layer Raster 3.
Layers>New Raster Layer.
Selections>Select All.
Open decopause1lc and go to Edit>Copy.
Go back to your work and go to Edit>Paste into Selection.
Selections>Select None.
Effects>Edge Effects>Enhance More.
Change the Blend Mode of this layer to Hard Light.
14. Open decopause2lc and go to Edit>Copy.
Go back to your work and go to Edit>Paste as new layer.
Image>Mirror.
(keep the Blend Mode in Luminance (legacy)
Activate your Pick Tool 
and pull the parts up and down to the edges

Adjust>Sharpness>Sharpen More.
15. Open decopause3lc and go to Edit>Copy.
Go back to your work and go to Edit>Paste as new layer.
Adjust>Sharpness>Sharpen More
(Raster 8)

16. Activate your top layer, Raster 4.
Open the tube SuizaBella_Ref_AG-001049 and go to Edit>Copy.
Go back to your work and go to Edit>Paste as new layer.
Resize and place the tube at your liking.
Effects>Edge Effects>Enhance.
Effects>Plugins>Alien Skin Eye Candy 5 Impact - Perspective Shadow - preset Drop Shadow Blurry and ok.
With your Erase Tool  , opacity 30/40 , opacity 30/40
give small touches to the woman's dress, to make the radiant deco and the edge of the frame visible.

You should have this

Image>Add borders, 40 pixels, symmetric, color #ffffff.
17. Effects>Plugins>AAA Frames - Foto Frame.

18. Image>Resize, 1000 pixels width, resize all layers checked.
19. Sign your work on a new layer.
little note about the watermark:
I don't ask to put watermark on the versions made by my translations.
But if you decide to use the watermark supplied by the author, I would appreciate that my work as translator was also respected.
For that, I added my watermark to the material.
20. Layers>Merge>All and save as jpg.
Version with tube by Suizabella

Your versions here

If you have problems or doubts, or you find a not worked link, or only for tell me that you enjoyed this tutorial, write to me.
7 July 2020
|


