|
TOP ADORABLE


Thanks Lica Cida for your invitation to translate your tutorial

This tutorial was created with PSPX9 and translated with PSPX2 and PSPX3 and PSPX7, but it can also be made using other versions of PSP.
Since version PSP X4, Image>Mirror was replaced with Image>Flip Horizontal,
and Image>Flip with Image>Flip Vertical, there are some variables.
In versions X5 and X6, the functions have been improved by making available the Objects menu.
In the latest version X7 command Image>Mirror and Image>Flip returned, but with new differences.
See my schedule here
 French translation here French translation here
 your versions here your versions here
For this tutorial, you will need:
Material here
Thanks for the tubes Calligraph.
(you find here the links to the material authors' sites)
Plugins
consult, if necessary, my filter section here
Mura's Meister - Perspective Tiling here
Alien Skin Eye Candy 5 Impact - Perspective Shadow here
AAA Filters - Custom here

You can change Blend Modes according to your colors.
In the newest versions of PSP, you don't find the foreground/background gradient (Corel_06_029).
You can use the gradients of the older versions.
The Gradient of CorelX here
Copy the presets Emboss 3 and Emboss 6 in the Presets Folder.
1. Set your foreground color to #d9cafe,
and your background color to #3c174e.

Set your foreground color to a Foreground/Background Gradient, style Linear.

Open a new transparent image 1000 x 700 pixels.
Flood Fill  the transparent image with your background color #ec174e. the transparent image with your background color #ec174e.
2. Selections>Select All.
Open the tube Callitubes-1311mulheres and go to Edit>Copy.
Go back to your work and go to Edit>Paste into Selection.
Selections>Select None.
3. Effects>Image Effects>Seamless Tiling.

4. Adjust>Blur>Motion Blur

Edit>Repeat Motion Blur.
5. Effects>Reflection Effects>Feedback.

6. Effects>Geometric Effects>Circle.

7. Layers>Duplicate.
Image>Mirror.
Change the Blend Mode of this layer to Lighten.

Layers>Merge>Merge visible.
8. Effects>Distotion Effects>Polar Coordinates.

Image>Flip.
9. Adjust>Brightness and Contraste>Brightness and Contraste.

Effects>User Defined Filter - select the preset Emboss 6 and ok.

10. Image>Canvas Size - 1000 x 800 pixels.

Layers>Duplicate.
11. Effects>Plugins>Mura's Meister - Perspective Tiling.

Effects>User Defined Filters - select the preset Emboss 3 and ok.

12. Effects>Reflection Effects>Rotating Mirror, default settings.

Activate your Magic Wand Tool  , feather 60, , feather 60,
and click in the transparent part to select it.
Press 2-3 times CANC on the keyboard  to soften the effect. to soften the effect.
Selections>Select None.
13. Image>Add borders, 1 pixel, symmetric, background color.
Image>Add borders, 1 pixels, symmetric, foreground color.
Selections>Select All.
Image>Add borders, 40 pixels, symmetric, color #ffffff.
Selections>Invert.
Flood Fill  the selection with your Gradient. the selection with your Gradient.
14. Effects>3D Effects>Drop Shadow, color #000000.

Selections>Select None.
15. Image>Add borders, 1 pixel, symmetric, foreground color.
Image>Add borders, 1 pixel, symmetric, background color.
Selections>Select None.
Image>Add borders, 30 pixels, symmetric, foreground color.
Effects>3D Effects>Drop Shadow, same settings.

Selections>Select None.
16. Effects>Plugins>AAA Filters - Custom - click on Grain and ok.

17. Activate again the tube Callitubes-1311mulheres and go to Edit>Copy.
Go back to your work and go to Edit>Paste as new layer.
Move  the tube to the left side. the tube to the left side.
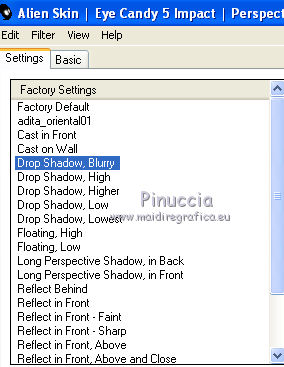
Effects>Plugins>Alien Skin Eye Candy 5 Impact - Perspective Shadow.
Select the preset Drop Shadow Blurry and ok.

18. Copy/Paste as new layer the tubes:
Callitube-96diversos
Callitubes-36diversos
Callitubes-153flores
Place  the tubes to your liking. the tubes to your liking.
For me

On the three layers:
Effects>Plugins>Alien Skin Eye Candy 5 Impact - Perspective Shadow - Drop Shadow Blurry.
19. Sign your work on a new layer.
Add, if you want, the author's and translator's watermarks.
20. Image>Add borders, 1 pixel, symmetric, background color.
Image>Add borders, 1 pixel, symmetric, foreground color.
Image>Resize, 1000 pixels width, resize all layers checked.
Save as jpg.
Version with tubes by Karine

 Your versions here Your versions here

If you have problems or doubts, or you find a not worked link, or only for tell me that you enjoyed this tutorial, write to me.
23 Octobre 2021

|

