|
TAG I AM


Thanks Lica Cida for your invitation to translate your tutorial

This tutorial was created with PSPX9 and translated with PSPX2 and PSPX3, but it can also be made using other versions of PSP.
Since version PSP X4, Image>Mirror was replaced with Image>Flip Horizontal,
and Image>Flip with Image>Flip Vertical, there are some variables.
In versions X5 and X6, the functions have been improved by making available the Objects menu.
In the latest version X7 command Image>Mirror and Image>Flip returned, but with new differences.
See my schedule here
 French translation here French translation here
 your versions ici your versions ici
For this tutorial, you will need:
Material here
Thanks for the tubes Luz Cristina (5312-luzcristina - 5472-luzcristina - 5156-luzcristina)
and Jeanne (Jeanne_Deko_Tafeltjes_17_02_2018)
for the mask DWorisch (hairflores5dworisch)
The rest of the material is by Lica Cida.
(you find here the links to the material authors' sites)
Plugins
consult, if necessary, my filter section here
Filters Unlimited 2.0 here
Toadies - Weaver here
&<Sandflower specials*v*> - Pool Shadow (to import in Unlimited) here
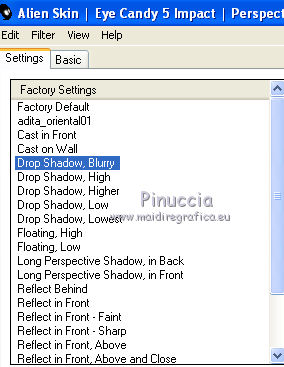
Alien Skin Eye Candy 5 Impact - Perspective Shadow here
Mura's Seamless - Emboss at Alpha here
Mura's Meister Perspective Tiling here
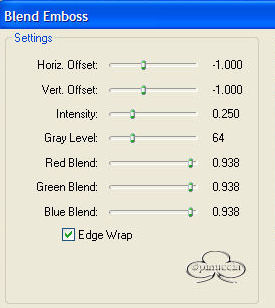
FM Tile Tools - Blend Emboss here
Simple - Top Left Mirror here
Nik Software - Color Efex Pro here
Filters VM Instant Art and Factory Gallery can be used alone or imported into Filters Unlimited.
(How do, you see here)
If a plugin supplied appears with this icon  it must necessarily be imported into Unlimited it must necessarily be imported into Unlimited

You can change Blend Modes according to your colors.
In the newest versions of PSP, you don't find the foreground/background gradient (Corel_06_029).
You can use the gradients of the older versions.
The Gradient of CorelX here
The texture Corel_15_047 or Tin foil is standard in PSP.
If you don't find it in your Psp, copy the supplied texture in the Textures Folder.
Open the masks in PSP and minimize them with the rest of the material.
1. Open a new transparent image 900 x 600 pixels.
Selections>Select All.
Open the tube 5312-luzcristina - and go to Edit>Copy.
Go back to your work and go to Edit>Paste into Selection.
Selections>Select None.
Effects>Image Effects>Seamless Tiling, default settings.

Layers>Merge>Merge all.
Layers>Promote Background Layer.
2. Adjust>Blur>Radial Blur.

Effects>Edge Effects>Enhance.
Adjust>Add/Remove Noise>JPEG Artifact Removal.

Effects>Plugins>FM Tile Tools - Blend Emboss, default settings.
Layers>Duplicate.
3. Selections>Select All.
Selections>Modify>Contract - 70 pixels.

Effects>Plugins>Filters Unlimited 2.0 - Buttons &Frames - 3D Glass Frame 2.

Selections>Invert.
Press CANC on the keyboard 
Selections>Select None.
4. Effects>Texture Effects>Texture - select the texture Corel_15_047 or Tin foil.

5. Effects>Geometric Effects>Perspective Horizontal.

Repeat the Effect Perspective Horizontal -55.

6. Effects>Reflection Effects>Kaleidoscope.

7. Image>Free Rotate - 90 degrees to right

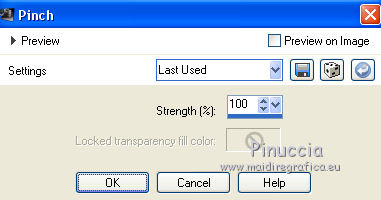
Effects>Distortion Effects>Pinch
Image>Resize, to 80%, resize all layers not checked.
8. Effects>Plugins>Toadies - Weaver, default settings.

9. Effects>Geometric Effects>Skew

Effects>Edge Effects>Enhance.
Change the Blend Mode of this layer to Hard Light, or as you like better.
10. Open deco2lc - and go to Edit>Copy.
Go back to your work and go to Edit>Paste as new layer.
Effects>Image Effects>Offset.

Effects>Edge Effects>Enhance.
Change the Blend Mode of this layer to Difference or as you prefer.

Activate the layer Raster 1.
Layers Duplicate.
Layers>Arrange>Bring to top.
11. Layers>New Mask layer>From image
Open the menu under the source window and you'll see all the files open.
Select the mask hairflores5dworisch.

Layers>Merge>Merge Group.
Effects>Plugins>Mura's Seamless - Emboss at Alpha, default settings.

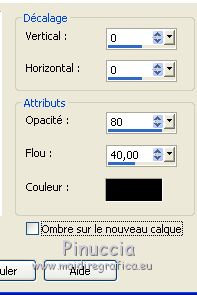
Effects>3D Effects>Drop Shadow, color #000000.

Effects>Image Effects>Offset.

Activate your bottom layer.
Selections>Select All.
Image>Crop to selection.
12. Image>Canvas Size - 900 x 700 pixels.

13. Choose two color of your background; for the example:
set your foreground color to #9f7456,
and your background color to #d8bdb0.

Set your foreground color to a Foreground/Background Gradient, style Linear.

Layers>New Raster Layer.
Layers>Arrange>Send to Bottom.
Flood Fill  the layer with your gradient. the layer with your gradient.
14. Activate the layer Raster 1.
Effects>Plugins>Mura's Meister - Perspective Tiling.

Effects>Reflection Effets>Rotating Mirror.

Effects>Plugins>Mura's Seamless - Emboss at Alpha, default settings.

Layers>Arrange>Move Up - 2 times

15. Effects>Plugins>Filters Unlimited 2.0 - &<Sandflower specials*v*> - Pool Shadow, default settings.

16. Activate the bottom layer, Raster 3.
Selections>Select All.
Open the misted 5472-luzcristina - and go to Edit>Copy.
Go back to your work and go to Edit>Paste into Selection.
Selections>Select None.
17. Effects>Distortion Effects>Pixelate.

Adjust>Blur>Motion Blur

Effects>Edge Effects>Enhance.
Effects>Plugins>FM Tile Tools - Blend Emboss, default settings.
Layers>Duplicate.
18. Effects>Plugins>Nik Software - Color Efex Pro
Bi-Color Filters - to the right Color Set: Cool Warm 2

Change the Blend Mode of this layer to Difference and reduce the opacity to 85%, or as you like better.

In the version under the tutorial the Blend mode is Normal

19. Activate your top layer.
Edit>Paste as new layer (the misted 5472-luzcristina is still in memory).
Image>Resize, to 80%, resize all layers not checked.
Adjust>Sharpness>Sharpen.
Move  the tube at the upper right, or where you prefer. the tube at the upper right, or where you prefer.

20. Open the tube Jeanne_Deko_Tafeltjes_17_02_201817 - and go to Edit>Copy.
Go back to your work and go to Edit>Paste as new layer.
Image>Mirror.
Image>Resize, at your choice (for me 2 times to 80%), resize all layers not checked.
Move the tube at the upper left, or where you prefer.
Effects>Plugins>Alien Skin Eye Candy 5 Impact - Perspective Shadow.
Select the preset Drop Shadow,Blurry and ok.
21. Open the tube 5312-luzcristina - and go to Edit>Copy.
Go back to your work and go to Edit>Paste as new layer.
Image>Mirror.
Image>Resize, at your choice (for me to 90%), resize all layers not checked.
Move the tube to the right side.
Effects>Plugins>Alien Skin Eye Candy 5 Impact - Perspective Shadow, Drop Shadow Blurry.
Optional.
Choose a misted to refine the Perspective Tiling.
I chose the 5156-luzcristina (see below that I used the same misted).
22. Layers>New Mask layer>From image
Open the menu under the source window
and select the mask Mask_herbe.

Layers>Merge>Merge Group.
Effects>Plugins>Mura's Seamless - Emboss at Alpha, default settings.

Édition>Copy.
Go back to your work and go to Edit>Paste as new layer.
Use to your liking (see my example).
I moved the layers below the tube layers,
and changed the Blend Mode in Hard light)

23. Image>Ajouter des bordures, 1 pixel, symétrique, couleur #000000.
Image>Ajouter des bordures, 3 pixels, symétrique, couleur #ffffff.
Image>Ajouter des bordures, 1 pixel, symétrique, couleur #000000.
Image>Ajouter des bordures, 50 pixels, symétrique, couleur #ffffff.
24. Ouvrir le tube deco(arquivo) - and go to Edit>Copy.
Go back to your work and go to Edit>Paste as new layer.
Effects>Image Effects>Offset.

25. Effects>Plugins>Simple - Top Left Mirror.
26. Selections>Select All.
Selections>Modify>Contract - 50 pixels.

Effects>3D Effects>Drop Shadow, couleur #000000.
Selections>Select None.
Image>Ajouter des bordures, 1 pixel, symétrique, couleur #000000.
Image>Ajouter des bordures, 3 pixels, symétrique, couleur #ffffff.
Image>Ajouter des bordures, 1 pixel, symétrique, couleur #000000.
Signer votre travail sur un nouveau calque.
Ajouter, si vous voulez, les watermarks de l'auteur et du traducteur.
Image>Redimensionner, 1000 pixels de largeur, redimensionner tous les calques coché.
Enregistrer en jpg.
Flood Fill the transparent image with your gradient.
2. Selections>Load/Save Selection>Load Selection from Disk.
Look for and load the selection seltriangulolc.PspSelection.

Set your foreground color to white #ffffff.
Layers>New Raster Layer.
Flood Fill the selection with color white #ffffff.
3. Selections>Modify>Contract - 3 pixels.
Press CANC on the keyboard
Selections>Select None.
Layers>Duplicate.
Image>Resize, to 80%, resize all layers not checked.
Layers>Merge>Merge Down.
4. Activate your Magic Wand Tool  , tolerance and feather 0, , tolerance and feather 0,
and click on the border to select it.

Reduce the opacity of your Flood Fill Tool to 30%,
Flood Fill the selection with color white #ffffff.
5. Selections>Promote Selection to Layer.
Selections>Select None.
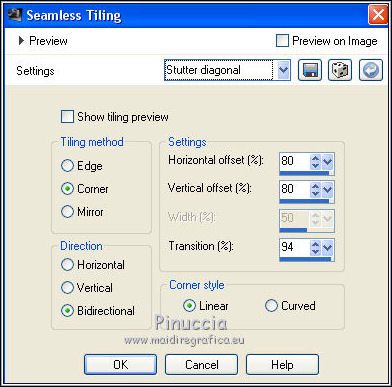
Effects>Image Effects>Seamless Tiling, Stutter Diagonal
6. Effects>3D Effects>Drop Shadow, color #ffffff.

Effects>Edge Effects>Enhance More.
Layers>Duplicate.
Image>Mirror.
Layers>Merge>Merge Down.
You should have this
7. Activate the layer Raster 2.
Layers>Duplicate.
Image>Resize, to 20%, resize all layers not checked.
Effects>Image Effects>Offset.
Activate your Magic Wand Tool
and click in the triangle to select it.

Flood Fill the selection with color white #ffffff (opacity 30)
Keep selected.
8. Effects>Texture Effects>Weave.

Selections>Select None.
Effects>Plugins>Alien Skin Eye Candy 5 Impact - Perspective Shadow.
Select the preset Drop Shadow Blurry and ok.
Effects>Reflection Effect>Rotating Mirror.
Layers>Merge>Merge Down.
9. Activate the top layer, Promoted Selection.
Effects>Plugins>Graphics Plus - Vertical Mirror, default settings.

10. Effects>Reflection Effects>Kaleidoscope

11. Selections>Load/Save Selection>Load Selection from Disk.
Look for and load the selection selcirculolc.PspSelection.

Selections>Promote Selection to Layer.
Effects>3D Effects>Drop Shadow, color #000000.

12. Selections>Modify>Contract - 10 pixels.
Effects>3D Effects>Drop Shadow, same settings.
13. Selections>Modify>Contract - 10 pixels.
Effects>Plugins>Alien Skin Eye Candy 5 Impact - Glass.
Select the preset katrina and ok.

Selections>Select None.
Layers>Duplicate.
Image>Resize, to 20%, resize all layers not checked.
Effects>Image Effects>Offset, same settings.
Effects>Reflection Effect>Rotating Mirror.
Layers>Merge>Merge Down - 3 times.
14. Layers>New Raster Layer - Raster 3.
Layers>Arrange>Move Down.
Set again the opacity of your Flood Fill Tool to 100
Flood Fill the layers with your background color.
Layers>New Mask layer>From image
Open the menu under the source window and you'll see all the files open.
Select the mask maskcameron.
Layers>Merge>Merge Group.
Effects>Reflection Effect>Rotating Mirror.
15. Selections>Load/Save Selection>Load Selection from Disk.
Look for and load the selection selquadradolc.PspSelection.

Press CANC on the keyboard
Selections>Select None.
Effects>Plugins>Alien Skin Eye Candy 5 Impact - Perspective Shadow.
Select the preset Drop Shadow Blurry and ok.
16. Effects>Texture>Weave, same settings.
Change the Blend Mode of this layer to Screen.

17. Activate the top layer Raster 2.
Selection Tool 
(no matter the type of selection, because with the custom selection your always get a rectangle)
clic on the Custom Selection 
and set the following settings.

Selections>Promote Selection to Layer.
Selections>Select None.
18. Effects>Plugins>It@lian Editors Effect - Effetto Fantasma.

Effects>Edge Effects>Enhance More.
Effects>Texture Effects>Weave, same settings.
Optional: Effects>Plugins>Alien Skin Eye Candy 5 Impact - Perspective Shadow.
Select the preset Drop Shadow Blurry and ok.
Change the Blend Mode of this layer to Screen.

19. Layers>New Raster Layer, Raster 3.
Reduce the opacity of your Flood Fill Tool to 50%.
Flood Fill the layer with color #ffffff.
Layers>New Mask layer>From image
Open the menu under the source window
and select the mask Narah_mask_0670.
Layers>Merge>Merge Group.
Layers>Duplicate.
Image>Flip.
20. Effects>Plugins>Mehdi - Weaver.

Effects>Edge Effects>Enhance.
Layers>Merge>Merge Down.
Effects>Plugins>Mura's Seamless - Emboss at Alpha, default settings.

Change the Blend Mode of this layer to Screen.

21. Activate the layer Raster 1.
Layers>Duplicate.
Effects>Plugins>Mura's Meister - Perspective Tiling
Effects>Image Effects>Seamless Tiling, same settings.
Effects>User Defined Filter - select the preset Emboss 3 and ok.

Layers>Arrange>Move Up.
22. activate the layer Raster 1.
Effects>Plugins>L&K's - L&K's - Zitah, default settings.

Activate the layer Raster 2.
Layers>Arrange>Bring to Top.
The Layers>Blend Mode and opacities (adapt at your choice)
Image>Add borders, 2 pixels, symmetric, foreground color.
Image>Add borders, 2 pixels, symmetric, background color.
Image>Add borders, 2 pixels, symmetric, foreground color.
Selections>Select All.
Image>Add borders, 40 pixels, symmetric, color #ffffff.
Effects>3D Effects>Drop Shadow, color #000000.
Selections>Select None.
23. Open the tube Jeanne_Woman_14_09_2020 and go to Edit>Copy.
Go back to your work and go to Edit>Paste as new layer.
Image>Mirror.
Image>Resize, at your choice, resize all layers not checked.
Move the tube to the left side, or where you like better.
Effects>3D Effects>Drop Shadow, at your choice.
24. Open the tube Jeanne_Deko_Grijze_Vase_06_10_2018 and go to Edit>Copy.
Go back to your work and go to Edit>Paste as new layer.
Image>Resize, at your choice, resize all layers not checked.
Move the tube to the right side, or where you like better.
Effects>3D Effects>Drop Shadow, at your choice.
Sign your work on a new layer.
Add, if you want, the watermarks of the author and of the translator.
Image>Resize, 1000 pixels width, resize all layers checked.
Save as jpg.
Version with tubes by Luz Cristina

Your versions here

If you have problems or doubts, or you find a not worked link, or only for tell me that you enjoyed this tutorial, write to me.
21 December 2020
|


