Home |
Home |

Mappa sito |
Mappa sito |
Tutorial |
Tutorial |
Tut tecnici |
Tut tecnici |
Links-Banner |
Links-Banner |
Regali-Award |
Regali-Award |
Informatica |
Informatica |
Archivio |
Archivio |
Mail |
Mail |
Privacy policy |
Privacy policy |
Novità |
Novità |
Home |
Home |
Mappa sito |
Mappa sito |
Tutorial |
Tutorial |
Tut tecnici |
Tut tecnici |
Links-Banner |
Links-Banner |
Regali-Award |
Regali-Award |
Informatica |
Informatica |
Archivio |
Archivio |
Mail |
Mail |
Privacy policy |
Privacy policy |
Novità |
Novità |
|
NIAMH  
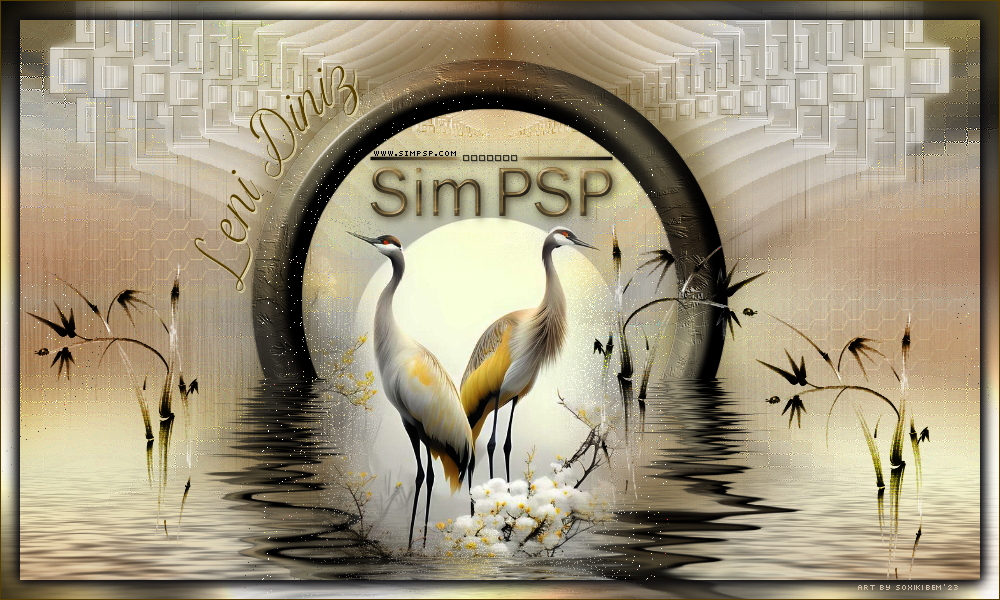
This tutorial was written and translated with Psp2020, but it can also be made using other versions of PSP.
 consult, if necessary, my filter section here Filters Unlimited 2.0 here Mehdi - Sorting Tiles here Toadies - What are you here FM Tile Tools - Blend Emboss Funhouse - Xaggerate here Graphics Plus - Cross Shadow here Filters Toadies, Funhouse and Graphics Plus can be used alone or imported into Filters Unlimited. (How do, you see here) If a plugin supplied appears with this icon  it must necessarily be imported into Unlimited it must necessarily be imported into Unlimited You can change Blend Modes according to your colors. In the newest versions of PSP, you don't find the foreground/background gradient (Corel_06_029). You can use the gradients of the older versions. The Gradient of CorelX here  Copy the preset Emboss 4 in the Presets Folder. 1. Choose two colors to work. For the example: Set your foreground color to the dark color #515660, and your background color to the light color #ffefae.  Set your Foreground color to a Foreground/Background Gradient, style Sunburst.  Open alpha_channel_leni_niamh This image, that will be the basis of your work, is not empty, but contains a selection saved to alpha channel. Selections>Load/Save Selections>Load Selection from Alpha Channel. The selection leni #1 is immediately available. You just have to click Load.  Flood fill  the selection with your Gradient. the selection with your Gradient.2. Effects>Texture Effects>Weave weave color: #000000 gap color: light background color #ffefae.  3. Effects>User Defined Filter - select the preset Emboss 4 and ok. 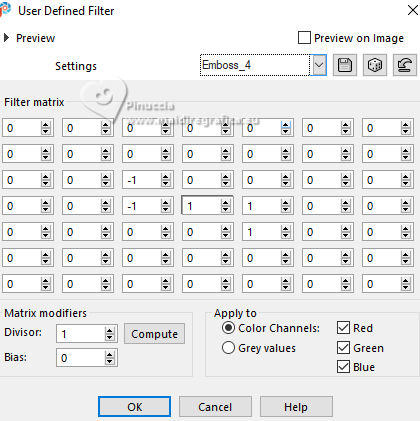 4. Layers>New Raster Layer. Open the landscape's misted LeniDiniz-153misted-paisagem  Edit>Copy. Go back to your work and go to Edit>Paste Into Selection. 5. Adjust>Blur>Radial Blur.  6. Effects>Edge Effects>Enhance More. Keep selected. Effects>Plugins>Mehdi - Sorting Tiles  7. Effects>Plugins>Toadies - What Are You?  8. Keep always selected. Effects>Plugins>FM Tile Tools - Blend Emboss  9. Adjust>Sharpness>Sharpen. Selections>Select None. 10. Edit>Paste as new layer - the landscape's misted is still in memory. Selections>Select None. Resize if necessary and position as shown in the example. When the material was mixed, it was not necessary to change the size, just position it. Adjust>Sharpness>Sharpen.  11. Layers>New Raster Layer. Selections>Load/Save Selections>Load Selection from Alpha Channel. Open the selections menu and load the selection leni #2  Change the Gradient's settings, style Linear.  Flood Fill the selection with this Gradient.12. Effects>Plugins>Filters Unlimited 2.0 - FunHouse - Xaggerate  13. Effects>Plugins>FM Tile Tools - Blend Emboss  14. Adjust>Sharpness>Sharpen. Selections>Select None. Layers>New Raster Layer. 15. Selections>Load/Save Selections>Load Selection from Alpha Channel. Open the selections menu and load the selection leni #3  Set your foreground color to Color. Flood Fill the selection with your dark foreground color #515660.Effects>Texture Effects>Blinds - light background color #ffefae.  16. Effects>3D Effects>Drop Shadow, color #000000. 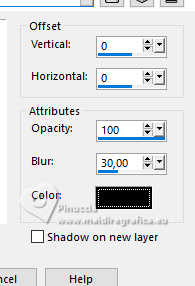 Selections>Select None. Layers>Duplicate. 17. Effects>Image Effects>Seamless Tiling.  18. Layers>Duplicate. Effects>Image Effects>Seamless Tiling - Side by side  19. Open decor_leni_niamh  Edit>Copy. Go back to your work and go to Edit>Past as New Layer. Don't move it  20. Image>Add Borders, 2 pixels, symmetric, light background color #ffefae. Image>Add Borders, 2 pixels, symmetric, dark foreground color #515660. Image>Add Borders, 2 pixels, symmetric, light background color #ffefae. 21. Selections>Select all. Image>Add Borders - 50 pixels, symmetric, whatever color. Selections>Invert. Set again your foreground color to the Linear Gradient Flood Fill with your Gradient.22. Effects>Plugins>Graphics Plus - Cross Shadow  23. Selections>Invert. Effects>3D Effects>Drop Shadow, color #000000.  Selections>Select None 24. Open the main misted LeniDiniz-1647mulheres  Edit>Copy. Go back to your work and go to Edit>Paste as New Layer. Image>Resize if necessary; for the supplied tube to 75%, resize all layers not checked. 25. Move  the tube to the right side. the tube to the right side.Adjust>Sharpness>Sharpen. Effects>3D Effects>Drop Shadow, at your choice. 26. Open decor_leni_niamh-2  Edit>Copy. Go back to your work and go to Edit>Paste as New Layer. Pick Tool  Position X: 39,00 - Position Y: 39,00.  27. Open título_leni_niamh  Edit>Copy. Go back to your work and go to Edit>Paste as New Layer. Move the tube to the left side.Effects>3D Effects>Drop Shadow, at your choice. 28. Image>Add Borders, 1 pixel, symmetric, dark foreground color #515660. 28. Sign your work and save as jpg. For the tube of this version thanks Mentali    Your versions.Thanks Your versions.Thanks Lynnette  Sue  Baby  Baby  Marion  If you have problems or doubts, or you find a not worked link, or only for tell me that you enjoyed this tutorial, write to me. 1 November 2024 |


