|
INES

english version

Here you find the original of this tutorial:

This tutorial was written with CorelX8 and translated with Corel X7 and CorelX3, but it can also be made using other versions of PSP.
Since version PSP X4, Image>Mirror was replaced with Image>Flip Horizontal,
and Image>Flip with Image>Flip Vertical, there are some variables.
In versions X5 and X6, the functions have been improved by making available the Objects menu.
In the latest version X7 command Image>Mirror and Image>Flip returned, but with new differences.
See my schedule here
italian translation here
your versions here
Material here
Thanks for the tube Colibry, for a mask Narah.
The rest of the material is by Laurette.
(The links of the tubemakers here).
Plugins
consult, if necessary, my filter section here
Filters Unlimited 2.0 here
Mura's Seamless - Emboss at Alpha here
Carolaine and Sensibility - CS-LDots here
Mura's Meister - copies here
Cybia - Screenworks here
Nik Software - Color Efex Pro here
Adjust - Variations here
Graphics Plus - Cross Shadow here
Simple - Top Left Mirror here
L&K's - L&K's Paris here
Filters Simple, Mura's Seamless Graphics Plus can be used alone or imported into Filters Unlimited.
(How do, you see here)
If a plugin supplied appears with this icon  it must necessarily be imported into Unlimited it must necessarily be imported into Unlimited

You can change Blend Modes according to your colors.
In the newest versions of PSP, you don't find the foreground/background gradient (Corel_06_029).
You can use the gradients of the older versions.
The Gradient of CorelX here
Copy the brush in Brushes folder. Attention, please, the brush is composed by two files, you must place both the files in the folder.
See my notes about Brushes here
In the material, you find also the brush en png (folder Divers)
Open the masks in PSP and minimize them with the rest of the material
1. Set your foreground color to #9b9380
and your background color to white #ffffff.

Set your foreground color to a Foreground/Background Gradient, style Linear.

Set your foreground color to Color.
Open a new transparent image 900 x 600 pixels.
Flood Fill  the transparente image with your foreground color #9b9380. the transparente image with your foreground color #9b9380.
Layers>New Raster Layer.
Flood Fill  with your background color #ffffff. with your background color #ffffff.
Layers>New Mask layer>From image
Open the menu under the source window and you'll see all the files open.
Select the mask @100%.

Layers>Merge>Merge Group.
Effects>Edge Effects>Enhance.
3. Layers>Duplicate.
Image>Mirror.
Layers>Merge>Merge Down.
Effects>Plugins>Mura's Seamless - Emboss at alpha.

Layers>Duplicate.
Image>Flip.
Reduce the opacity of this layer to 45%.
Layers>Merge>Merge down.
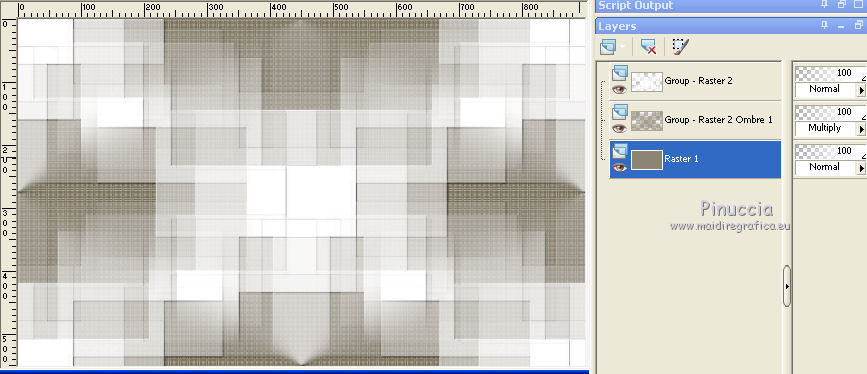
4. Effects>Image Effects>Seamless Tiling, default settings.

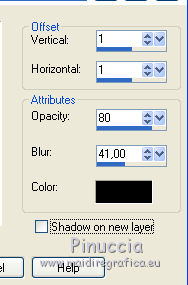
Effects>3D Effects>Drop Shadow, color #9b9380,
shadow on new layer checked.

Change the Blend Mode of the shadow's layer to Multiply.
Activate the top layer.
Effects>Plugins>Mura's Seamless - Emboss at alpha, same settings.
Activate the bottom layer, Raster 1.
Effects>Plugins>Carolaine and Sensibility - CS-LDots.

Adjust>Sharpness>Sharpen More - 2 times.

Layers>Merge>Merge visible.
5. Selection Tool 
(no matter the type of selection, because with the custom selection your always get a rectangle)
clic on the Custom Selection 
and set the following settings.

Layers>New Raster Layer, Raster 1.
Flood Fill  with your foreground color. with your foreground color.
Selections>Modify>Contract - 4 pixels.
Press CANC on the keyboard 
Layers>New Raster Layer, Raster 2
Flood Fill  with your background color #ffffff. with your background color #ffffff.
Selections>Modify>Contract - 6 pixels.
Press CANC on the keyboard.
Reduce the opacity of the Flood Fill Tool to 35
Flood Fill  again with color white. again with color white.
Selections>Modify>Contract - 12 pixels.
Set again the opacity of your Flood Fill Tool to 100
Flood Fill  with color white. with color white.
Selections>Modify>Contract - 6 pixels.
Press CANC on the keyboard.
Selections>Select None.
Effects>Plugins>Mura's Seamless - Emboss at alpha, same settings.

Layers>Merge>Merge down.
6. Layers>New Raster Layer, Raster 2.
Custom Selection  same settings. same settings.

Selections>Modify>Contract - 8 pixels.
Set your foreground color to Gradient

Flood Fill  the selection with your Gradient. the selection with your Gradient.
Adjust>Blur>Gaussian Blur - radius 25

Effects>Art Media Effects>Brush Strokes.

Open the tube fond fleur and go to Edit>Copy.
Go back to your work and go to Edit>Paste as new layer.
Place  the tube in the middle. the tube in the middle.
Selections>Invert.
Press CANC on the keyboard.
Again Selections>Invert.
Reduce the opacity to 75%.
Selections>Select None.
You shoud have this

Layers>Merge>Merge down.
Layers>Arrange>Move down.
Activate the top layer.
Layers>Merge>Merge down.
7. Layers>Duplicate.
Image>Resize, to 40%, resize all layers not checked.
On the keyboard K key to activate the Pick Tool 
and set Position X: 698,00 and Position Y: 12.00

M key to deselect the tool.
Effects>Plugins>Mura's Meister - Copies.

Effects>3D Effects>Drop Shadow, color #534d41.

8. Activate the layer Raster 2.
Activate the Magic Wand tool 

and clic on the little border of the frame to select it.

Effects>Plugins>Cybia - Screenworks - Dot Screen

Effects>3D Effects>Inner Bevel

Selections>Select None.
Effects>3D Effects>Drop Shadow, same setting.
9. Activate the bottom layer.
Open the tube déco dentelle and go to Edit>Copy.
Go back to your work and go to Edit>Paste as new layer.
Don't move it.
Effects>3D Effects>Drop Shadow, color #534d41,
shadow on new layer checked.

Change the Blend Mode of the shadow's layer to Multiply.

10. Activate the bottom layer Merged.
Open the tube déco CL1 and go to Edit>Copy.
Go back to your work and go to Edit>Paste as new layer.
Effects>3D Effects>Drop Shadow, same settings,
but shadow on new layer not checked.

K key to activate the Pick Tool 
and set Position X: 724,00 and Position Y: 4,00

M key to deselect.
11. Close the bottom layer and activate a visible layer.
Layers>Merge>Merge visible.
Open and activate the bottom layer.
Effects>Plugins>Nik Software - Color Efex Pro -
Bi-Color Filters - Color Set Brown 1

Activate the top layer.
Effects>Plugins>Adjust - Variations
1 clic on Original to cancel any previous settings kept in memory by the filter,
1 clic on More Yellow, 1 clic on Darker and ok.

12. Close the top layer and activate the bottom layer.
Custom Selection 

Selections>Promote Selection to Layer.
Effects>3D Effects>Drop Shadow, color #534d41.

Repeat Drop Shadow, but vertical and horizontal -3.
Effects>Art Media Effects>Brush Strokes, same settings.

Selections>Select None.
13. Open the tube déco CL2 and go to Edit>Copy.
Go back to your work and go to Edit>Paste as new layer.
K key to activate the Pick Tool 
and set Position X: -4,00 and Position Y: 156,00

M key to deselect.
Layers>Merge>Merge down.
Effects>3D Effects>Drop Shadow, color #534d41.

14. Keep this layer selected.
Layers>New Raster Layer, Raster 1.
Flood Fill  with your background color #ffffff. with your background color #ffffff.
Layers>New Mask layer>From image
Open the menu under the source window and you'll see all the files open.
Select the mask Narah_Mask_1171.

Adjust>Sharpness>Sharpen.
Layers>Merge>Merge Group.
Image>Flip.
Change the Blend Mode of this layer to Luminance (legacy) and reduce the opacity to 70.
Layers>Merge>Merge visible.
15. Open the tube déco fleur and go to Edit>Copy.
Go back to your work and go to Edit>Paste as new layer.
K key to activate the Pick Tool 
and set Position X: 6,00 and Position Y: 173,00

M key to deselect.
Effects>3D Effects>Drop Shadow, color #534d41.

16. Open the tube texte Inés and go to Edit>Copy.
Go back to your work and go to Edit>Paste as new layer.
K key to activate the Pick Tool 
and set Position X: 6,00 and Position Y: 1734,00

M key to deselect.
Effects>3D Effects>Drop Shadow, color white.
shadow on new layer not checked

Keep the shadow's layer selected.
Effects>Distortion Effects>Vent - from right, intensity 80.

Activate the top layer.
Effects>3D Effects>Drop Shadow, color white,
shadow on new layer selected

Layers>Merge>Merge All.
17. Image>Add borders, 1 pixel, symmetric, color white.
Image>Add borders, 2 pixels, symmetric, color #9b9380.
Image>Add borders, 5 pixels, symmetric, color white.
Image>Add borders, 2 pixels, symmetric, color #9b9380.
Selections>Select All.
Image>Add borders, 25 pixels, symmetric, color white.
Effects>3D Effects>Drop Shadow, color #534d41

Selections>Select None.
Image>Add borders, 2 pixels, symmetric, color white.
Selections>Select All.
Image>Add borders, 45 pixels, symmetric, foreground color #9b9380.
Selections>Invert.
Effects>Plugins>Graphics Plus - Cross Shadow, default settings.

Effects>Plugins>L&K's - L&K's Paris

Repeat this plugin another time.
Adjust>Sharpness>Sharpen More.
Selections>Invert.
Effects>3D Effects>Drop Shadow, color black.

Edit>Repeat Drop Shadow.
Selections>Select None.
Image>Add borders, 2 pixels, symmetric, color white.
Image>Add borders, 5 pixels, symmetric, colore #9b9380.
Image>Add borders, 5 pixels, symmetric, color white.
18. Layers>New Raster Layer.
Set your foreground color to Color.
Activate the Brush Tool 
look for and select the brush Pinceau écriture CL, size 430 pixels.

Apply the brush in the middle with your foreground color #534d41.
Effects>3D Effects>Drop Shadow, color white.

19. Image>Add borders, 10 pixels, symmetric, color white.
Open the tube coin and go to Edit>Copy.
Go back to your work and go to Edit>Paste as new layer.
K key to activate the Pick Tool 
and set Position X: 20,00 and Position Y: 20,00

M key to deselect.
Effects>3D Effects>Buttonize.

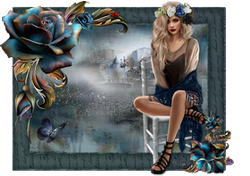
20. Open the tube of the woman by Colybrix, erase the watermark and go to Edit>Copy.
Go back to your work and go to Edit>Paste as new layer.
Place  the tube as you want, or see my example. the tube as you want, or see my example.
Effects>3D Effects>Drop Shadow, foreground color.

Sign your work on a new layer.
Image>Add borders, 2 pixels, symmetric, color #b4a677.
Image>Resize, to 950 pixels width, resize all layers checked.
Adjust>Sharpness>Unsharp Mask.

Save as jpg.
The tube of this version is by Luz Cristina


If you have problems or doubts, or you find a not worked link,
or only for tell me that you enjoyed this tutorial, write to me.
16 Novembre 2018
|


