|
AUX PORTES DE L'HIVER

english version

Here you find the original of this tutorial:

This tutorial was written with CorelX8 and translated with Corel X7 and CorelX3, but it can also be made using other versions of PSP.
Since version PSP X4, Image>Mirror was replaced with Image>Flip Horizontal,
and Image>Flip with Image>Flip Vertical, there are some variables.
In versions X5 and X6, the functions have been improved by making available the Objects menu.
In the latest version X7 command Image>Mirror and Image>Flip returned, but with new differences.
See my schedule here
italian translation here
Material here
Thanks for the tube Sylvie Erwan.
The rest of the material is by Laurette.
(The links of the tubemakers here).
Plugins
consult, if necessary, my filter section here
Filters Unlimited 2.0 here
VM Instant Art - Tripolis here
Carolaine and Sensibility - CS-LinearH here
Graphics Plus - Quick Pick I here
Filters VM Instant Art and Graphics Plus can be used alone or imported into Filters Unlimited.
(How do, you see here)
If a plugin supplied appears with this icon  it must necessarily be imported into Unlimited it must necessarily be imported into Unlimited

You can change Blend Modes according to your colors.
In the newest versions of PSP, you don't find the foreground/background gradient (Corel_06_029).
You can use the gradients of the older versions.
The Gradient of CorelX here
Set your foreground color to color white,
and your background color to #456a9e.

Open canal_alpha_l'automne_s'enfuit.
Window>Duplicate, or on the keyboard shift+D, to make a copy.
Close the original.
The copy, that will be the basis of your work, is not empty,
but contains the selections saved on the alpha channel.
1. Selection>Select All.
Open the background image "fond", colorize if you are using other colors, and go to Edit>Copy.
Go back to your work and go to Edit>Paste into Selection.
Selection>Select None.
2. Layers>New Raster Layer - Raster 1.
Selection>Select All.
Open the tube paysage 1, and go to Edit>Copy.
Go back to your work and go to Edit>Paste into Selection.
Selection>Select None.
Effects>Image Effects>Seamless Tiling, default settings.

Layers>Merge>Merge Down.
Layers>Duplicate.
Effects>Artistic Effects>Enamel.

3. Effects>Plugins>VM Instant Art - Tripolis, default settings.

Layers>Duplicate.
Image>Flip.
Reduce the opacity of this layer to 50%.
Layers>Merge>Merge Down.
Effects>Reflection Effects>Rotating Mirror.

4. Activate the bottom layer.
Selections>Load/Save Selection>Load Selection from Disk.
The selection sélection#1 is immediately available.
You just have to click Load.

Selections>Promote Selection to Layer.
Layers>Arrange>Bring to Top.
Effects>Plugins>Carolaine and Sensibility - CS-LinearH

Effects>Texture Effects>Blinds, background color.

Selection>Select None.
Layers>Duplicate.
Image>Mirror.
Layers>Merge>Merge Down.
Effects>3D Effects>Drop Shadow, background color.
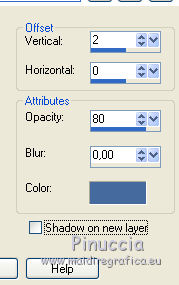
Repeat Drop Shadow, horizontal -2.
5. Activate the layer Copy of Merged.

Open "tube fruit d'hiver", and go to Edit>Copy.
Go back to your work and go to Edit>Paste as new layer.
Press on the keyboard K key to activate the Pick Tool 
and set Position X: -7,00 and Position Y: -109,00

M key to deselect the Tool.
Reduce the opacity of this layer to 35%.
6. Activate the bottom layer.
Selections>Load/Save Selection>Load Selection from Disk.
Open the Selections menu and load sélection#2.

Selections>Promote Selection to Layer.
Layers>Arrange>Bring to Top.
Selections>Modify>Select Selection Borders.

Layers>New Raster Layer.
Flood Fill  with your background color. with your background color.
Selection>Select None.
Layers>Merge>Merge Down.
7. Stay on this layer.
Selections>Load/Save Selection>Load Selection from Disk.
Open the Selections menu and load again sélection#2.

Selections>Modify>Contract - 4 pixels.
Open the tube "paysage 2" and go to Edit>Copy.
Go back to your work and go to Edit>Paste as new layer.
Place  rightly the tube on the selection. rightly the tube on the selection.

Selections>Invert.
Press CANC on the keyboard 
Selection>Select None
Adjust>One Step Photo Fix.
Layers>Merge>Merge Down.
8. Activate the bottom layer.
Selections>Load/Save Selection>Load Selection from Disk.
Open the Selections menu and load sélection#3.
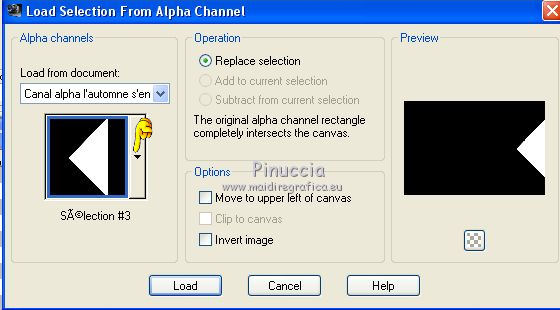
Selections>Promote Selection to Layer.
Layers>Arrange>Bring to Top.
Open "tube cerf" and go to Edit>Copy.
Go back to your work and go to Edit>Paste as new layer.
Place  the tube on the selection,. the tube on the selection,.

Selections>Invert.
Press CANC on the keyboard.
Again Selections>Invert.
Effects>3D Effects>Chisel, background color.

Selection>Select None.
Layers>Merge>Merge Down.
9. Activate the bottom layer.
Selections>Load/Save Selection>Load Selection from Disk.
Open the Selections menu and load sélection#2.

Selections>Promote Selection to Layer.
Layers>Arrange>Bring to Top.
Open "tube oiseau hiver" and go to Edit>Copy.
Go back to your work and go to Edit>Paste as new layer.
Place  the tube on the selection. the tube on the selection.

Selections>Invert.
Press CANC on the keyboard.
Again Selections>Invert.
Effects>3D Effects>Chisel, same settings.

Selection>Select None.
Layers>Merge>Merge Down.
10. Open the tube "déco scintillants" and go to Edit>Copy.
Go back to your work and go to Edit>Paste as new layer.
Place  the tube to the left side. the tube to the left side.

11. Open the tube "déco fond neige" and go to Edit>Copy.
Go back to your work and go to Edit>Paste as new layer.
Move  it at the bottom. it at the bottom.
Change the Blend Mode of this layer to Luminance (héritée).
12. Image>Add borders, 2 pixels, symmetric, color white.
Image>Add borders, 4 pixels, symmetric, background color.
Image>Add borders, 2 pixels, symmetric, color white.
Selection>Select All.
Image>Add borders, 25 pixels, symmetric, color white.
Selections>Invert.
Effects>Texture Frame>Blinds, same settings.

Selections>Invert.
Effects>3D Effects>Drop Shadow, background color.

Selection>Select None.
Image>Add borders, 2 pixels, symmetric, color white.
Image>Add borders, 4 pixels, symmetric, background color.
Image>Add borders, 2 pixels, symmetric, color white.
13. Set your foreground color to a Foreground/Background Gradient, style Linear.
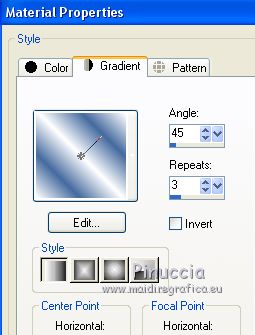
Selection>Select All.
Image>Add borders, 50 pixels, symmetric, color white.
Selections>Invert.
Flood Fill  the selection with your Gradient. the selection with your Gradient.
Effects>Plugins>Graphics Plus - Quick Tile I.

Selections>Invert.
Effects>3D Effects>Drop Shadow, same settings.
Selection>Select None.
14. Image>Add borders, 2 pixels, symmetric, color white.
Image>Add borders, 2 pixels, symmetric, background color.
Image>Add borders, 40 pixels, symmetric, color white.
Image>Add borders, 2 pixels, symmetric, background color.
Open the tube "deco pinceau", erase the watermark, colorise if necessary, and go to Edit>Copy.
Go back to your work and go to Edit>Paste as new layer.
Effects>3D Effects>Drop Shadow, color black.

15. Open the tube of the woman and go to Edit>Copy.
Go back to your work and go to Edit>Paste as new layer.
Place  the tube as you like. the tube as you like.
Effects>3D Effects>Drop Shadow, at your choice.
Open the wordart and go to Edit>Copy.
Go back to your work and go to Edit>Paste as new layer.
Place  the wordart where you like. the wordart where you like.
Effects>3D Effects>Drop Shadow, colore black.

Sign your work on a new layer.
Layers>Merge>Merge all.
Image>Resize, 950 pixels width, resize all layer checked.
Save as jpg.
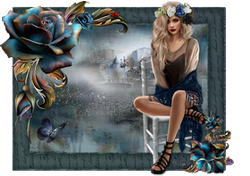
The tubes of this version are by Isa and Thafs.


If you have problems or doubts, or you find a not worked link,
or only for tell me that you enjoyed this tutorial, write to me.
14 December 2018
|


