|
MARILYN MONROE 

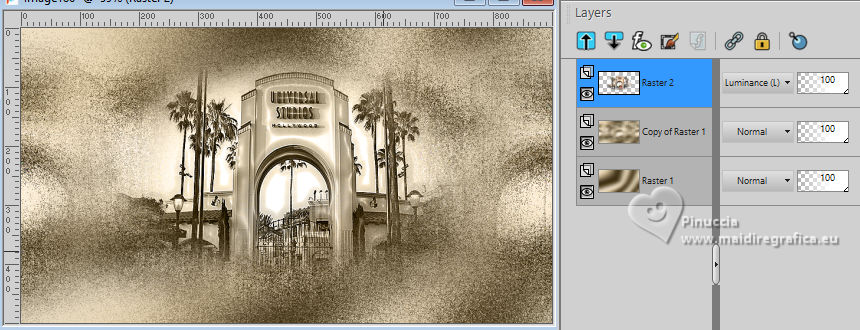
This tutorial, was created with PSPX9 and translated with PSP2020, but it can also be made using other versions of PSP. For this tutorial, you will need:  Thanks for the tube AigenbyCaz. The rest of the material is by Lady Tess. (you find here the links to the material authors' sites)  consult, if necessary, my filter section here Filters Unlimited 2.0 here Mehdi - Wavy Lab 1.1. here Graphics Plus - Cross Shadow here Toadies - Blast'em here Mura's Meister - Copies here Mura's Meister - Perspective Tiling here VM Toolbox - Instant Tile here Distortion Filters here Alien Skin Eye Candy 5 Impact - Glass, Perspective Shadow here AAA Frames - Foto Frame here Filters Graphics plus, Toadies, VM Toolbox can be used alone or imported into Filters Unlimited. (How do, you see here) If a plugin supplied appears with this icon  You can change Blend Modes according to your colors.  Copy the Selections in the Selections Folder. Colors  1. Set your foreground color to #cbb893 and your background color to #61502f.  2. Open a new transparent image 900 x 500 pixels. Effects>Plugins>Mehdi - Wavy Lab 1.1. This filter creates gradients with the colors of your Materials palette. The first is your background color, the second is your foreground color. Change the last two colors created by the filtre: the third color with #4e4026 and the fourth color with #dfd3bb.  Effects>Plugins> Toadies - Blast'em!...  3. Layers>Duplicate. Layers>New Raster Layer. Selections>Select All. Open Studios_Imagen  Edit>Copy. Go back to your work and go to Edit>Paste into Selection. 4. Selections>Select None. Change the Blend Mode of this layer to Luminance (L) Effects>Image Effects>Seamless Tiling.  Effects>Edge Effects>Enhance. Layers>Merge>Merge Down. Effects>Plugins>Toadies - Blast'em!...  Note: you can change these settings to your liking - you can play with Diffuse 5. We have this.  6. Layers>New Raster Layer. Selections>Load/Save Selection>Load Selection from Disk. Look for and load the selection MM2024_sel_1  Edit>Paste into Selection - the image Studios-Imagen is still in memory. Selections>Select None. 7. Change the Blend Mode of this layer to Luminance (L). Effects>Edge Effects>Enhance.  8. Selections>Load/Save Selection>Load Selection from Disk. Look for and load the selection MM2024_sel_2  Activate the layer Raster 1. Selections>Promote Selection to Layer. Selections>Select None. Layers>Arrange>Bring to top. 9. Adjust>Blur>Radial Blur.  Layers>Duplicate. Image>Mirror>Mirror Vertical. Effects>Plugins>Mura's Meister - Perspective Tiling.  Change the Blend Mode of this layer to Luminance (L) and reduce the opacity to 67%. Activate the layer below - Promoted Selection. Change the Blend Mode of this layer to Luminance (L) and reduce the opacity to 71%. 10. We have this:  11. Activate your bottom Layer, Raster 1. Selections>Load/Save Selection>Load Selection from Disk. Look for and load the selection MM2024_sel_3  Selections>Promote Selection to layer. Selections>Select None. Layers>Arrange>Bring to Top. 12. Effects>Plugins>Filters Unlimited 2.0 - Distortion Filters - Scaline Shifter, default settings  Effects>3D Effects>Drop Shadow, color #000000.  13. Activate again your bottom layer, Raster 1. Selections>Load/Save Selection>Load Selection from Disk. Look for and load the selection MM2024_sel_4  Selections>Promote Selection to Layer. Keep selected. Layers>Arrange>Bring to Top. Flood Fill  the selection with your background color #61502f. the selection with your background color #61502f.14. Open aigenbycaz_marilynmonroe37  Activate your Selection Tool  and select the top zone of the tube  Edit>Copy. Minimize the tube. Go back to your work. Layers>New Raster layer. Edit>Paste into Selection. 15. Effects>Plugins>Alien Skin Eye Candy 5 Impact - Glass  Selections>Modify>Select Selection Borders.  Layers>New Raster Layer. Set your foreground color to the third color #4e4206. Flood Fill  the selection with foreground color #4e4026. the selection with foreground color #4e4026.16. Effects>Plugins>Graphics Plus - Cross Shadow, default settings.  Repeat this Effect another time. Selections>Select None. Layers>Merge>Merge Down - 2 times. Effects>Plugins>Mura's Meister - Copies.  17. Objects>Align>Vertical Center. Adjust>Sharpness>Sharpen. Effects>3D Effects>Drop Shadow, color #000000.  Layers>Merge>Merge Down. Layers>Duplicate. Image>Mirror>Mirror Horizontal. 18. We have this  19. Image>Add borders, 1 pixel, simmetric, color #000000. Edit>Copy. Edit>Paste as new image, and minimize this image. Go back to your work. Selections>Select All. Image>Add borders, 40 pixels, symmetric, color #cbb893. Selections>Invert. 20. Effects>Plugins>Graphics Plus - Cross Shadow, default settings.  Selections>Promote Selection to Layer. Effects>Plugins>VM Toolbox - Instant Tile, default settings.  Selections>Select all. 21. Image>Add borders, 40 pixels, symmetric, color #ffffff. Selections>Invert. Edit>Paste into Selection (the minimized image is still in memory). 22. Adjust>Blur>Gaussian Blur - radius 10.  Effects>Plugins>AAA Frames - Foto Frame.  Selections>Select None. 23. Open again aigenbycaz_marilynmonroe37 Edit>Undo Selection. Edit>Copy. Go back to your work and go to Edit>Paste as new layer. Image>Resize, to 60%, resize all layers not checked. K key to activate your Pick Tool  set Position X: 439,00 and Position Y: 96,00.  M key to deselect the Tool. Adjust>Sharpness>Sharpen. 24. Layers>Duplicate. Activate the layer below of the original. Adjust>Blur>Gaussian Blur - radius 20.  Change the Blend Mode of this layer to Multiply. Open LTDStudio_MM2024_Deco  Edit>Copy. Go back to your work and go to Edit>Paste as new layer. Layers>Arrange>Move Down - 2 times (under the images) 25. Activate your top layer. Open LTDStudio_MM2024_Texto  Edit>Copy. Go back to your work and go to Edit>Paste as new layer. K key to activate your Pick Tool  keep Position X: 286,00 and set Position Y: 94,00.  M key to deselect the Tool. Change the Blend Mode of this layer to Luminance (L). 26. Sign your work on a new layer. Please, don't forget the translator's watermark, if you add the author's watermark. Layers>Merge>Merge All and save as jpg. For the tube of this version thanks MsKitty .    Your versions. Thanks Your versions. Thanks Kika  If you have problems or doubts, or you find a not worked link, or only for tell me that you enjoyed this tutorial, write to me. |