|
ST. VALENTIN
 ENGLISH VERSION ENGLISH VERSION

Here you find the original of this tutorial:

This tutorial was translated with PSPX3 but it can also be made using other versions of PSP.
Since version PSP X4, Image>Mirror was replaced with Image>Flip Horizontal,
and Image>Flip with Image>Flip Vertical, there are some variables.
In versions X5 and X6, the functions have been improved by making available the Objects menu.
In the latest version X7 command Image>Mirror and Image>Flip returned, but with new differences.
See my schedule here
Italian translation here
For this tutorial, you will need:
Material here
Thanks Babette for the tube and Nikita for the mask.
Thanks also to the author, that I don't know, of the mask with the points.
Plugins
consult, if necessary, my filter section here
Filters Unlimited 2.0 here
Transparency - Eliminate White here
Filters Transparency can be used alone or imported into Filters Unlimited.
(How do, you see here)
If a plugin supplied appears with this icon  it must necessarily be imported into Unlimited it must necessarily be imported into Unlimited
Animation Shop

Copy the Selection in the Selections Folders.
Open the mask in PSP and minimize it with the rest of the material, except the animation that you'll open in Animation Shop.
1. Set your foreground color to #d0cfd5.
2. Open a new transparent image 800 x 600 pixels.
Selections>Select All.
3. Open the mask with the points and go to Edit>Copy.
Go back to your work and go to Edit>Paste into Selection.
Selections>Select None.
4. Effects>Plugins>Transparency - Eliminate White.
You will not see the difference, but now the points are transparent.
5. Open the tube of the flowers and go to Edit>Copy.
Go back to your work and go to Edit>Paste as new layer.
Image>Resize, to 80%, resize all layers not checked.
Move  the tube at the bottom right. the tube at the bottom right.
6. Effects>3D Effects>Inner Bevel.

7. Open the tube of the couple and go to Edit>Copy.
Go back to your work and go to Edit>Paste as new layer.
Image>Resize, to 45%, resize all layers not checked.
Adjust>Sharpness>Sharpen More.
Place  rightly the tube. rightly the tube.
8. Open the text "Love" and go to Edit>Copy.
Go back to your work and go to Edit>Paste as new layer.
Place  rightly the text. rightly the text.

9. Sign your work.
10. Layers>Merge>Merge visible.
11. Layers>New Mask layer>From image
Open the menu under the source window and you'll see all the files open.
Select the mask 1250181186_nikita.

Layers>Merge>Merge Group.
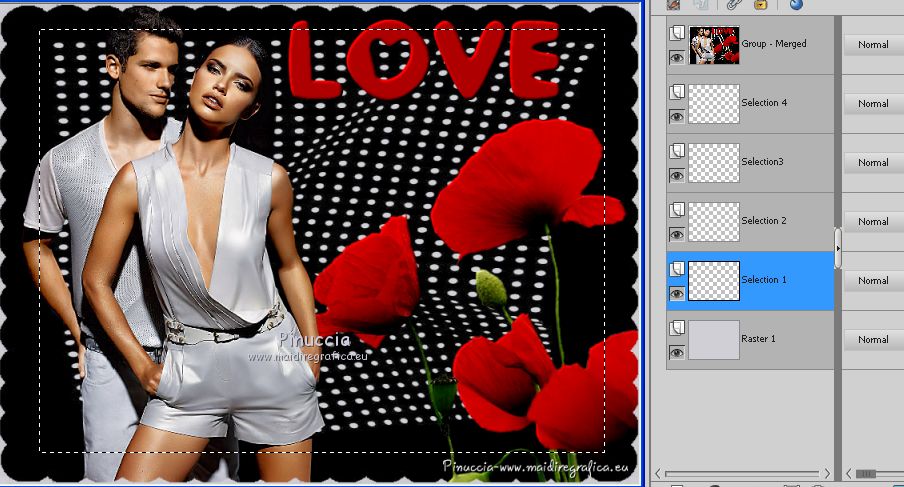
12. Layers>New Raster Layer.
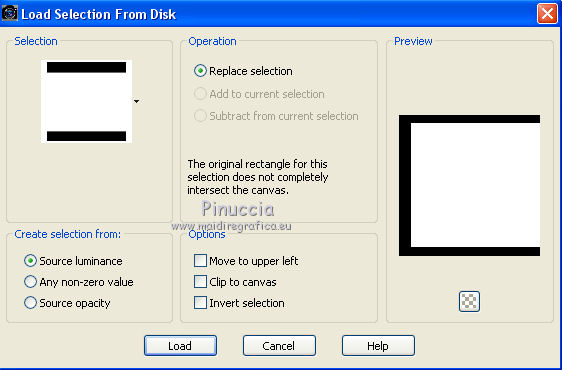
Selections>Load/Save Selection>Load Selection from Disk.
Look for and load the selection Selection-Joanne-StValentin

13. Layers>Duplicate - 4 times, total 5 layers.
Activate the bottom layer,
Flood Fill  with your foreground gray color. with your foreground gray color.
14. Rename the other layers Selection 1, 2, 3 and 4.

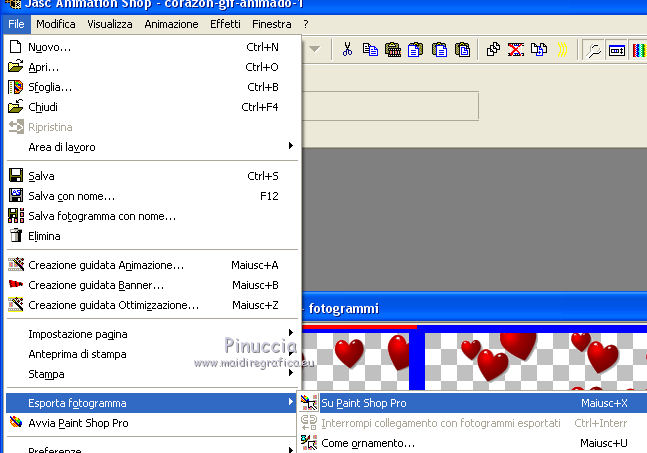
15. Open Animation Shop.
Open the animation "Corazon Gif animado 1" that is composed by 4 frames.
Edit>Selection All.
Edit>Export frames in PSP

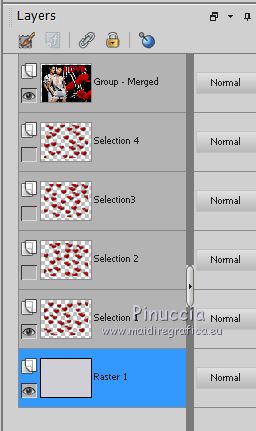
And you'll find the animation in PSP, with 4 layers named with the numbers from 1 to 4.

If your version of Animation Shop don't get available this option (it is gray):
Edit>Selection All
Edit>Copy and in PSP go to Edit>Paste>Paste as new image
and you'll have the 4 frames, but the layers will named all with the same number.

If you want, rename the layers Frame 1, 2, 3 e 4.
16. Activate the layer of the first frame.
Edit>Copy.
Go back to your work and activate the layer Selection 1.
Edit>Paste into Selection.

Effects>Edge Effects>Enhance More.
Go back to your work and activate the layer Selection 2.
Edit>Paste into Selection.
Effects>Edge Effects>Enhance More.
18. Again activate the animation and copy the layer Frame 3.
Go back to your work, activate the layer Selection 3
and go to Edit>Paste into Selection.
Effects>Edge Effects>Enhance More.
19. Again activate the animation and copy the layer Frame 4.
Go back to your work, activate the layer Selection 4
and go to Edit>Paste into Selection.
Effects>Edge Effects>Enhance More.
20. Selections>Select None.
Now you can close the animation.
If your Animation Shop let you export it,
when you'll close the file, reply NO to both questions you'll see.
21. Keep always the bottom layer selected.
Close the layers Selection 2, 3 and 4.

Edit>Copy Special>Copy Merged.
Go back in Animation Shop and go to Edit>Paste>Paste as new animation.
22. Go back to PSP.
Close the layer Selection 1 and open the layer Selection 2.

Edit>Copy Special>Copy Merged.
Go back in Animation Shop and go to Edit>Paste>Paste after the current frame.
23. In PSP.
Close the layer Selection 2 and open the layer Selection 3.
Edit>Copy Special>Copy Merged.
Go back in Animation Shop and go to Edit>Paste>Paste after the current frame.
24. In PSP.
Close the layer Selection 3 and open the layer Selection 4.
Edit>Copy Special>Copy Merged.
In Animation Shop and go to Edit>Paste>Paste after the current frame.
25. And you'll get your animation composed by 4 frames.

Keep the frames to 10.
26. Check your result clicking on Visualize 
and save as gif.
Your versions here

If you have problems or doubts, or you find a not worked link, or only for tell me that you enjoyed this tutorial, write to me.
13 February 2018
|
 ENGLISH VERSION
