|
MERIDITH

english version

Thanks Carine for your invitation to translate

This tutorial was written with CorelX17 and translated with CorelX17, but it can also be made using other versions of PSP.
Since version PSP X4, Image>Mirror was replaced with Image>Flip Horizontal,
and Image>Flip with Image>Flip Vertical, there are some variables.
In versions X5 and X6, the functions have been improved by making available the Objects menu.
In the latest version X7 command Image>Mirror and Image>Flip returned, but with new differences.
See my schedule here
italian translation here
your versions here
Material here
For the tube thanks Isa (FB 0115).
(The links of the tubemakers here).
Plugins:
consult, if necessary, my filter section here
Filters Unlimited 2.0 here
Toadies - What are you here
Alien Skin Eye Candy 5 Impact - glass here
Graphics Plus - Cross Shadow here
AAA Frames - Foto Frame - Texture Frame here
Filters Graphics Plus and Toadies can be used alone or imported into Filters Unlimited.
(How do, you see here)
If a plugin supplied appears with this icon  it must necessarily be imported into Unlimited it must necessarily be imported into Unlimited

You can change Blend Modes according to your colors.
In the newest versions of PSP, you don't find the foreground/background gradient (Corel_06_029).
You can use the gradients of the older versions.
The Gradient of CorelX here
Copy the preset  in the folder of the plugins Alien Skin Eye Candy 5. in the folder of the plugins Alien Skin Eye Candy 5.
One or two clic on the file (it depends by your settings), automatically the preset will be copied in the right folder.
why one or two clic see here
Place the brush in Brush folder. Attention, please, the brush is composed by two files, you must place both the files in the folder.
See my notes about Brushes here
Open the masks in PSP and minimize them with the rest of the material.
1. Set your foreground color to #c5dcfb,
set your background color to #3a4468.

Set your foreground color to a Foreground/Background Gradient, style Linear.

2. Open Alpha Meridith.
Windows>Duplicate, or on the keyboard shift+D, to make a copy.
Close the original.
The copy, that will be the basis of your work, is not empty,
but contains the selections saved on the alpha channel.
3. Flood Fill  the transparent image with your Gradient. the transparent image with your Gradient.
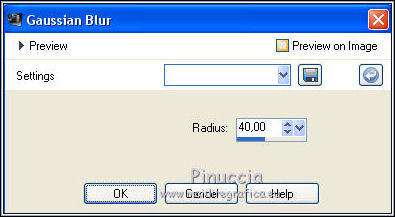
4. Adjust>Blur>Gaussian Blur, radius 40.

5. Layers>Duplicate.
Image>Mirror.
Reduce the opacity of this layer to 50%.
Layers>Merge>Merge Down.
6. Layers>New Raster Layer - Raster 2.
Set your foreground color to #1d283a 
Flood Fill  the layer with your foreground color #1d283a. the layer with your foreground color #1d283a.
7. Layers>New Mask layer>From image
Open the menu under the source window and you'll see all the files open.
Select the mask masque54 noisette.

Layers>Merge>Merge Group.
8. Selections>Load/Save Selection>Load Selection from alpha channel.
The selection sélection#1 is immediately available.
You just have to click Load.

Selections>Promote Selection to layer.
9. Layers>New Raster Layer Raster 2.
Flood Fill  with your foreground color #1d283a. with your foreground color #1d283a.
10. Adjust>Add/Remove Noise>Add Noise.

11. Effects>Texture Effects>Weave
Weave color: white - gap color: background color #3a4468.

Selections>Select None.
12. Effects>Plugins>Graphics Plus - Cross Shadow.

13. Set your foreground color to white #ffffff
and your background color to #1d283a.

14. Layers>New Raster Layer - Raster 3.
Selections>Load/Save Selection>Load Selection from alpha channel.
Open the selections menu and load sélection#2.

15. Reduce the opacity of Flood Fill Tool to 50.
Flood Fill  the selection with color white. the selection with color white.
Set again the opacity of Flood Fill Tool to 100.
16. Selections>Modify>Contract - 20 pixels.
Layers>New Raster Layer - Raster 4.
Flood Fill  with your dark background color. with your dark background color.
17. Selections>Modify>Contract - 2 pixels.
Flood Fill  with color white. with color white.
18. Selections>Modify>Contract - 2 pixels.
Set again your first colors: foreground #c5dcfb, background #3a4468.

Set your foreground color to a Foreground/Background Gradient, style Sunburst.

Flood Fill  the selection with your Gradient. the selection with your Gradient.
Selections>Select None.
19. Layers>Merge>Merge Down.
20. Effects>Plugins>Toadies - What are you.

Effects>Edge Effects>Enhance.
21. K Key to activate the Pick Tool 
and set Position X: 31,00 and Position Y: 14,00.

22. Layers>Duplicate.
Pick Tool 
and set Position X: 241,00 and Position Y: 203,00.

23. Layers>Merge>Merge Down.
24. Activate the layer Promoted Selection.
Set your foreground color to white #ffffff.
Layers>New Raster Layer - Raster 4.
Flood Fill  with color white. with color white.
25. Layers>New Mask layer>From image
Open the menu under the source window select the mask LF mask 51.

Layers>Merge>Merge Group.
26. Change the Blend Mode of this layer to Overlay.
Stay on this layer.
27. Layers>New Raster Layer - Raster 4.
Flood Fill  with color white. with color white.
28. Layers>New Mask layer>From image
Open the menu under the source window and select the mask Narah_mask_1016.

Layers>Merge>Merge Group.
29. Change the Blend Mode of this layer to Overlay.
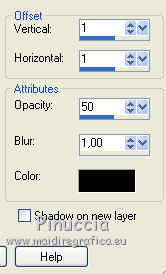
30. Effects>3D Effects>Drop Shadow, color black.

31. Adjust>Sharpness>Sharpen.
32. Activate the top layer.
33. Layers>New Raster Layer - raster 4.
Selections>Load/Save Selection>Load Selection from alpha channel.
Open the Selections Menu and load sélection#3.

34. Open the background image Abstract_XX and go to Edit>Copy.
Go back to your work and go to Edit>Paste into Selection.
35. Effects>Plugins>Alien Skin Eye Candy 5 Impact - Glass.
Select the preset GlassFeline01 and ok.

Selections>Select None.
36. Layers>Duplicate.
Pick Tool 
set Position X: 275,00 and Position Y: 232,00.

37. Layers>Merge>Merge Down - 2 times.
Adjust>Sharpness>Sharpen (according to your image).
38. Layers>New Raster Layer - Raster 4.
Activate the Brush Tool 
Look for and select the brush Cercle 01, size 413.

Apply the brush to the left, by clicking with left mouse button,
to use the white foreground color.
39. Change the Blend Mode of this layer to Overlay.
40. Effects>3D Effects>Drop Shadow, color black.

41. Layers>Arrange>Move Down (under the frames).

Activate the top layer.
42. Open the tube Bouton 1 - Edit>Copy.
Go back to your work and go to Edit>Paste as new layer - Raster 5.
Image>Resize, to 65%, resize all layers not checked.

43. Pick Tool 
and set Position X: 34,00 and Position Y: 61,00.

44. Layers>Duplicate.
Pick Tool 
and set Position X: 34,00 and Position Y: 110,00.

45. Pick Tool 
and set Position X: 34,00 and Position Y: 160,00.

46. Layers>Merge>Merge Down - 2 times.
47. Layers>Duplicate.
Pick Tool 
and set Position X: 245,00 and Position Y: 250,00.

48. Layers>Merge>Merge Down.
49. Effects>3D Effects>Drop Shadow, color black.

50. Image>Add borders, 2 pixels, symmetric, color white.
Image>Add borders, 2 pixels, symmetric, color #3a4468.
51. Edit>Copy.
52. Selections>Select All.
Image>Add borders, 30 pixels, symmetric, color white.
53. Selections>Invert.
Edit>Paste into Selection.
54. Adjust>Blur>Gaussian Blur, radius 25.

55. Effects>Plugins>AAA Frames - Texture Frame.

56. Selections>Invert.
Effects>3D Effects>Drop Shadow, color white.

Selections>Select None.
57. Effects>Plugins>AAA Frames - Foto Frame.

58. Open the woman tube by Isa and go to Edit>Copy.
Go back to your work and go to Edit>Paste as new layer.
For my example, I resized to 105%.
Move  the tube to the right side. the tube to the right side.
59. Effects>3D Effects>Drop Shadow, color back.

60. Open the text Meridith and go to Edit>Copy.
Go back to your work and go to Edit>Paste as new layer.
Move  the text at the bottom left. the text at the bottom left.
61. Effects>3D Effects>Drop Shadow, color black.

62. Change the Blend Mode of this layer to Overlay.
63. Image>Add borders, 1 pixels, symmetric, color white.
Image>Add borders, 1 pixels, symmetric, color #3a4468.
64. Sign your work.
Image>Resize, 900 pixels width, resize all layer checked.
Save as jpg.
The tube of this version is by Beatriz


If you have problems or doubts, or you find a not worked link, or only for tell me that you enjoyed this tutorial, write to me.
3 Avril 2018
|


