|
HALFTONE


Thanks Estela for your invitation to translate your tutorials into english

This tutorial, created with PSP2022, was translated with PspX7, but it can also be made using other versions of PSP.
Since version PSP X4, Image>Mirror was replaced with Image>Flip Horizontal,
and Image>Flip with Image>Flip Vertical, there are some variables.
In versions X5 and X6, the functions have been improved by making available the Objects menu.
In the latest version X7 command Image>Mirror and Image>Flip returned, but with new differences.
See my schedule here
 French Translation here French Translation here
 Your versions here Your versions here
For this tutorial, you will need:

For the tubes thanks Beatriz and Mentali.
The rest of the material is by Estela Fonseca.
(The links of the tubemakers here).
*It is forbidden to remove the watermark from the supplied tubes, distribute or modify them,
in order to respect the work of the authors

consult, if necessary, my filter section here
Filters Unlimited 2.0 here
Graphics Plus - Cross Shadow here
Simple - Centre Tile here
Mura's Meister - Perspective Tiling here
Mura's Seamless - Emboss at Alpha here
Filters Graphics Plus, Simple and Mura's Seamless can be used alone or imported into Filters Unlimited.
(How do, you see here)
If a plugin supplied appears with this icon  it must necessarily be imported into Unlimited it must necessarily be imported into Unlimited

You can change Blend Modes according to your colors.

Open the mask in PSP and minimize it with the rest of the material.
1. Set your foreground color to the color to #435389,
and your background color to the color white #ffffff.

2. Open a new transparent image 1000 x 600 pixels.
Flood Fill  the transparent image with your foreground color #435389. the transparent image with your foreground color #435389.
3. Effects>Plugins>Graphics Plus - Cross Shadow, default settings.

4. Effects>Artistic Effects>Halftone.

5. Effects>Reflection Effects>Rotating Mirror.

6. Layers>Duplicate.
Effects>Texture Effects>Soft Plastic.

Change the Blend Mode of this layer to Soft Light.
7. Effects>Edge Effects>Enhance.
Layers>Merge>Merge Down.
8. Open EF-Halftone_Deco_1 
Edit>Copy.
Go back to your work and go to Edit>Paste as new layer.
9. Layers>New Raster Layer.
Flood Fill  the layer with your background color #ffffff. the layer with your background color #ffffff.
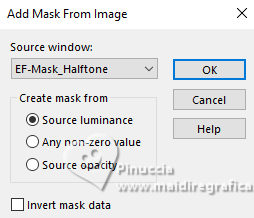
Layers>New Mask layer>From image
Open the menu under the source window and you'll see all the files open.
Select the mask EF-Mask_Halftone .

Layers>Merge>Merge Group.
10. Selection Tool 
(no matter the type of selection, because with the custom selection your always get a rectangle)
clic on the Custom Selection 
and set the following settings.

10. Open mentali-misted2426 
Edit>Copy.
Go back to your work and go to Edit>Paste as new layer.
Image>Resize, to 75%, resize all layers not checked.
Place  the tube on the selection. the tube on the selection.
Selections>Invert.
Press CANC on the keyboard 
11. Selections>Invert.
Layers>Duplicate.
Layers>Merge>Merge Down.
12. Adjust>Hue and Saturation>Vibrancy.

13. Layers>New Raster Layer.
Effects>3D Effects>Cutout, foreground color.

Selections>Select None.
14. Activate the layer Group-Raster 3.

Layers>Merge>Merge Down.
15. Effects>Artistic Effects>Halftone, foreground color.

16. Layers>Merge>Merge visible.
Layers>Duplicate.
17. Efects>Plugins>Filters Unlimited 2.0 - Simple - Centre Tile.

18. Effects>Plugins>Mura's Meister - Perspective Tiling.

19. Effects>Reflection Effects>Rotating Mirror, default settings.

20. Activate your Magic Wand Tool, tolerance 0 and feather 55,
and click in the transparent part to select it.
Press 4-5 times CANC on the keyboard 
Selections>Select None.
don't forget to set again the feather to 0
21. Open the tube 3354-Can Yaman-LB TUBES 
Edit>Copy.
Go back to your work and go to Edit>Paste as new layer.
Image>Resize, to 85%, resize all layers not checked.
22. Adjust>Sharpness>Unsharp Mask.

Move  the tube to the left side. the tube to the left side.
Effects>3D Effects>Drop Shadow, at your choice.
23. Window>Duplicate, or shift+D on the keyboard to make a copy.
On this copy.
Layers>Merge>Merge visible.
Image>Resize, to 15%, resize all layers checked.
Adjust>Sharpness>Sharpen.
24. Image>Add borders, 15 pixels, symmetric, color #ffffff.
Edit>Copy.
25. Go back to your work and go to Edit>Paste as new layer.
K key to activate your Pick Tool 
and set Position X: 743,00 and Position Y: 146,00.

26. Layers>Duplicate.
Image>Flip>Flip Horizontal (This command mirrors the image and leaves it in the same position.)
Keep Position X: 743,00 and set Position Y: 290,00.

M key to deselect the Tool.
Layers>Merge>Merge Down.
27. Layers>Duplicate.
Activate the layer below, Raster 2.
Adjust>Blur>Gaussian Blur - radius 15.

Change the Blend Mode of this layer to Multiply.
28. Image>Add borders, 5 pixels, symmetric, color #ffffff.
Edit>Copy
29. Selections>Select All.
Image>Add borders, 50 pixels, symmetric, color #ffffff.
Selections>Invert.
Edit>Paste into Selection
30. Adjust>Blur>Gaussian Blur - radius 50.

31. Effects>Texture Effects>Soft Plastic, same settings.

33. Adjust>Add/Remove Noise>Add Noise.

Selections>Select None.
34. Open EF-Halftone_Deco_2 
Edit>Copy.
Go back to your work and go to Edit>Paste as new layer.
35. Effects>Plugins>Mura's Seamless - Emboss at Alpha, default settings.

36. K key to activate your Pick Tool 
and set Position X: 12,00 and Position Y: 10,00.

M key to deselect the Tool.
Note: if a star covers the tube's face, erase it
37. Sign your work.
Image>Add borders, 1 pixel, symmetric, color #ffffff.
38. Image>Resize, 1000 pixels width, resize all layers checked.
Save as jpg.
For the tubes of this version thanks Beatriz and Luz Cristina


If you have problems or doubts, or you find a not worked link, or only for tell me that you enjoyed this tutorial, write to me.
12 November 2023

|


