|
JUMP


Thanks Estela for your invitation to translate your tutorials into english

This tutorial was translated with PspX17, but it can also be made using other versions of PSP.
Since version PSP X4, Image>Mirror was replaced with Image>Flip Horizontal,
and Image>Flip with Image>Flip Vertical, there are some variables.
In versions X5 and X6, the functions have been improved by making available the Objects menu.
In the latest version X7 command Image>Mirror and Image>Flip returned, but with new differences.
See my schedule here
 French Translation here French Translation here
 Your versions here Your versions here
For this tutorial, you will need:

For the tubes thanks Guismo and Anna.br.
The text of the poem is by The Who
The rest of the material is by Estela Fonseca.
(The links of the tubemakers here).
*It is forbidden to remove the watermark from the supplied tubes, distribute or modify them,
in order to respect the work of the authors

consult, if necessary, my filter section here
Filters Unlimited 2.0 here
VM Toolbox - Reductor here
Filters VM Toolbox can be used alone or imported into Filters Unlimited.
(How do, you see here)
If a plugin supplied appears with this icon  it must necessarily be imported into Unlimited it must necessarily be imported into Unlimited

You can change Blend Modes according to your colors.
In the newest versions of PSP, you don't find the foreground/background gradient (Corel_06_029).
You can use the gradients of the older versions.
The Gradient of CorelX here

1. Open a new transparent image 850 x 500 pixels.
Choose two colors from your landscape; for the example:
Set your foreground color to #237ee2,
and your background color to #cab098.

Set your foreground color to a Foreground/Background Gradient, style Linear.
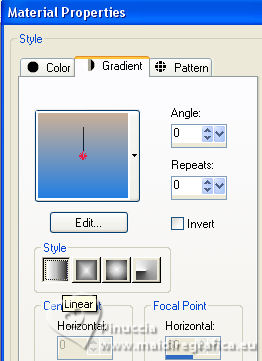
Flood Fill  the transparent image with your Gradient. the transparent image with your Gradient.
3. Open the tube anna.br_azul_15-08-10 
Edit>Copy.
Go back to your work and go to Edit>Paste as new layer.
4. Effects>3D Effects>Seamless Tiling.

Change the Blend Mode of this layer to Hard Light and reduce the opacity to 40.
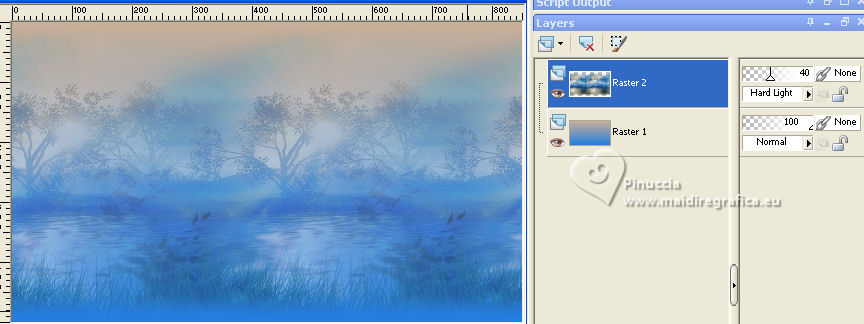
5. Layers>New Raster Layer.
Selections>Select All.
Open the tube Grade 
Edit>Copy.
Go back to your work and go to Edit>Paste into Selection.
Selections>Select None.
Adjust>Sharpness>Sharpen.
6. Image>Add borders, 4 pixels, symmetric, color white.
Selections>Select All.
Image>Add borders, 40 pixels, symmetric, whatever color.
Selections>Invert.
Flood Fill  the selection with your Gradient. the selection with your Gradient.
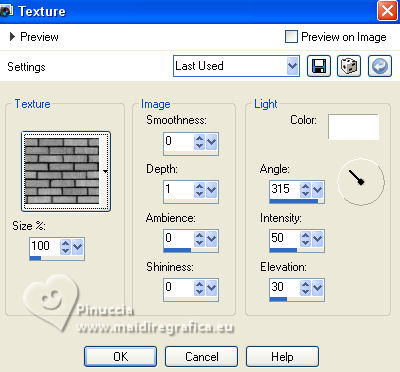
7. Effects>Texture Effects>Texture - select the texture Bricks, or Corel 15_033
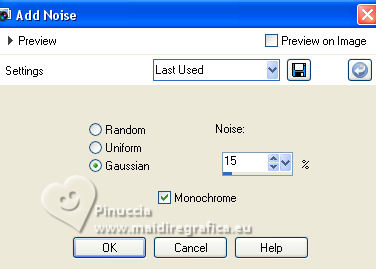
8. Adjust>Add/Remove Noise>Add Noise.
9. Selections>Invert.
Effects>3D Effects>Chisel, foreground color.
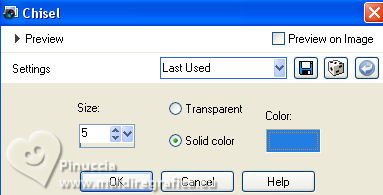
Selections>Select None.
10. Layers>Duplicate.
Effects>Plugins>VM Toolbox - Reductor, default settings.

Change the Blend Mode of this layer to Soft Light and reduce the opacity to 50.
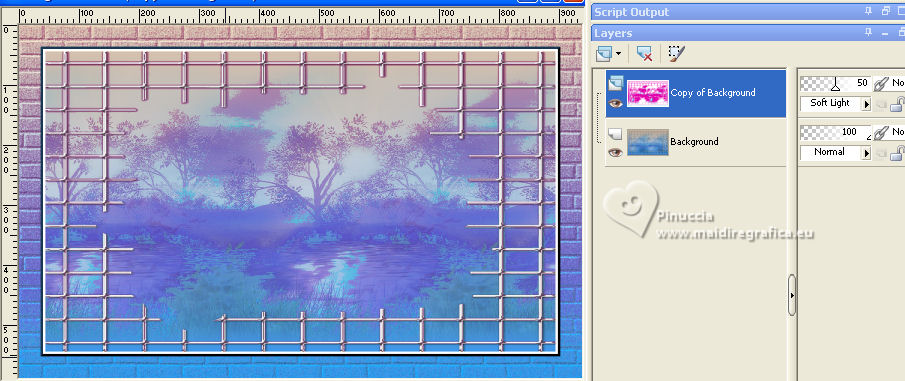
11. Image>Add borders, 30 pixels, symmetric, color white.
12. Open the tube calguispeintre169 
Edit>Copy.
Go back to your work and go to Edit>Paste as new layer.
Image>Resize, to 85%, resize all layers not checked.
Move  the tube to the left side. the tube to the left side.
13. Effects>3D Effects>Drop Shadow, color #000000.
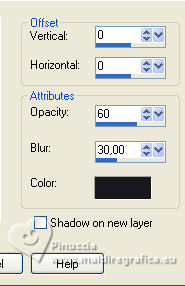
14. Image>Add borders, 1 pixel, symmetric, foreground color.
Image>Add borders, 10 pixels, symmetric, color #ffffff.
Image>Add borders, 1 pixel, symmetric, foreground color.
15. Open the text Texto_jump 
Edit>Copy.
Go back to your work and go to Edit>Paste as new layer.
Move  the text at the upper right, or to your liking. the text at the upper right, or to your liking.
16. Sign your work on a new layer.
Layers>Merge>Merge All and save as jpg.
For the tubes of these versions thanks DBK Katrina and Lana


If you have problems or doubts, or you find a not worked link, or only for tell me that you enjoyed this tutorial, write to me.
5 August 2023

|


