|
MARAVILLAS


Thanks Emilieta for your invite to translate your tutorials into english.
Here you can find the original tutorial.

This tutorial has been translated with PSPX2, but it can also be made using other versions of PSP.
Since version PSP X4, Image>Mirror was replaced with Image>Flip Horizontal,
and Image>Flip with Image>Flip Vertical, there are some variables.
In versions X5 and X6, the functions have been improved by making available the Objects menu.
In the latest version X7 command Image>Mirror and Image>Flip returned, but with new differences.
See my schedule here
french translation here
your versions here
Material here
The tube of the woman is by Animabelle.
The rest of the material is by Emilieta
(in the material there is a mask created by the tube, if you work with other colors)
(The links of the tubemakers here).
Plugins
consult, if necessary, my filter section here
Filters Unlimited here
Carolaine and Sensibility - LDots here
VM Toolbox - Radial Mosaic here
AAA Frames - Foto Frame here
Filters VM Toolbox can be used alone or imported into Filters Unlimited.
(How do, you see here)
If a plugin supplied appears with this icon  it must necessarily be imported into Unlimited it must necessarily be imported into Unlimited

You can change Blend Modes according to your colors.
Copy the Gradient in the Gradients Folder.
1. Set your foreground color #d5a83a,
and your background color to #904c4b.

Set your foreground color to Gradient and select the gradient ivi_fantasy, style Linear.

Open a new transparent image 900 x 600 pixels.
Flood Fill  the transparent image with your Gradient. the transparent image with your Gradient.
2. Effects>Plugins>VM Toolbox - Radial Mosaic.

3. Effects>Plugins>Carolaine and Sensibility - CS-LDots

Effects>Edge Effects>Enhance More.
Adjust>Sharpness>Sharpen.
Reduce the opacity of this layer to 45%.
4. Effects>Image Effets>Seamless Tiling, default settings.

Adjust>Sharpness>Sharpen.
5. Layers>New Raster Layer.
Flood Fill  with your background color #904c4b. with your background color #904c4b.
Layers>Arrange>Send to Bottom.

6. Layers>Merge>Merge visible.
7. Open the tube Lia-Maravillas and go to Edit>Copy.
Go back to your work and go to Edit>Paste as new layer.
8. Open the tube Adorno-bolitas and go to Edit>Copy.
Go back to your work and go to Edit>Paste as new layer.
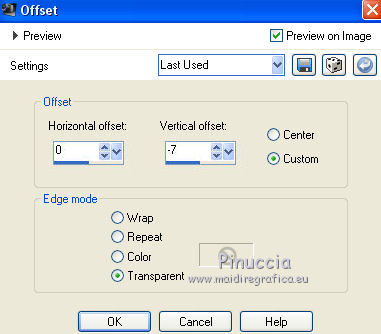
Effects>Image Effects>Offset.

9. Open the landscape tube and go to Edit>Copy.
Go back to your work and go to Edit>Paste as new layer.
Image>Resize, to 90%, resize all layers not checked.
Adjust>Sharpness>Sharpen.
Layers>Duplicate.
Layers>Merge>Merge down.
10. Open the woman tube and go to Edit>Copy.
Go back to your work and go to Edit>Paste as new layer.
Image>Resize, to 60%, resize all layers not checked.
Adjust>Sharpness>Sharpen.
Image>Mirror.
Move  the tube at the bottom left. the tube at the bottom left.
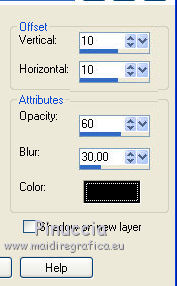
11. Effects>3D Effects>Drop Shadow.

12. Image>Add borders, 2 pixels, symmetric, foreground color #d5a83a.
Image>Add border, 10 pixels, symmetric, background color #904c4b.
Activate the Magic Wand Tool 
and click on the last border to select it.
13. Change the Gradient settings.

Flood Fill  the selection with your Gradient. the selection with your Gradient.
Effects>Edge Effects>Enhance More - 2 times.
Selections>Select None.
14. Image>Add borders, 2 pixels, symmetric, foreground color #d5a83a.
Image>Add border, 50 pixels, symmetric, background color #904c4b.
Select the last border with your Magic Wand Tool  . .
Effects>Plugins>Carolaine and Sensibility - CS-LDots, same settings.
Effects>Edge Effects>Enhance More.
Selections>Select None.
15. Effects>Plugins>AAA Frames - Foto Frame.

16. Sign your work on a new layer.
Layers>Merge>Merge All and save as jpg.

If you have problems or doubts, or you find a not worked link, or only for tell me that you enjoyed this tutorial, write to me.
13 Juillet 2018
|


