|
LAS ROSAS


Thanks Emilieta for your invite to translate your tutorials into english.

This tutorial has been translated with PSPX7, but it can also be made using other versions of PSP.
Since version PSP X4, Image>Mirror was replaced with Image>Flip Horizontal,
and Image>Flip with Image>Flip Vertical, there are some variables.
In versions X5 and X6, the functions have been improved by making available the Objects menu.
In the latest version X7 command Image>Mirror and Image>Flip returned, but with new differences.
See my schedule here
french translation here
your versions here
Material here
For the woman and the roses thanks Nicole.
The rest of the material is by Emilieta.
(The links of the tubemakers here).
Plugins
consult, if necessary, my filter section here
FM Tile Tools - Saturation Emboss, here
Simple - Blintz here
AAA Frames - Foto Frame here
Filters Unlimited 2.0 here
Filters Simple can be used alone or imported into Filters Unlimited.
(How do, you see here)
If a plugin supplied appears with this icon  it must necessarily be imported into Unlimited it must necessarily be imported into Unlimited

You can change Blend Modes according to your colors.
In the newest versions of PSP, you don't find the foreground/background gradient (Corel_06_029).
You can use the gradients of the older versions.
The Gradient of CorelX here
Open the mask in PSP and minimize it with the rest of the material.
1. Open a new transparent image 1000 x 700 pixels.
2. Open tube-cuadrados and go to Edit>Copy.
Go back to your work and go to Edit>Paste as new layer.
2. Effects>Distortion Effects>Wave.
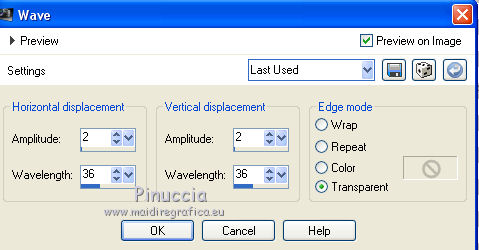
3. Effects>Reflection Effects>Rotating Mirror.

4. Effects>Geometric Effects>Circle.

5. Effects>Image Effects>Offset.
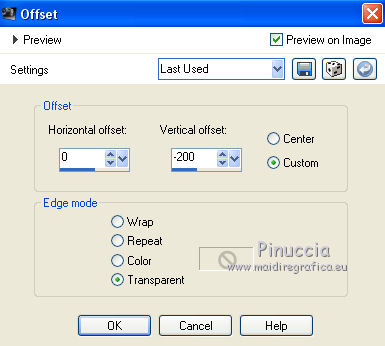
6. Layers>Duplicate.
Image>Flip.

7. Layers>Merge>Merge visible.
8. With your Eraser Tool  , in the vertical line, , in the vertical line,
touch the points so they are right

My settings

9. Edit>Cut.
Edit>Paste as new layer, so that the image is centered.
Delete the layer left empty.

10. Activate your Selection Tool  , rectangle, , rectangle,
and draw a rectangle as below

11. Set your foreground color to #800000,
and your background color to #c0c0c0.

Set your foreground color to a Foreground/Background Gradient, style Linear.
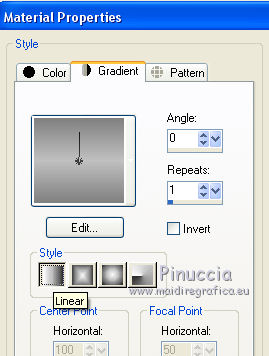
12. Layers>New Raster Layer.
Flood Fill  the layer with your Gradient. the layer with your Gradient.
Selections>Modify>Contract - 3 pixels.
Press CANC on the keyboard 
Keep selected.
13. Set your foreground color to #720609,
and your background color to #d7ab4e.

Set your foreground color to a Foreground/Background Gradient, style Sunburst.

14. Layers>New Raster Layer.
Flood Fill  the selection with your Gradient. the selection with your Gradient.
15. Effects>Texture Effects>Weave

Reduce the opacity of this layer to 30%.
Effects>Edge Effects>Enhance.
Selections>Select None.
Layers>Merge>Merge Down.
Layers>Arrange>Send to Bottom.
Layers>Merge>Merge visible.
Effects>3D Effects>Drop Shadow.
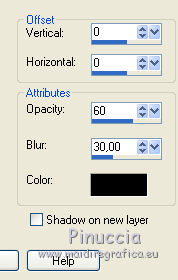
15. Layers>New Raster Layer.
Flood Fill  the layer with the last gradient the layer with the last gradient

16. Layers>New Mask layer>From image
Open the menu under the source window and you'll see all the files open.
Select the mask mascara
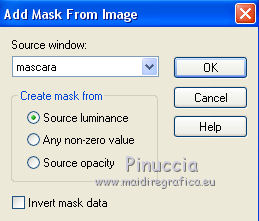
Layers>Merge>Merge group.
Effects>Edge Effects>Enhance More.
Reduce the opacity of this layer to 60%.
17. Effects>Plugins>FM Tile Tools - Saturation Emboss, default settings.

18. Layers>Duplicate.
Layers>Merge>Merge down.
19. Effects>Reflection Effects>Rotating Mirror, same settings.

Layers>Arrange>Send to Bottom.
20. Activate your top layer.
Open the woman tube and go to Edit>Copy.
Go back to your work and go to Edit>Paste as new layer.
Place  rightly the tube on the curve. rightly the tube on the curve.

21. Effects>3D Effects>Drop Shadow.

22. Open the tube of the 5 roses and go to Edit>Copy.
Go back to your work and go to Edit>Paste as new layer.
Image>Resize, to 60%, resize all layers not checked.
Move  the tube to the right side, the tube to the right side,
and erase  the stems on the frame. the stems on the frame.

Effects>3D Effects>Drop Shadow, same settings.
23. Open the tube of the 2 roses and go to Edit>Copy.
Go back to your work and go to Edit>Paste as new layer.
Place  the tube over the frame, the tube over the frame,
and erase  the stems. the stems.
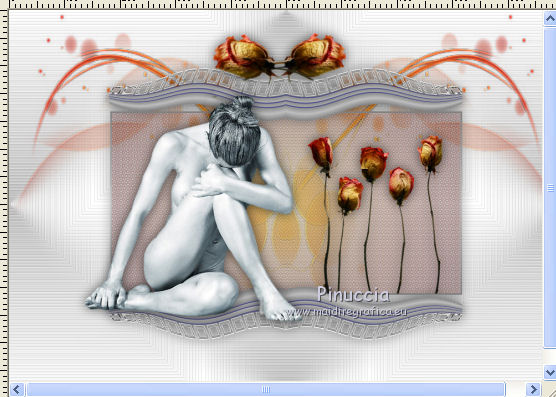
Effects>3D Effects>Drop Shadow, same settings.
24. Layers>Merge>Merge visible.
24. Set your foreground color to #c0c0c0,
and your background color to #ffffff.

Set your Foreground color to a Foreground/Background Gradient, style Linear.

25. Layers>New Raster Layer.
Flood Fill  the layer with your gradient. the layer with your gradient.
Layers>Arrange>Send to Bottom.
Effects>Edge Effects>Enhance More - 2 times.
25. Effects>Plugins>Simple - Blintz.
26. Effects>Image Effects>Seamless Tiling, default settings.

27. Image>Add borders, 3 pixels, symmetric, color #808080.
Image>Add borders, 3 pixels, symmetric, color #c0c0c0.
28. Image>Resize, to 85%, resize all layers checked.
29. Image>Add borders, 50 pixels, symmetric, color white #ffffff.
Activate your Magic Wand Tool 
and click on the white border to select it.
30. Set again your foreground color to the Gradient used for the mask:
Foreground color #720609,
Background color #d7ab4e.


31. Layers>New Raster Layer.
Flood Fill  the selection with your gradient. the selection with your gradient.
Effects>Texture Effects>Weave, same settings.

Reduce the opacity of this layer to 30%.
Effects>Edge Effects>Enhance.
32. Effects>Plugins>FM Tile Tools - Saturation Emboss, default settings.

Selections>Select None.
33. Effects>Plugins>AAA Frames - Foto Frame - 2 times with these settings.

34. Sign your work on a new layer.
Layers>Merge>Merge All and save as jpg.

If you have problems or doubts, or you find a not worked link, or only for tell me that you enjoyed this tutorial, write to me.
10 August 2019
|