|
À L'APPROCHE
 ENGLISH VERSION ENGLISH VERSION
Thanks Alyciane for your invitation to translate your tutorial.
This tutorial was created with PSP2019 and translated with PSPX3 but it can also be made using other versions of PSP.
Since version PSP X4, Image>Mirror was replaced with Image>Flip Horizontal,
and Image>Flip with Image>Flip Vertical, there are some variables.
In versions X5 and X6, the functions have been improved by making available the Objects menu.
In the latest version X7 command Image>Mirror and Image>Flip returned, but with new differences.
See my schedule here
Italian translation here
Tube of yours.
The rest of the material here

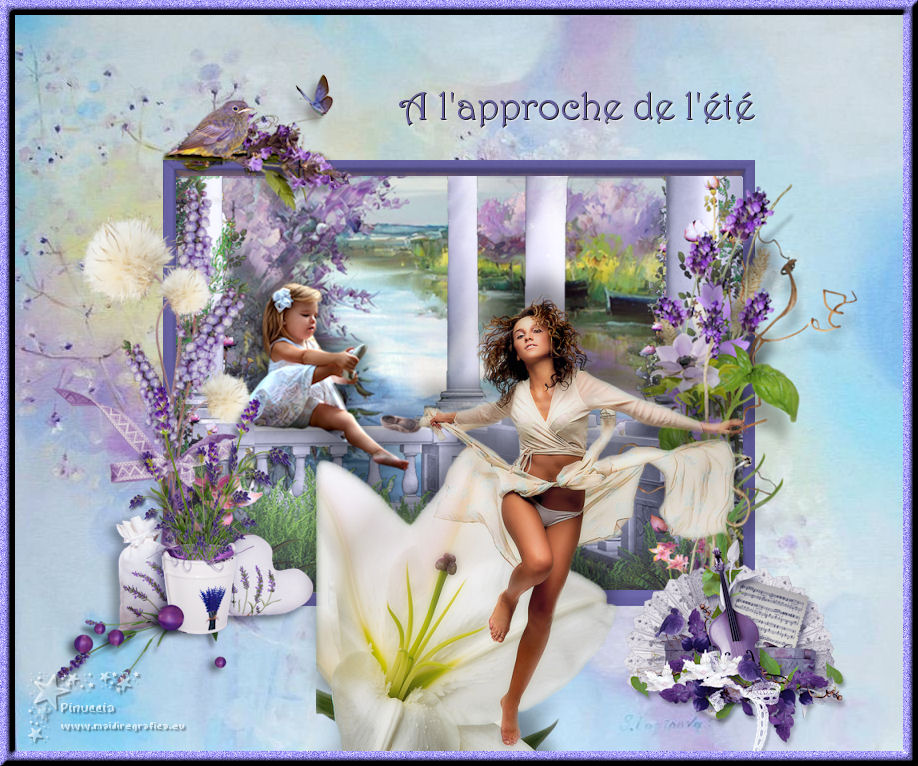
1. Open the tube cadre; colorize according to your main tube's colors.
I use the Color Changer tool 
Foreground color #6f69af.
2. Activate your Magic Wand Tool 
and click on the border to select it.
Selections>Modify>Expand - 3 pixels.
Open the landscape tube and go to Edit>Copy.
Go back to your work and go to Edit>Paste as new layer.
Selections>Invert.
Press CANC on the keyboard 
Again Selections>Invert and kee selected.
3. Layers>New Raster Layer.
Open the tube Patio and go to Edit>Copy.
Go back to your work and go to Edit>Paste into Selection.
Selections>Select None.
4. Open the little girl tube and go to Edit>Copy.
Go back to your work and go to Edit>Paste as new layer.
Place  the tube where you want, or see my example. the tube where you want, or see my example.

5. Layers>Merge>Merge All.
Edit>Copy (and save this work, if you want to keep it).
6. Open the tube "fond", that will be the basis of your work.
Edit>Paste as new layer and the image shoud be perfectly in the middle.

7. Copy/Paste as new layer the deco tubes supplied (of your tubes)
and place them at your choice.
8. Copy/Paste as new layer the text and move it up.
9. Open your tube and go to Edit>Copy.
Go back to your work and go to Edit>Paste as new layer.
Place the tube at your choice.
10. Layers>Merge>Merge All.
11. Image>Add borders, 15 pixels, symmetriche, with the color of your frame.
Select this border with your Magic Wand Tool
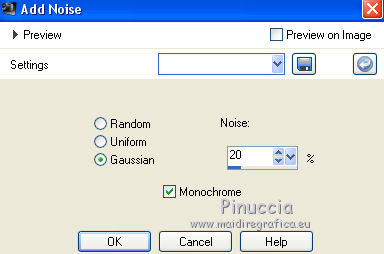
12. Adjust>Add/Remove Noise>Add Noise.
13. Effects>3D Effects>Inner Bevel.

13. Image>Resize, 900 pixels width, resize all layers not checked.
Sign your work and save as jpg.

If you have problems or doubts, or you find a not worked link, or only for tell me that you enjoyed this tutorial, write to me.
18 June 2019
|